Everything you need to set up and use LK Platform v2.0, step by step with screenshots. Numbered red markers on the screenshots match the numbered notes below them.
Signing in
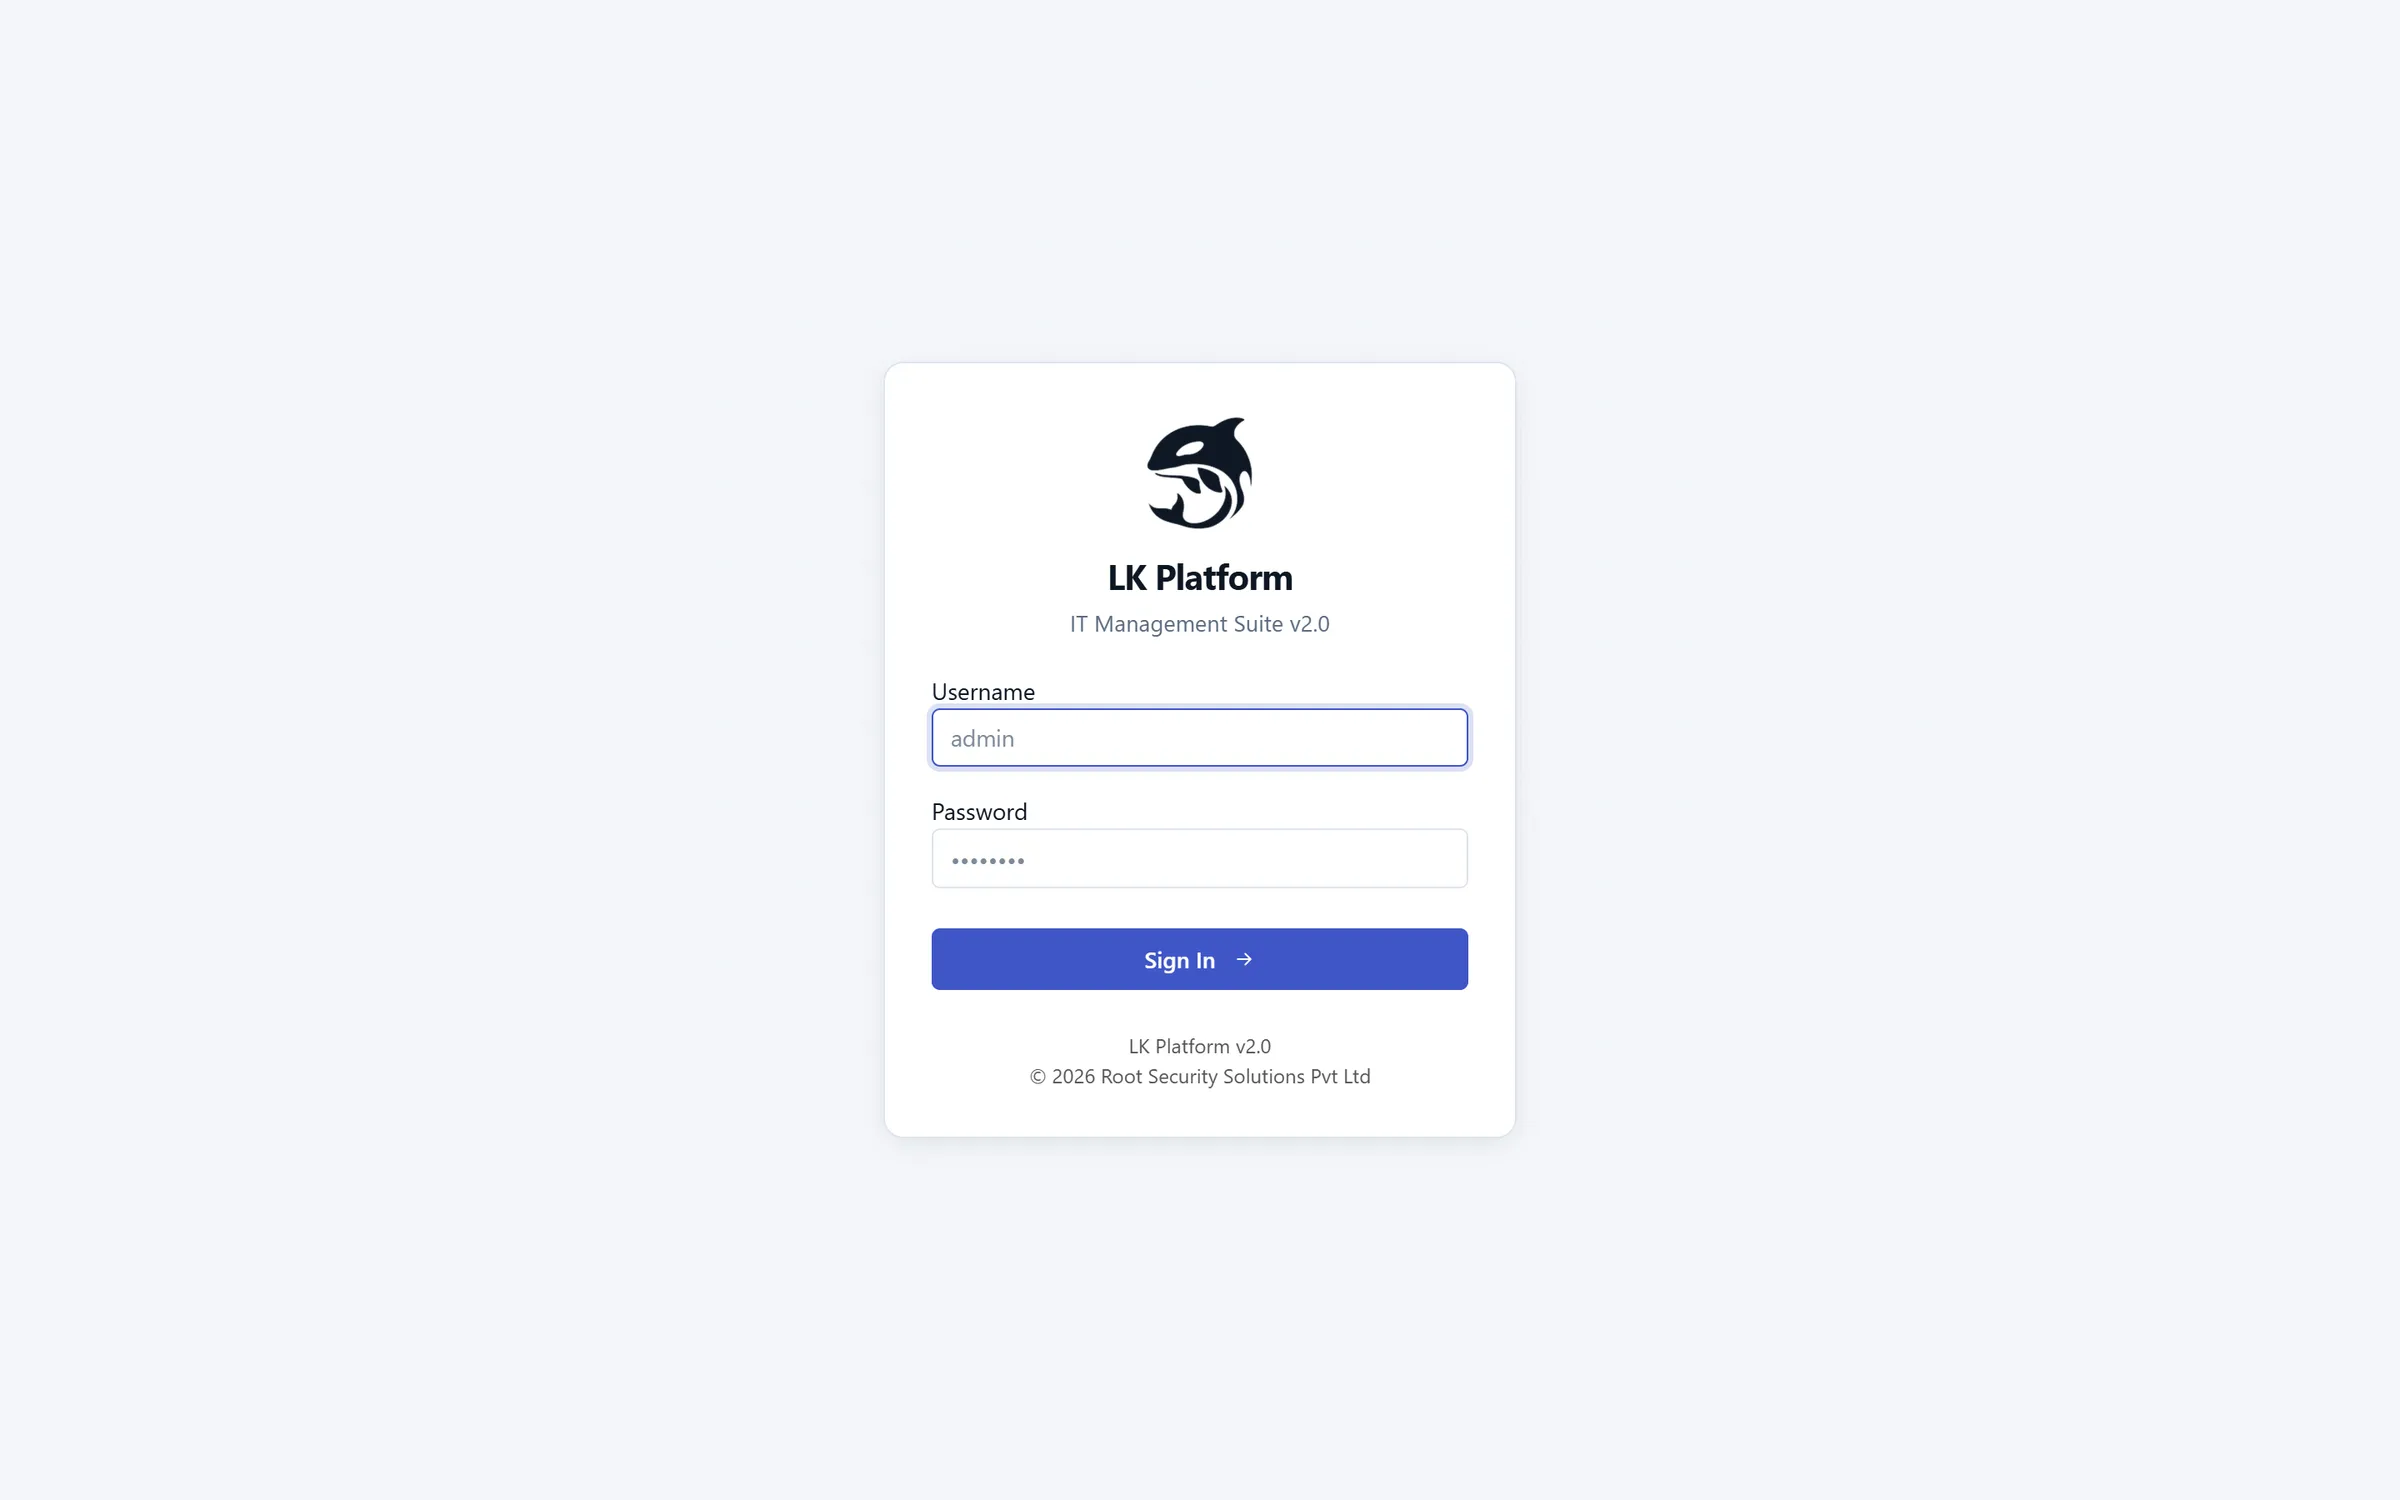
LK Platform runs in your web browser. Open the address your administrator gave you (for example https://lk.yourcompany.com).
Enter your Username and Password.
Click Sign In →.
If two-factor authentication is on for your account, enter the 6-digit code from your authenticator app.
Login
Tip: Forgot your password? Ask an administrator to reset it from Users. After signing in, change it under Profile → Change Password.
The dashboard
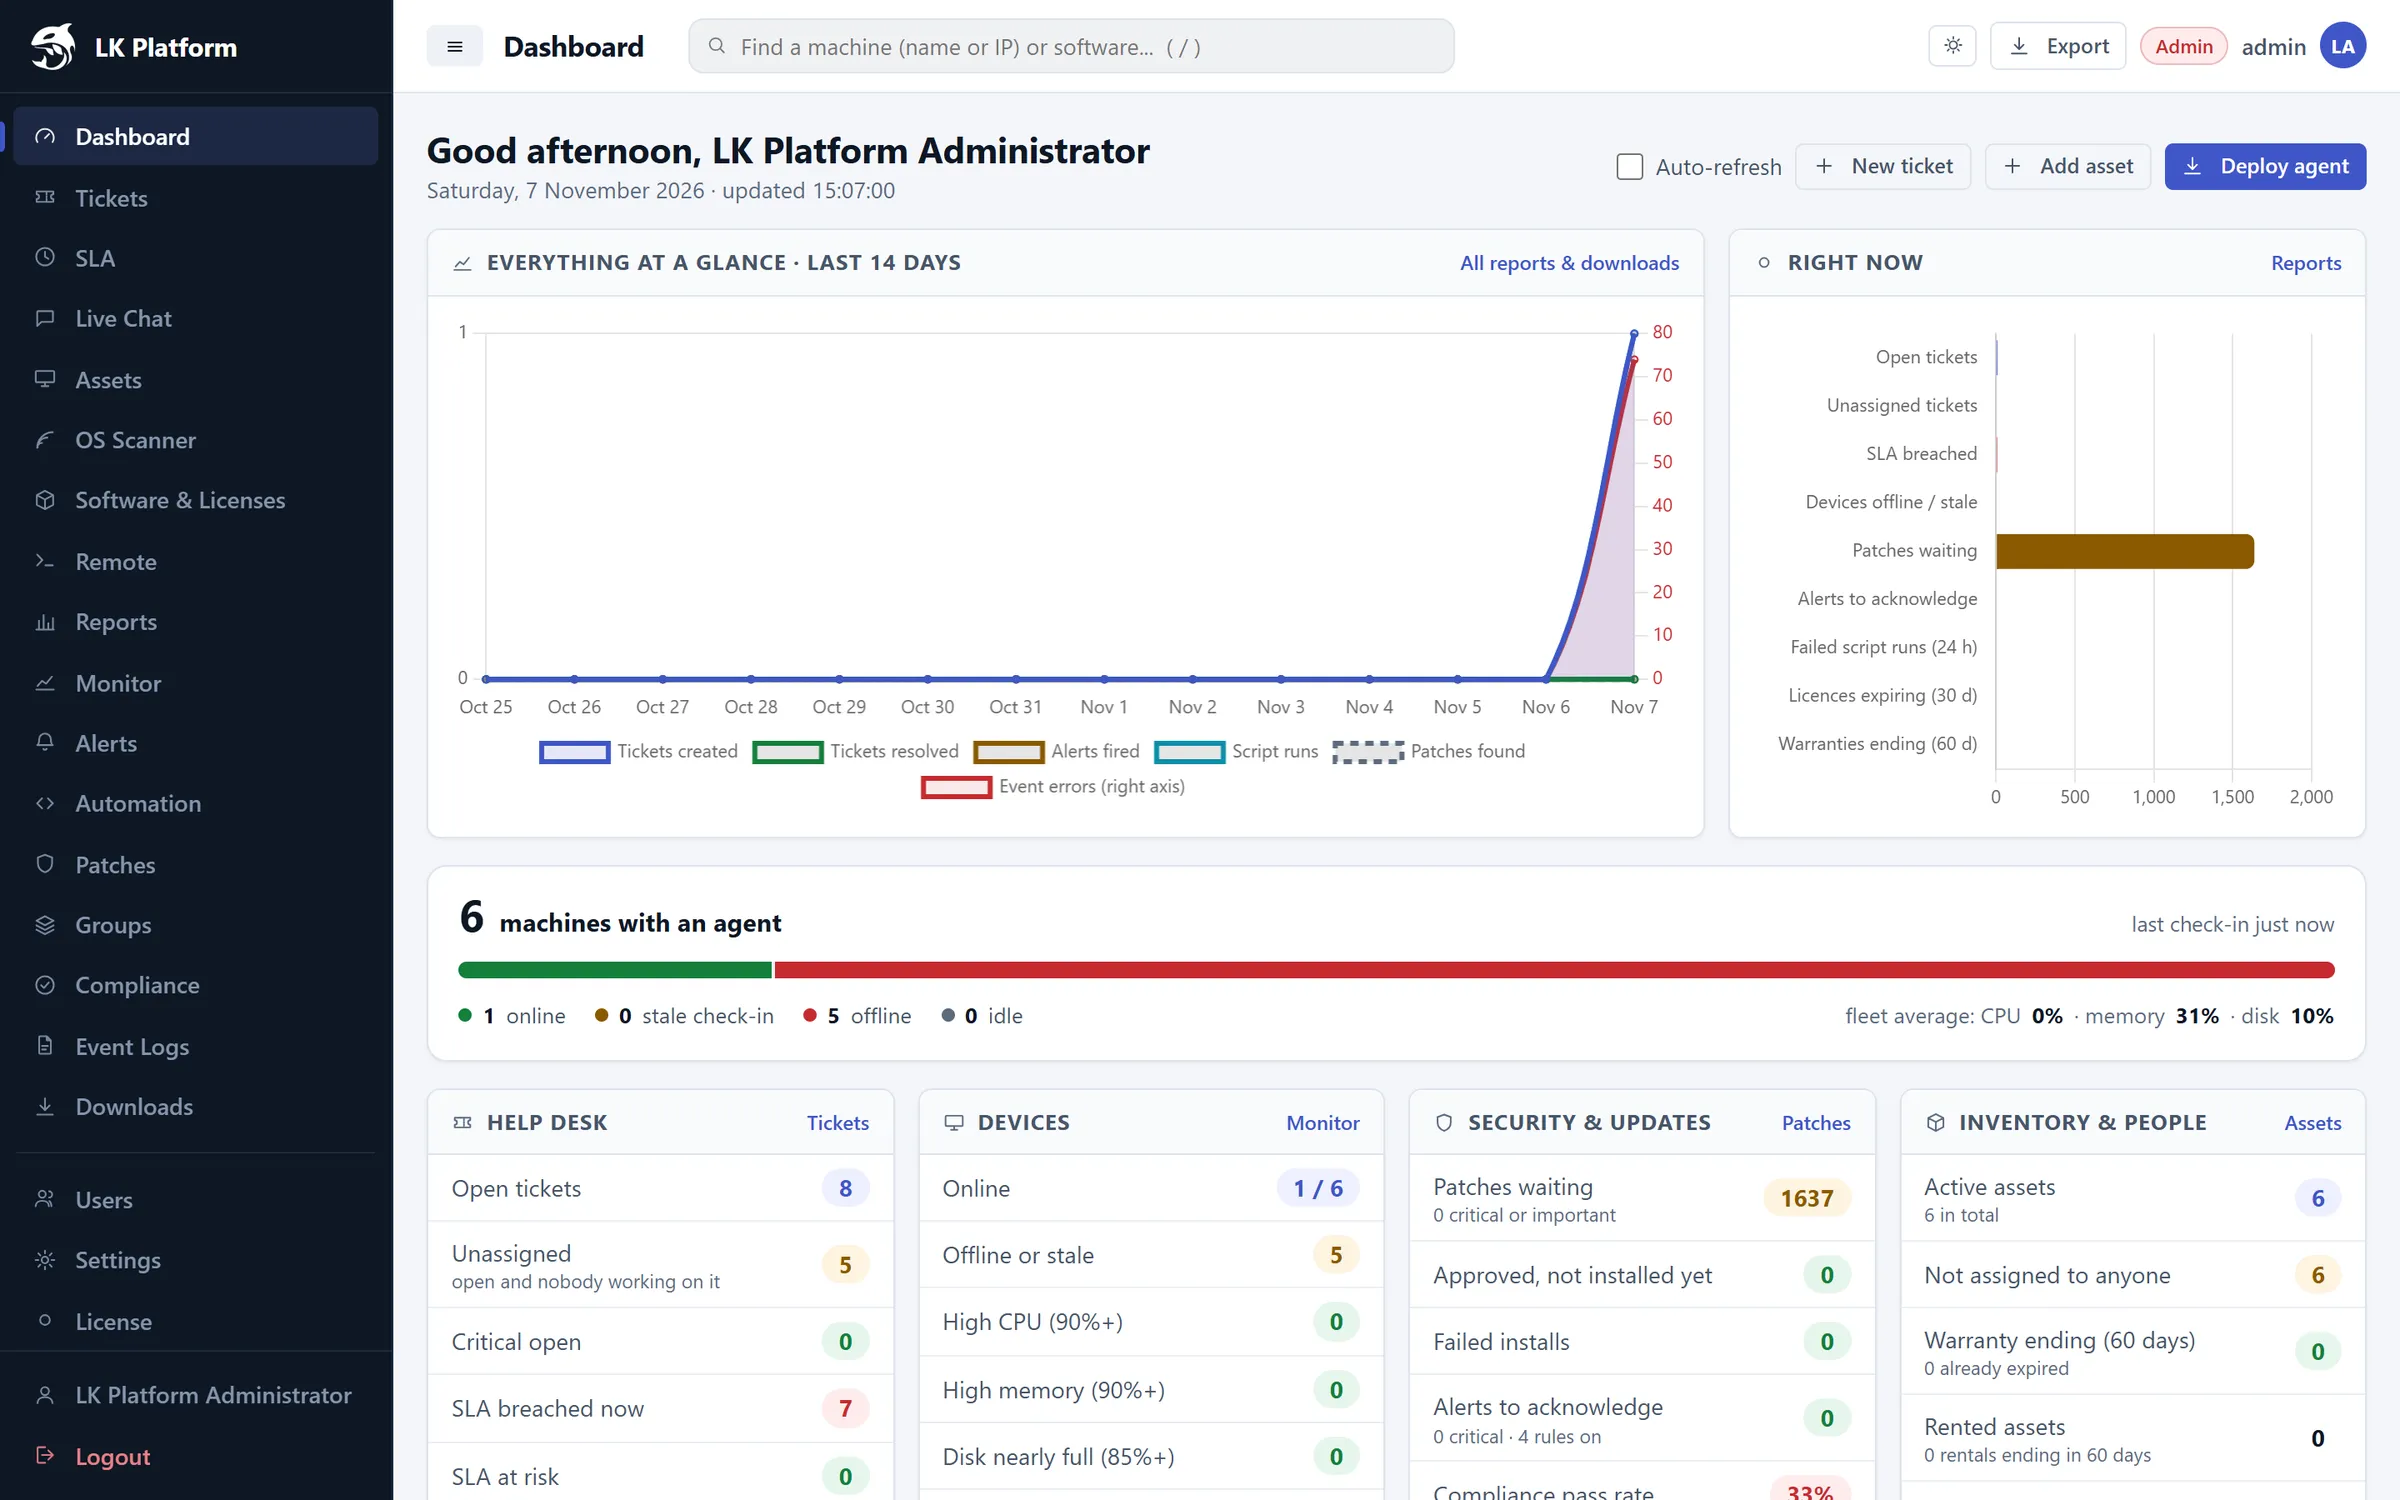
After signing in you land on the dashboard, a live overview of your whole IT environment.
Dashboard
12345678
1
Sidebar: every module. A red badge (e.g. on Event Logs) means new items.
2
Global search: find any machine by name or IP, or any software. Press / to jump here.
3
Theme toggle: switch between light and dark mode.
4
Quick actions: Auto-refresh, New ticket, Add asset, Deploy agent.
5
Everything at a glance: 14-day trend of tickets, alerts, script runs, patches and event errors.
6
Right now: what needs action today, as a bar chart.
7
Fleet bar: online / stale / offline / idle agents, plus average CPU, memory and disk.
8
Summary cards: Help Desk, Devices, Security & Updates, Inventory & People. Click any number to open the filtered list.
Further down, the dashboard shows charts (tickets by priority and status, asset status, operating systems, patch status) and two action lists: Devices needing attention and Tickets needing attention.
Deploying agents
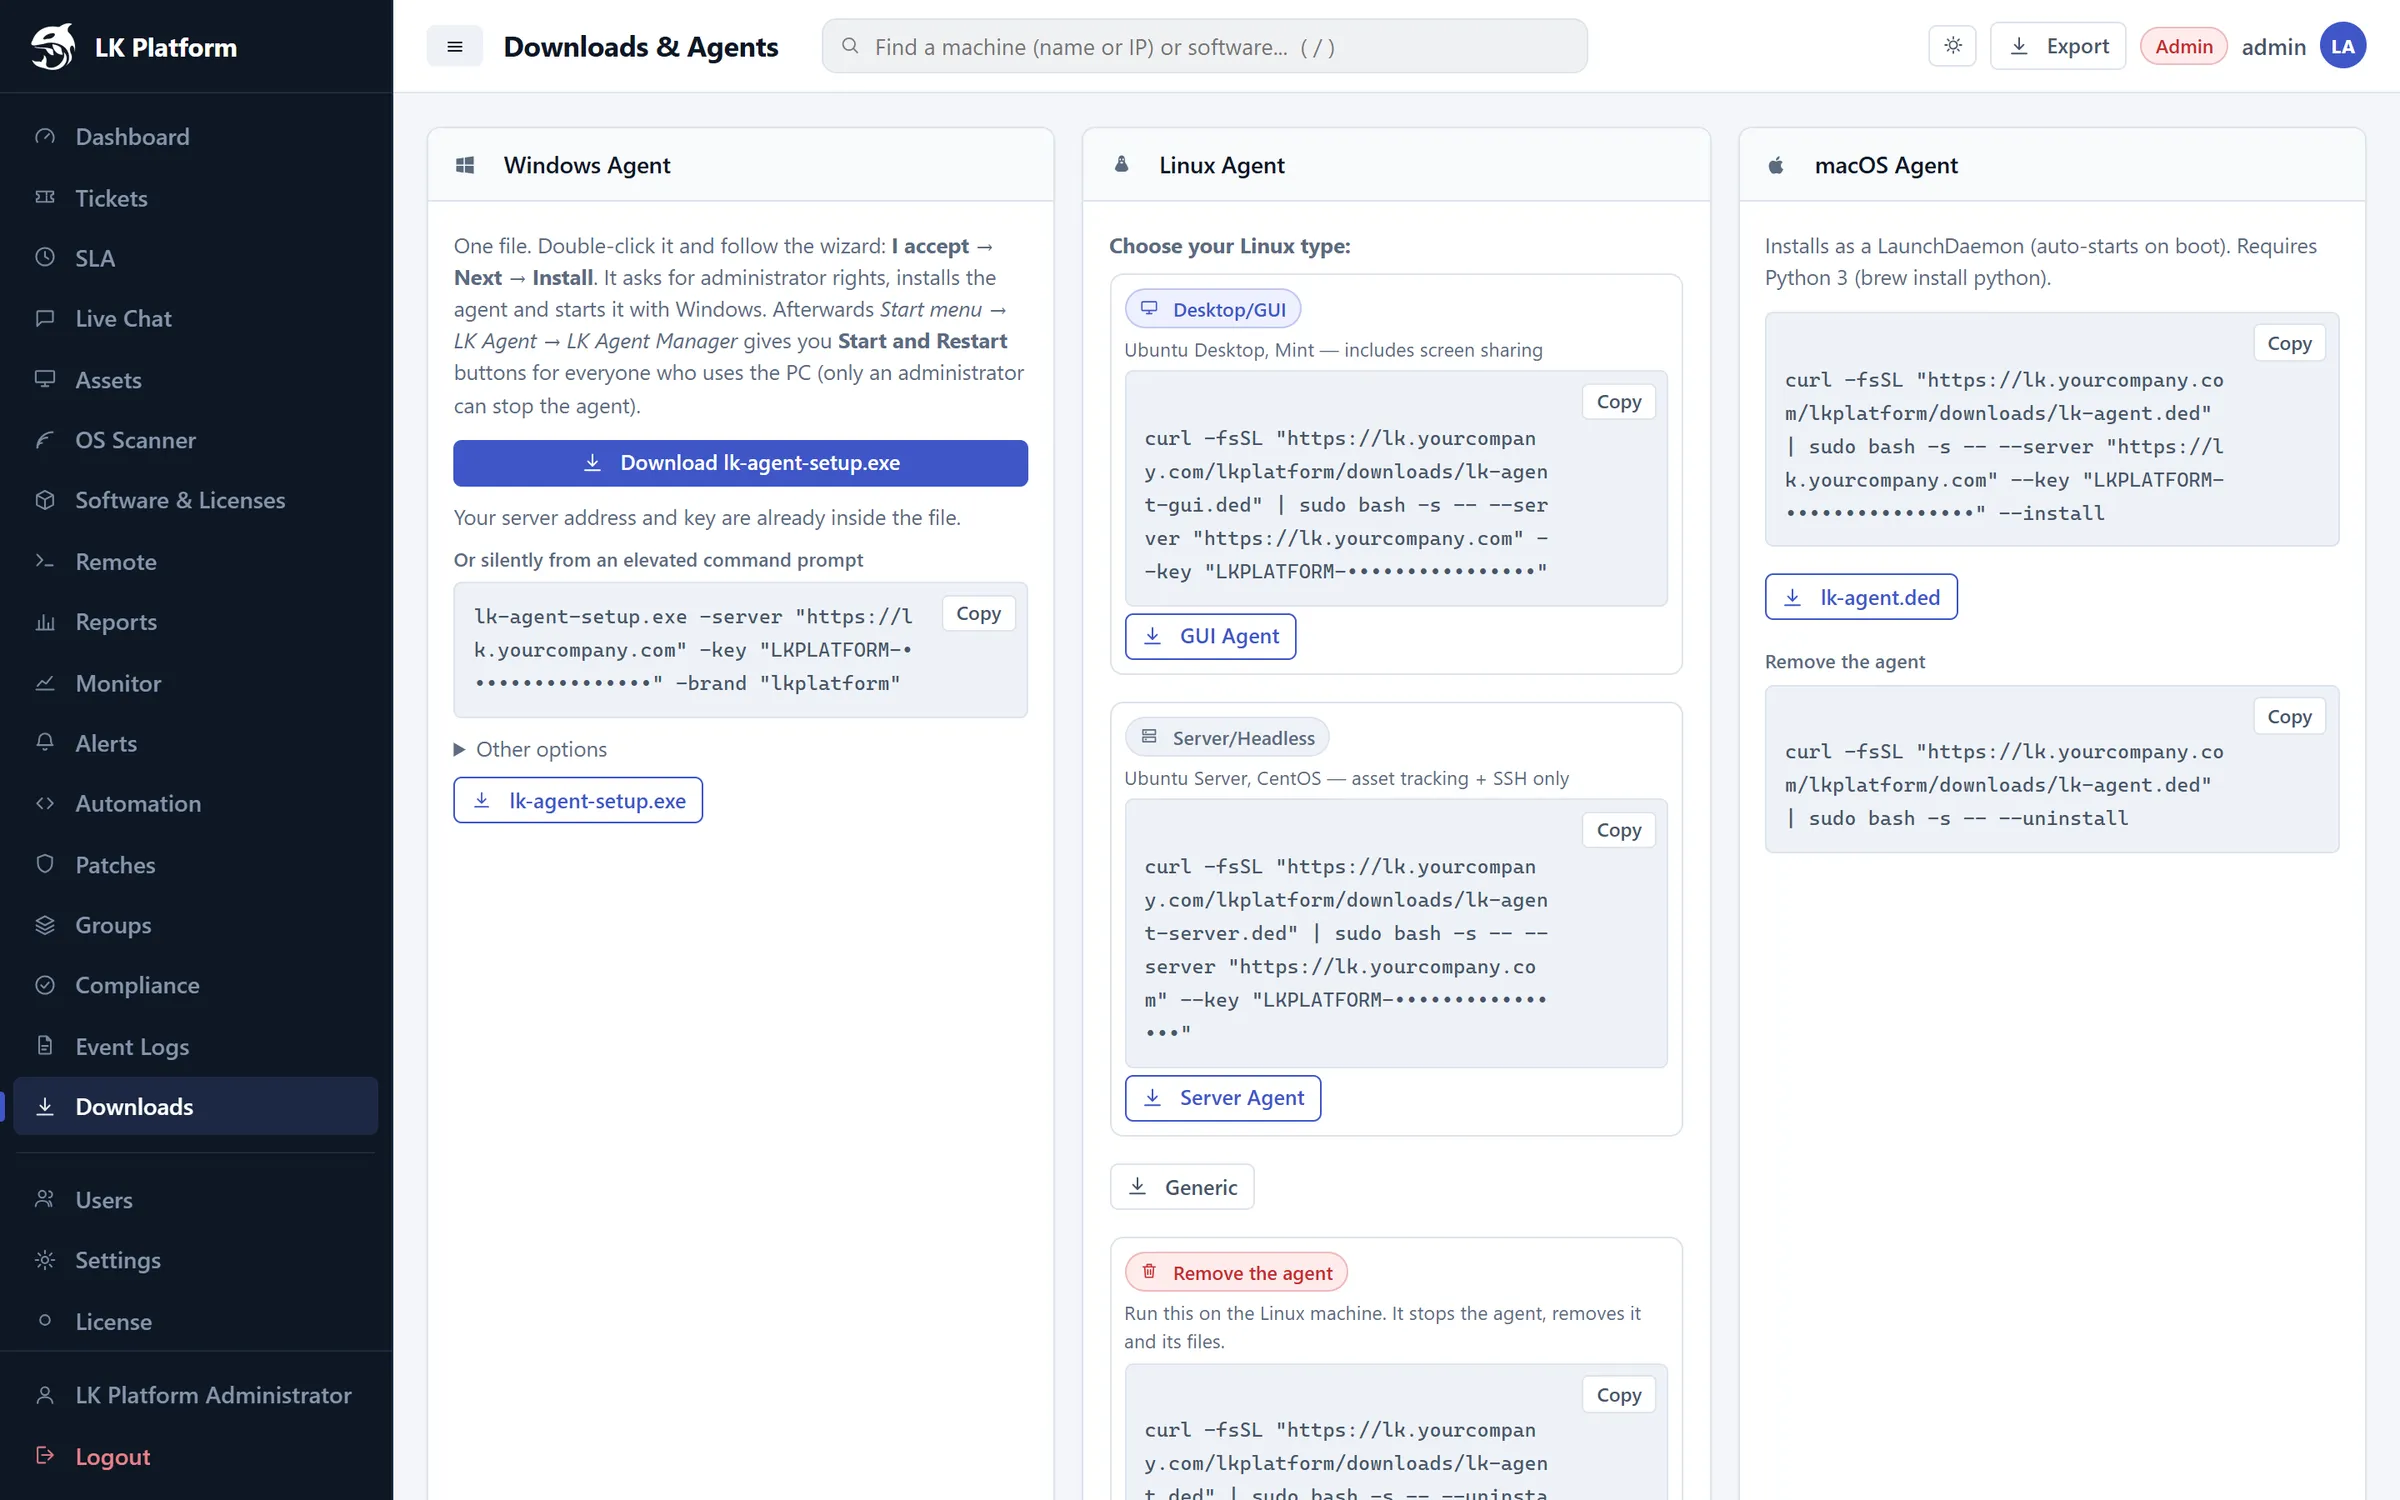
The LK Agent is a small service that runs on each computer. It reports hardware, software, health, patches and event logs, and enables remote access and scripts. Open Downloads in the sidebar (or click Deploy agent on the dashboard).
Downloads & Agents
12345
1
Windows installer: one .exe with your server address and key already built in.
2
Silent install: command for scripted / mass deployment.
3
Linux Desktop (Ubuntu Desktop, Mint): includes screen sharing.
4
Linux Server / headless (Ubuntu Server, CentOS): asset tracking + SSH.
5
macOS: installs as a LaunchDaemon that starts on boot.
Windows
Click Download lk-agent-setup.exe and copy it to the target PC.
Double-click it and follow the wizard: I accept → Next → Install. Approve the administrator prompt.
The agent starts automatically with Windows. Within seconds the PC appears under Assets, Monitor and Remote.
To deploy silently (e.g. via GPO or another RMM), run from an elevated command prompt:
Good to know: After installation, Start menu → LK Agent → LK Agent Manager gives users Start / Restart buttons. Only an administrator can stop the agent.
Linux
Copy the command for your Linux type from the Downloads page and run it on the machine:
Then delete the machine under Assets or Remote, or it will reappear if the agent is still running.
Keep your key private. The agent key lets machines enrol into your platform. If it leaks, rotate it under Settings → API & Agent Deploy → Rotate API Key.
Users & roles
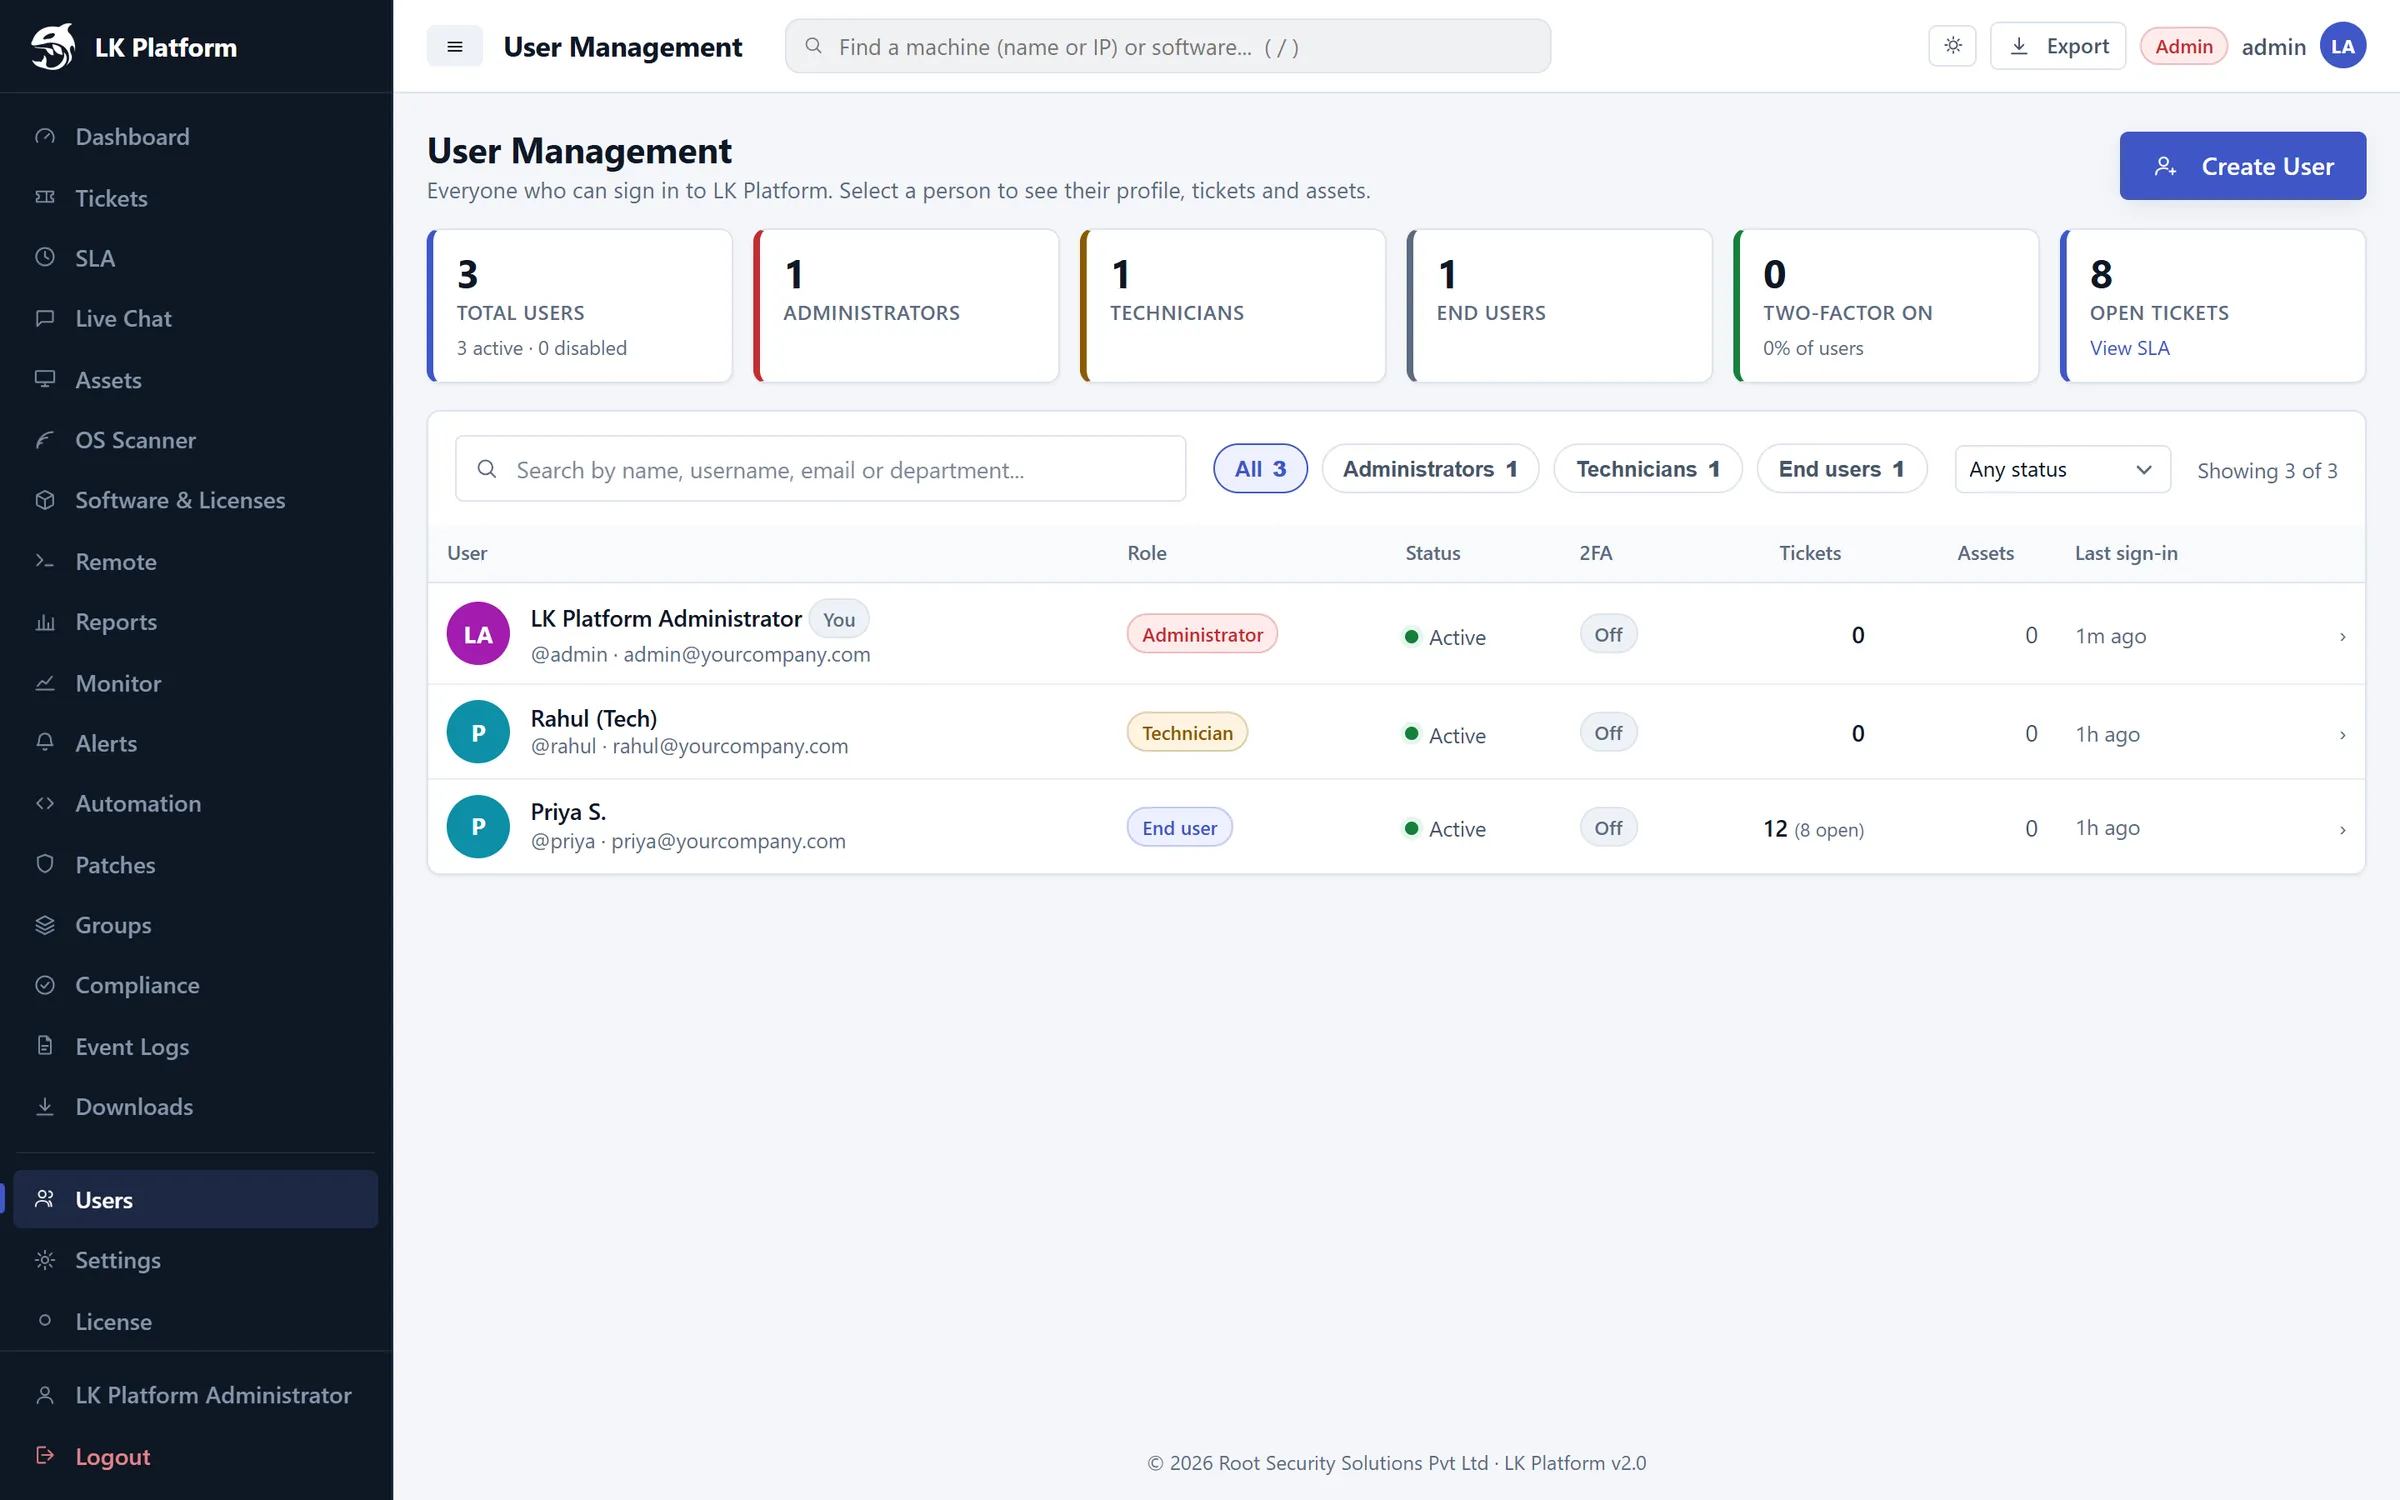
Users lists everyone who can sign in, with role, status, 2FA, tickets, assets and last sign-in.
Role
What they can do
Administrator
Everything, including users, settings, licence, backup and API keys.
Technician
Work tickets and chats, manage assets, use remote access, scripts and patches.
End user
Raise and follow their own tickets and chat with IT.
Open Users and click Create User.
Enter the username, full name, email and a password, and choose a role.
Save. Click any user to see their profile, tickets and assigned assets, or to disable the account.
User Management
Two-factor sign-in & theme
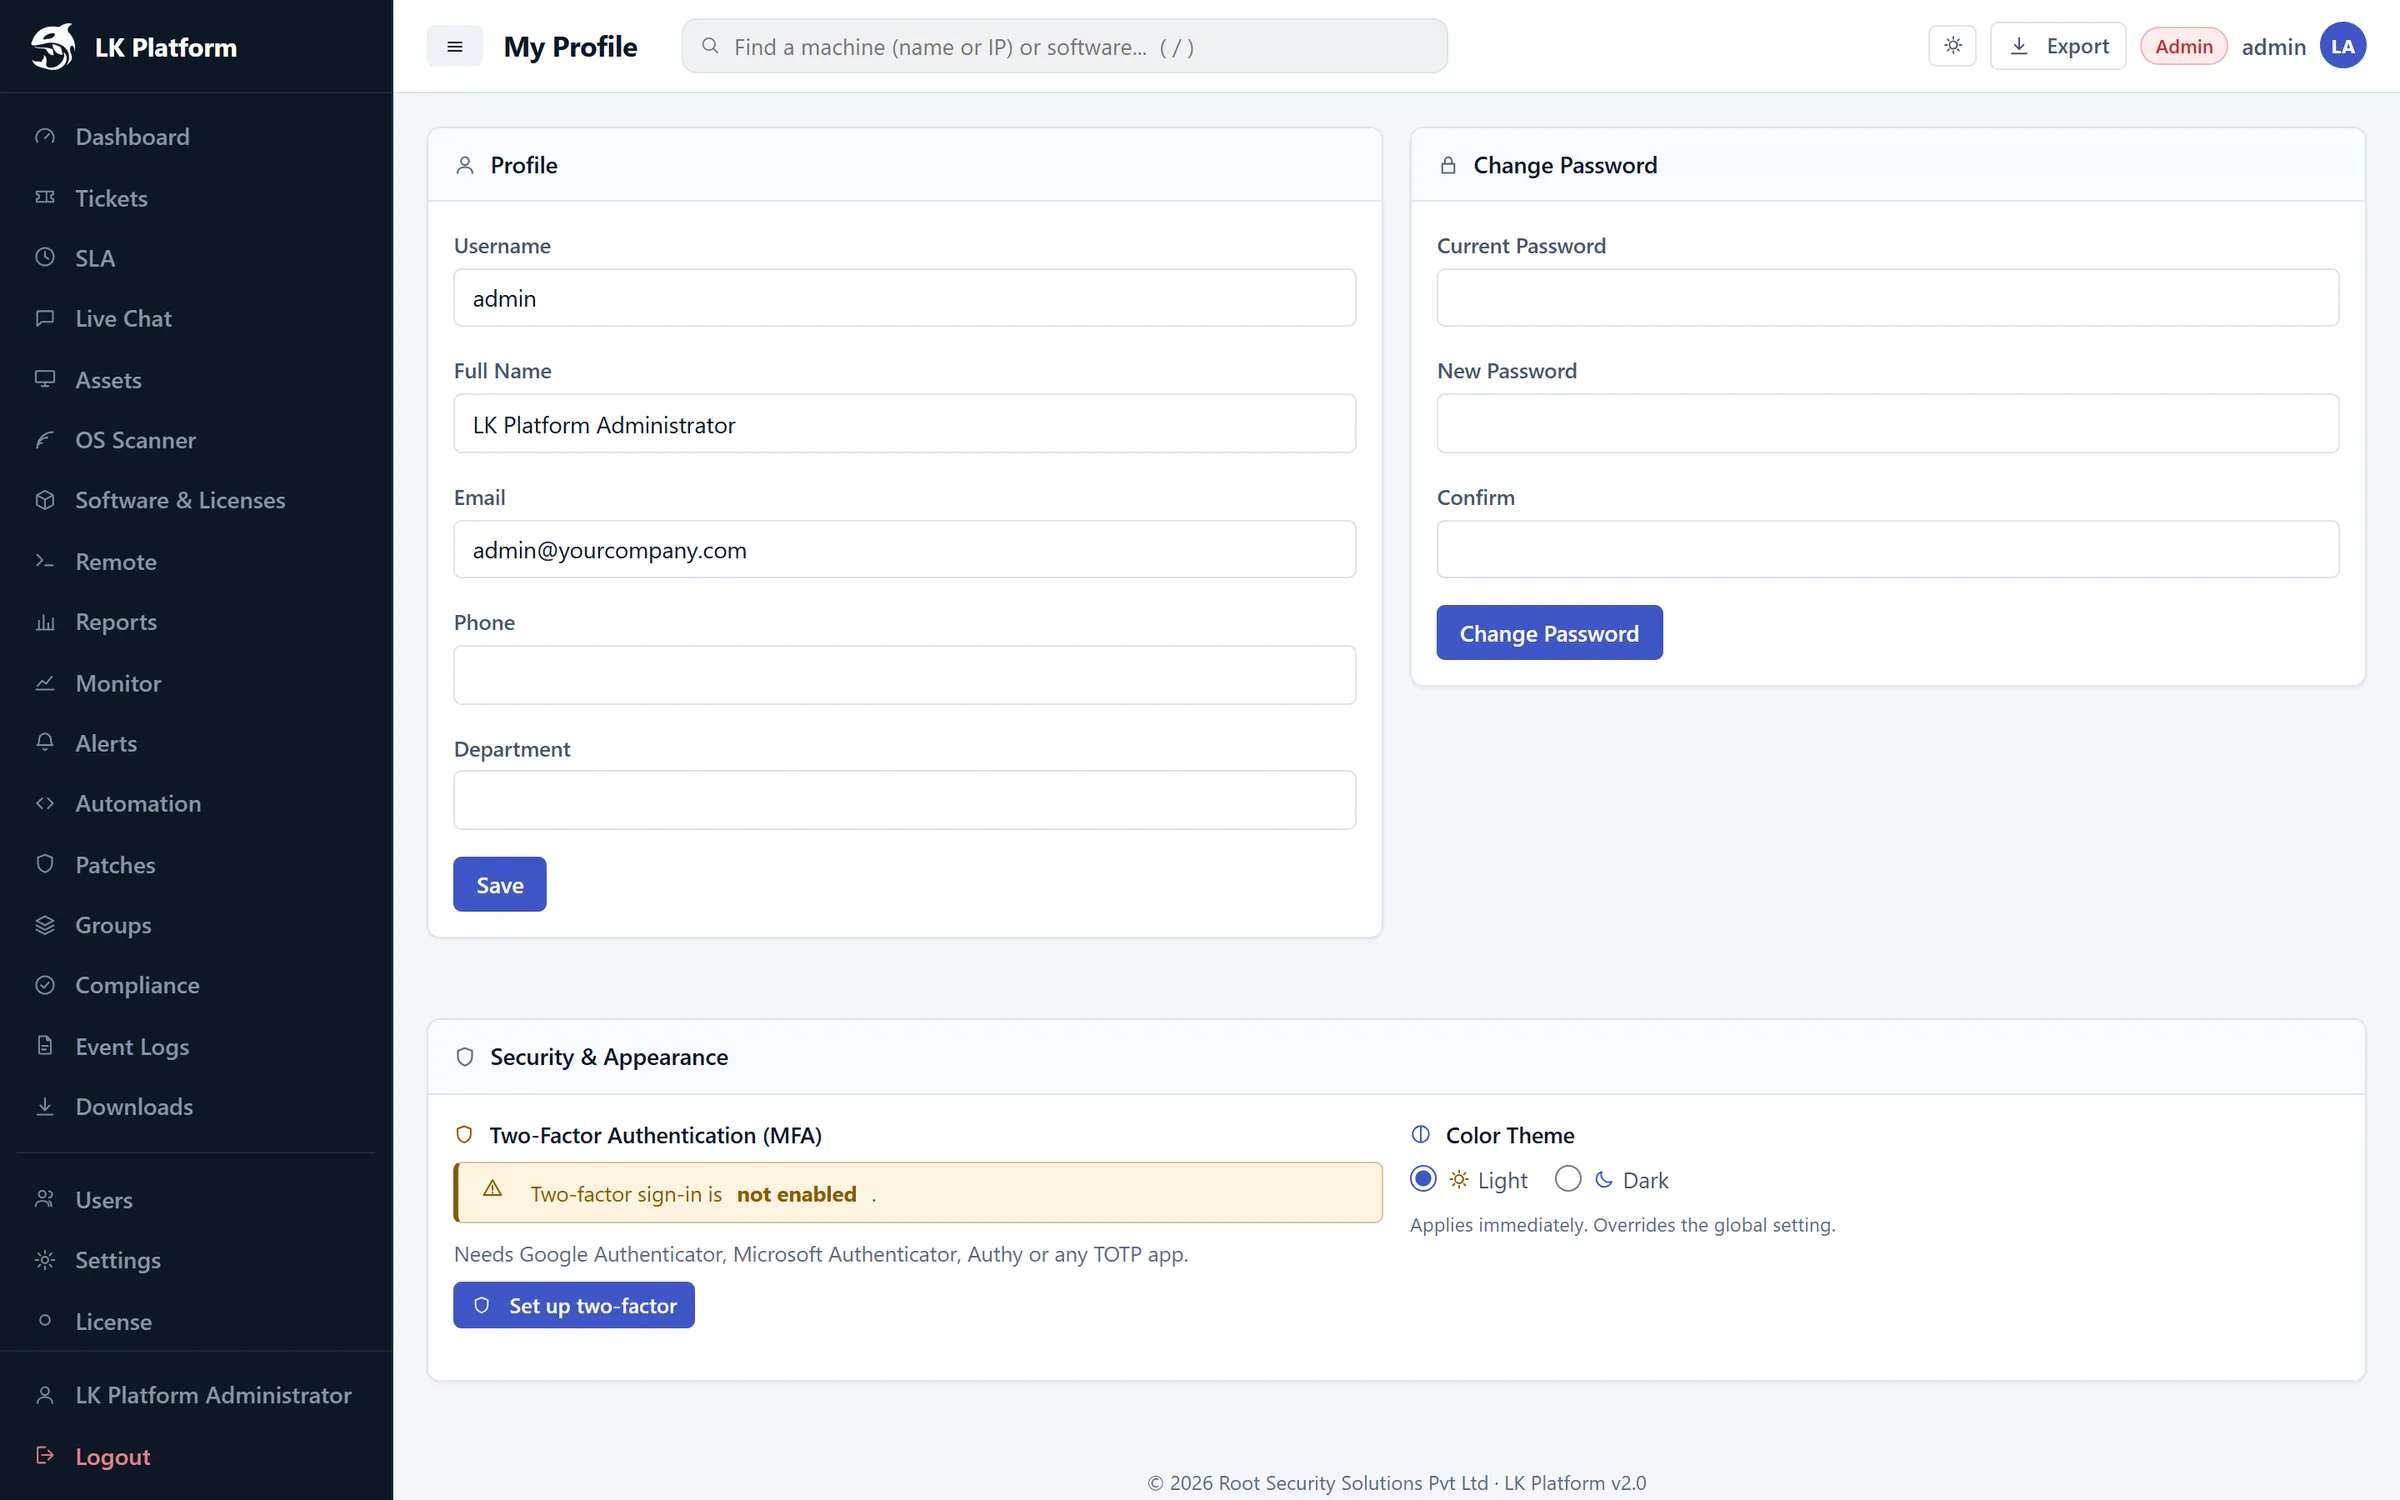
Click your name at the bottom of the sidebar to open your Profile.
Under Two-Factor Authentication (MFA), click Set up two-factor.
Scan the QR code with Google Authenticator, Microsoft Authenticator, Authy or any TOTP app.
Enter the 6-digit code to confirm. From now on you'll be asked for a code at sign-in.
Under Color Theme, pick Light or Dark. This overrides the global setting for you only.
Profile
Recommended: The dashboard shows Two-factor coverage. Aim for 100% of administrators and technicians.
Tickets
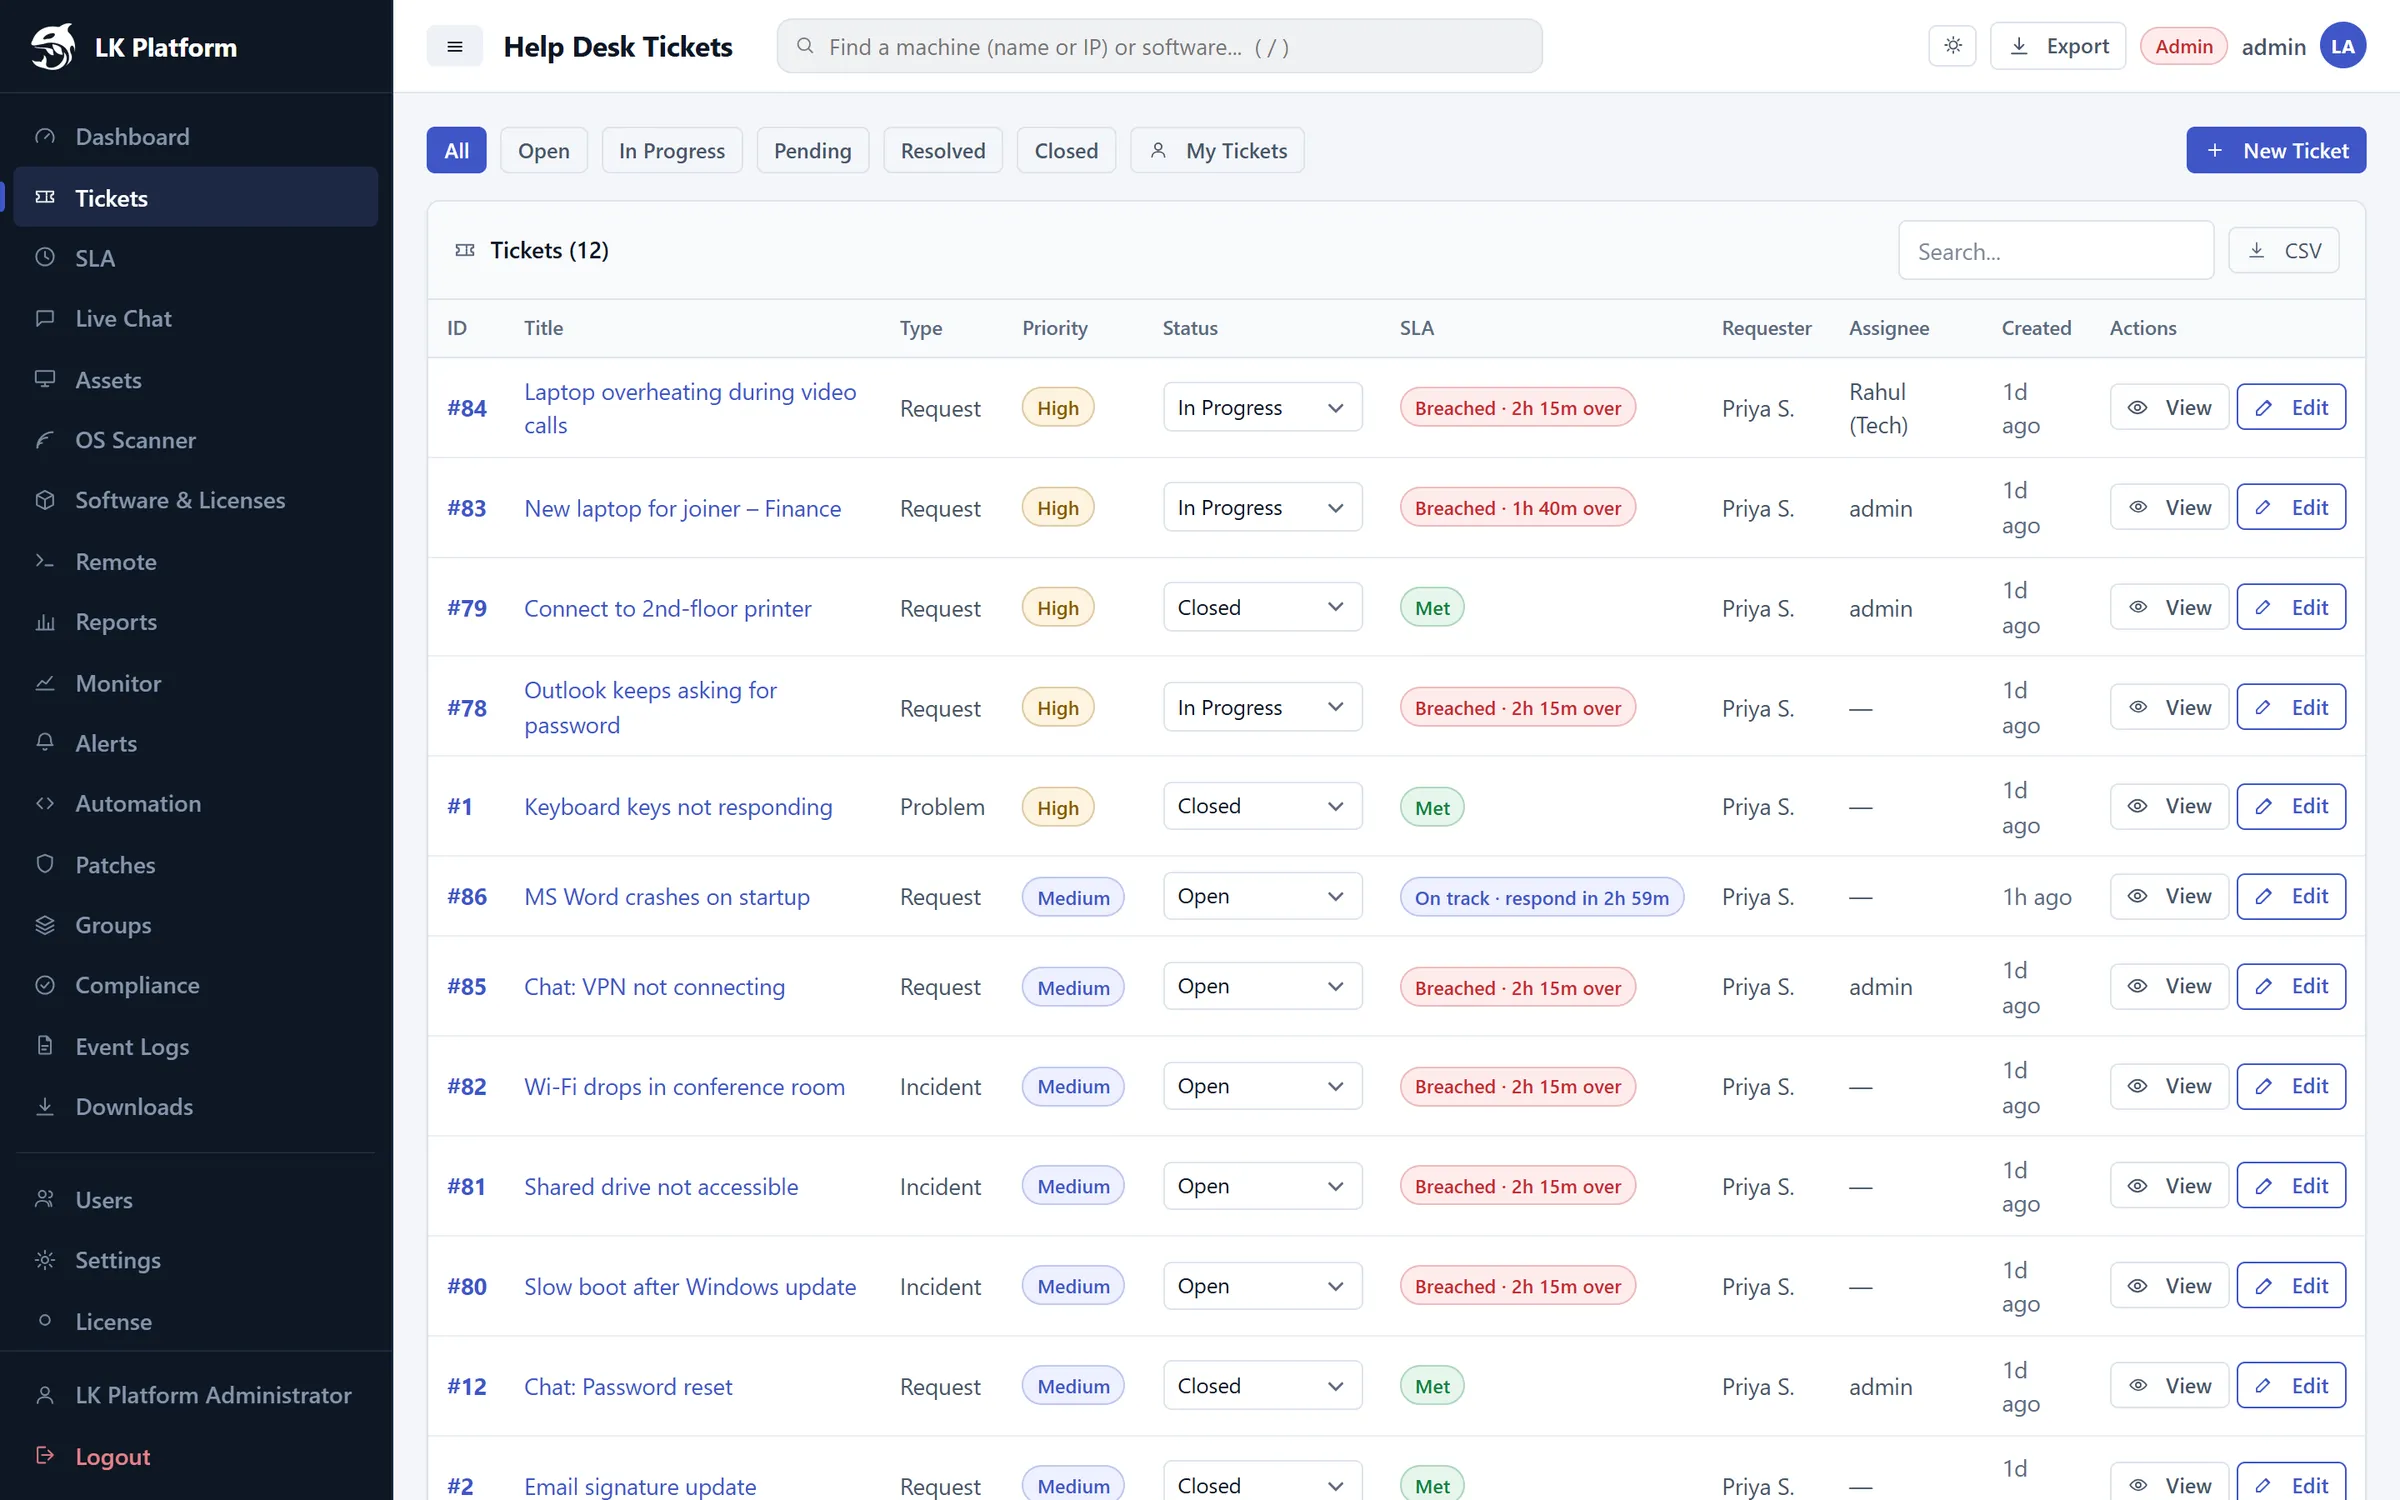
The help desk handles four ticket types: Incident (something broke), Request (something needed), Problem (root cause of repeated incidents) and Change (planned change).
Help Desk Tickets
12345
1
Status filters: All, Open, In Progress, Pending, Resolved, Closed, My Tickets.
2
New Ticket: raise a ticket on behalf of a user.
3
Search & CSV: find tickets instantly, or export the list.
4
Inline status: change status straight from the list.
5
SLA badge: On track, At risk, Breached or Met.
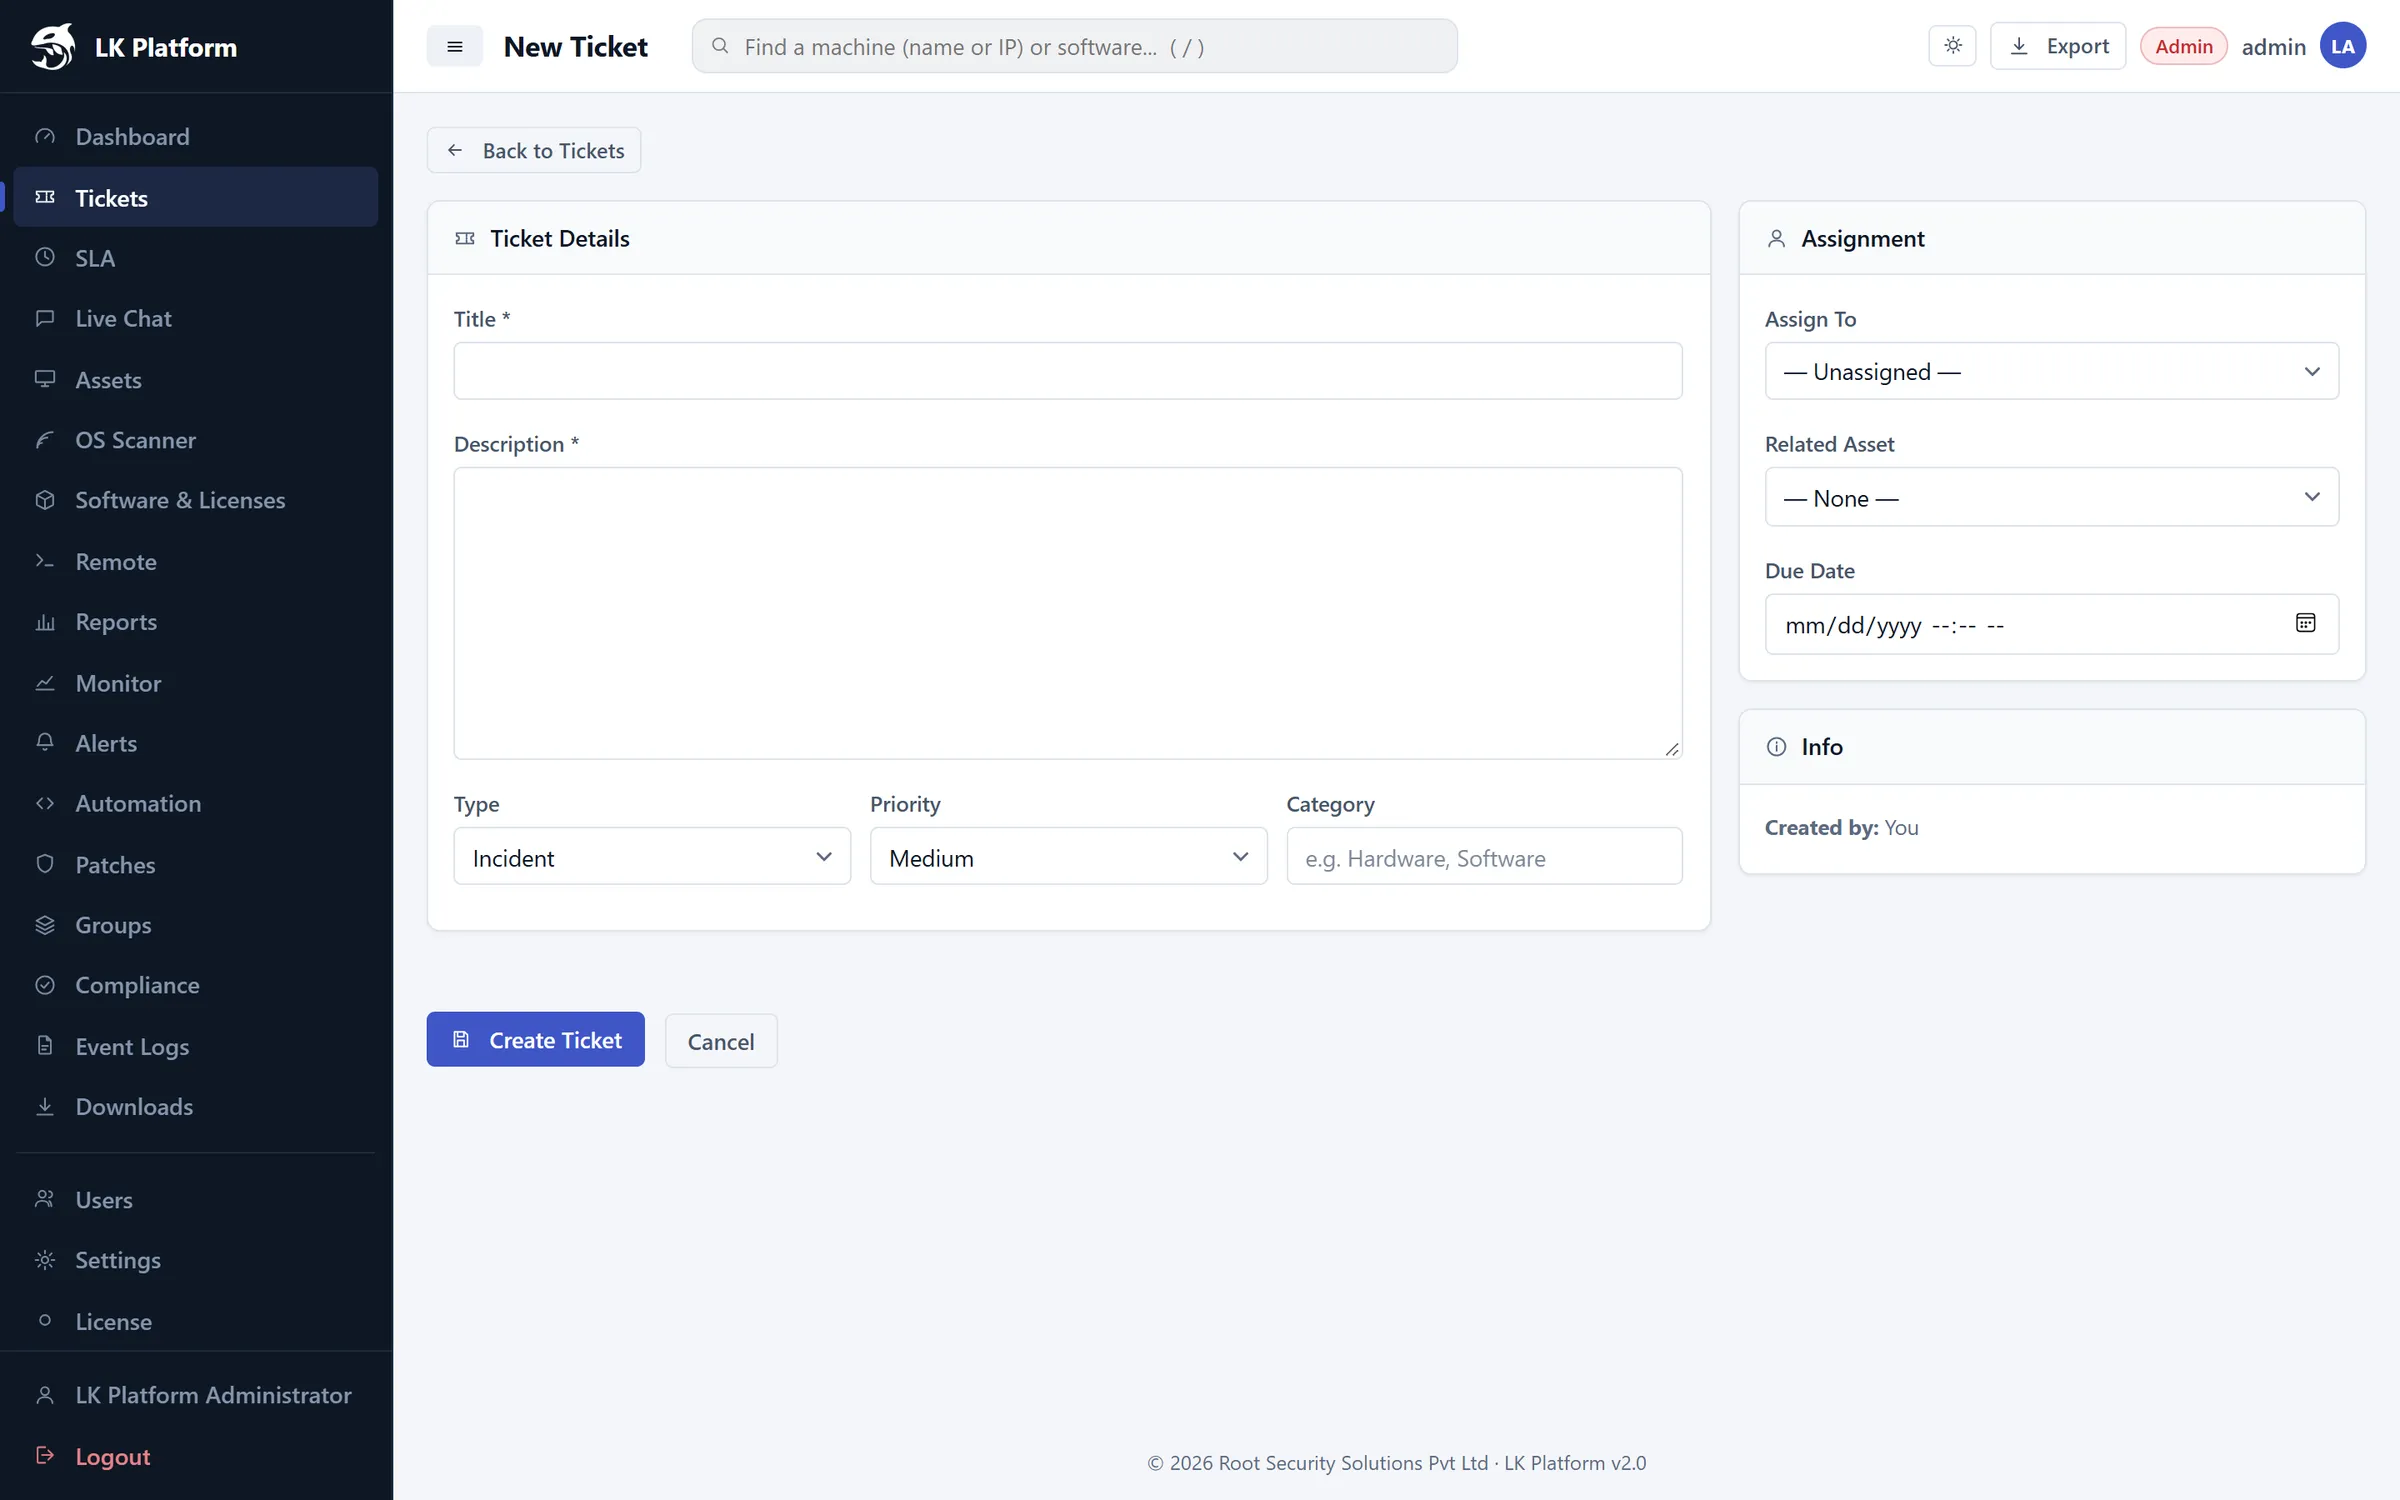
Creating a ticket
Click New Ticket.
Enter a clear Title and Description.
Choose Type, Priority (Low, Medium, High, Critical) and optionally a Category.
Set Assign To (a technician), the Related Asset (the affected computer) and a Due Date if needed.
Click Create Ticket. The SLA clock starts immediately based on the priority.
New Ticket
Working a ticket
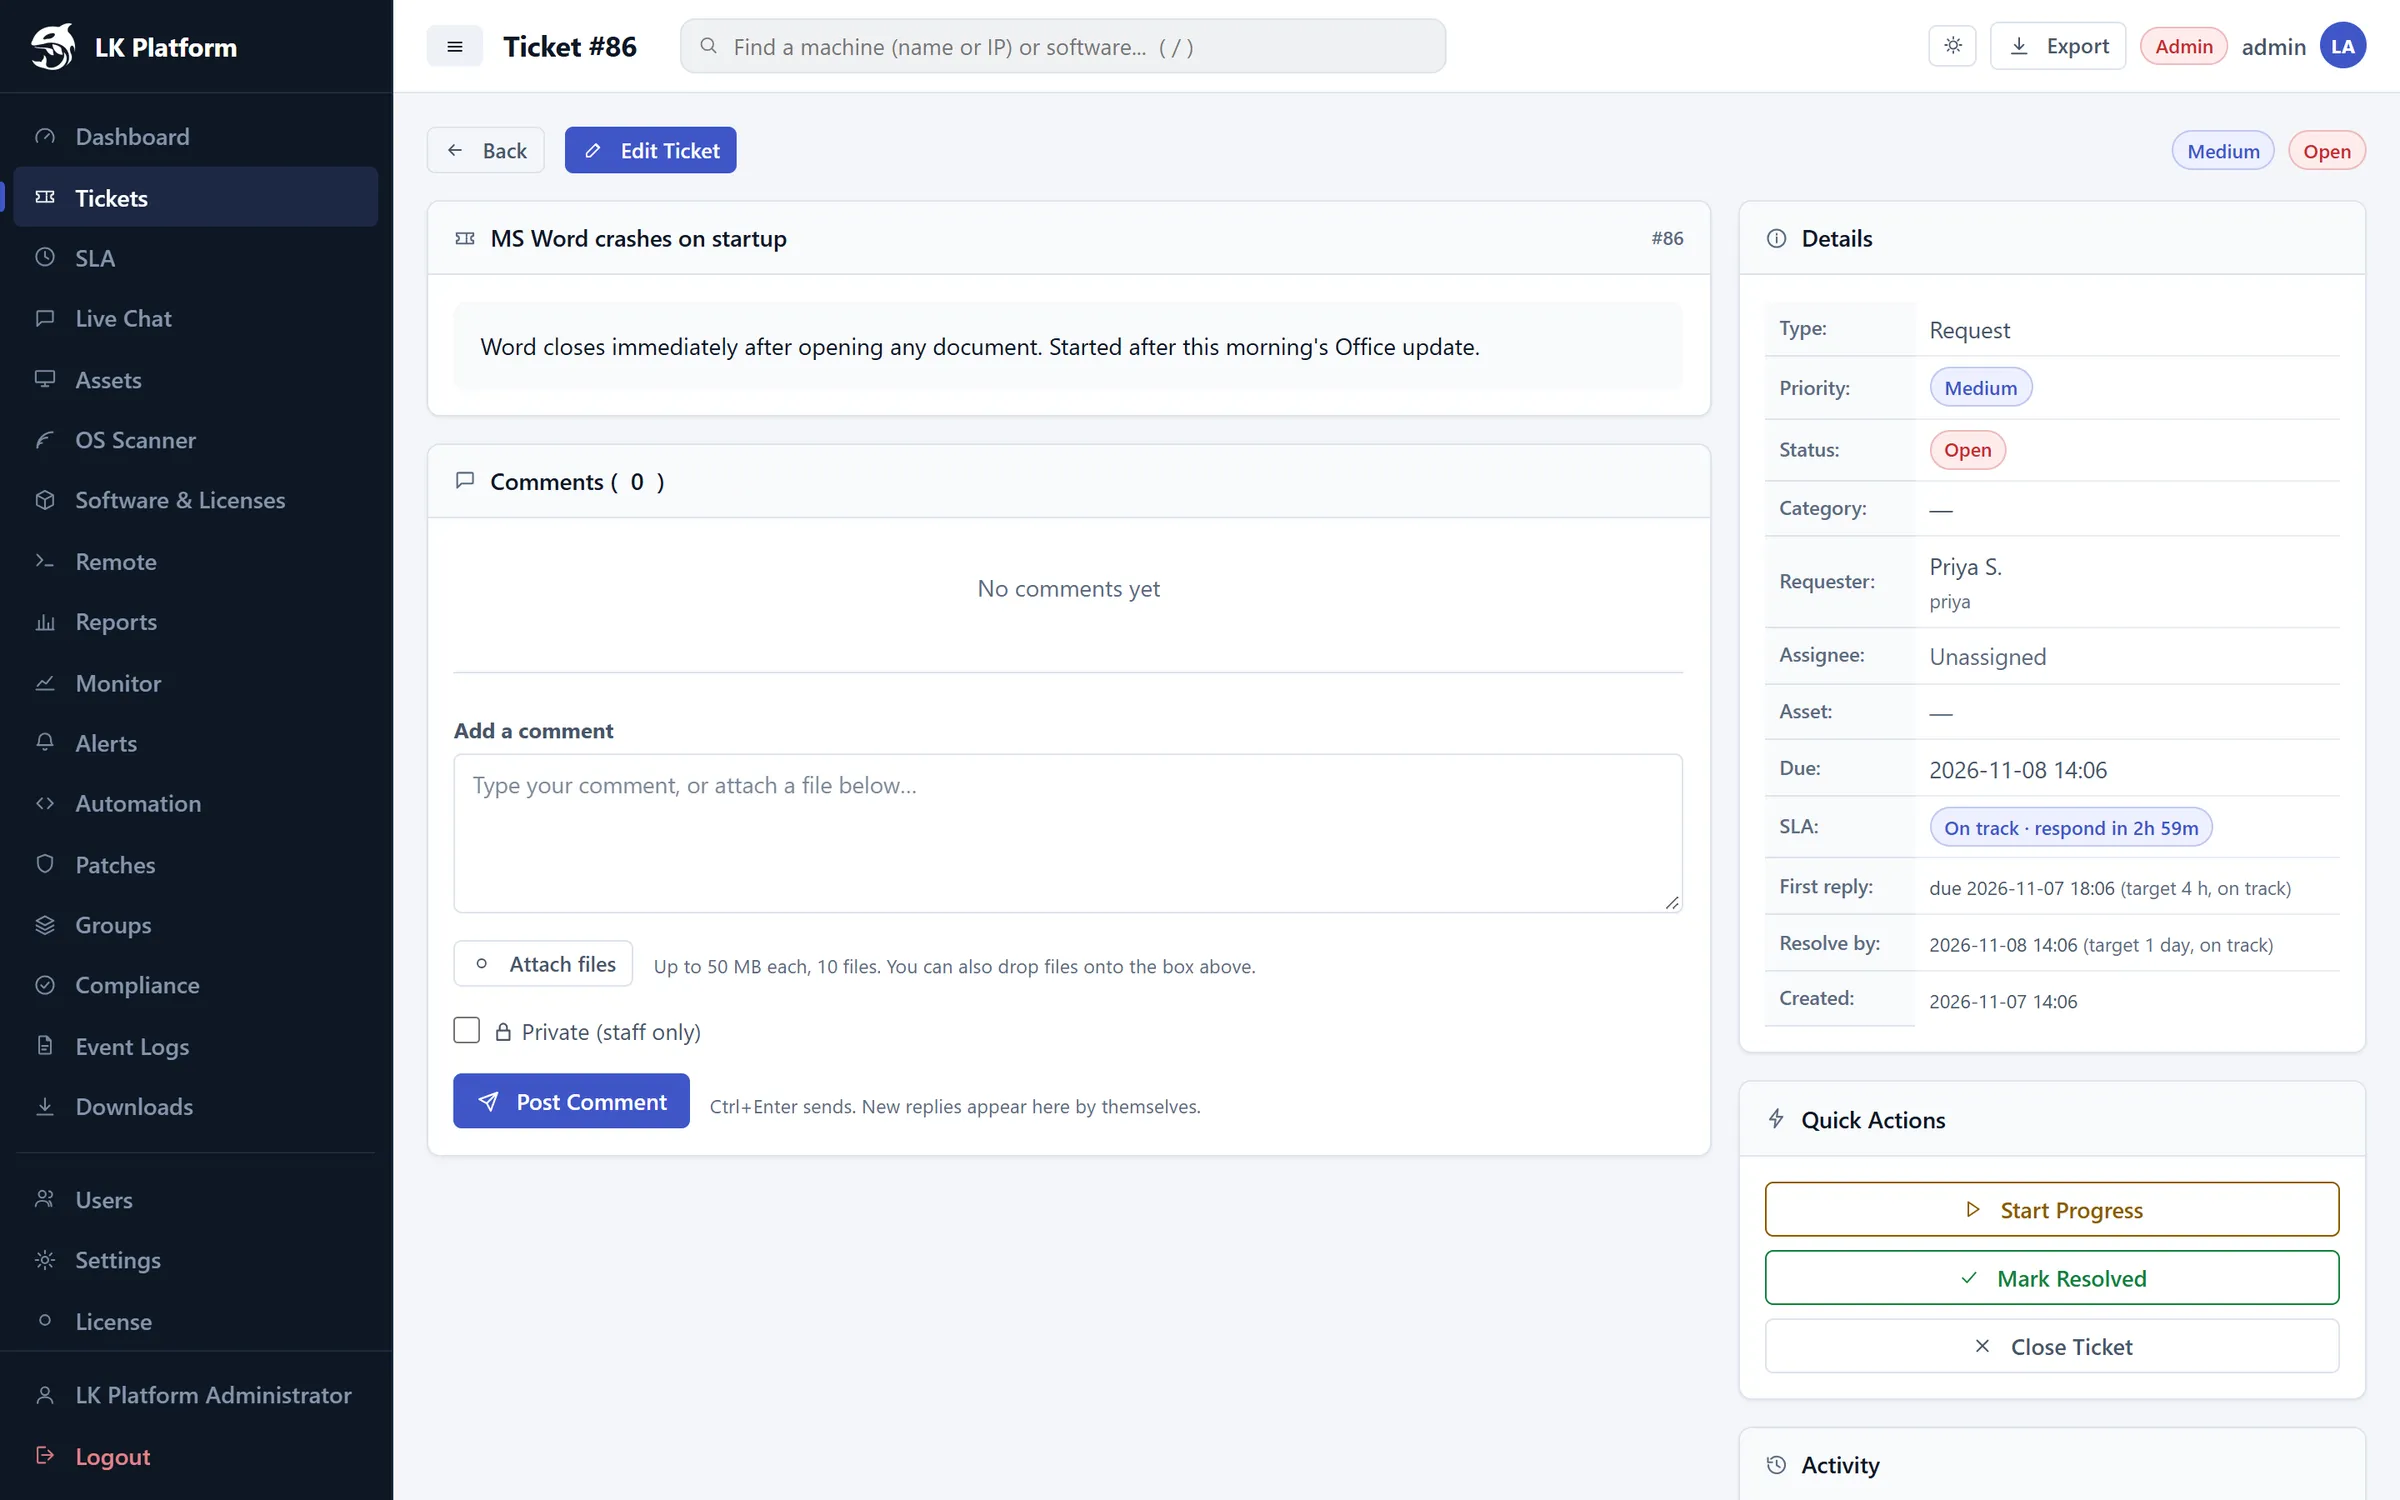
Click a ticket number or title to open it.
Ticket #86
123456
1
Edit Ticket: change title, priority, type, assignee or asset.
2
Comment box: reply to the user. Ctrl+Enter sends, and new replies appear by themselves.
3
Attach files: up to 10 files, 50 MB each, or drag & drop.
4
Private (staff only): internal notes the requester can't see.
5
Details & SLA: first-reply and resolve-by deadlines with live status.
6
Quick Actions: Start Progress, Mark Resolved, Close Ticket.
The Activity panel at the bottom records every change with who made it and when.
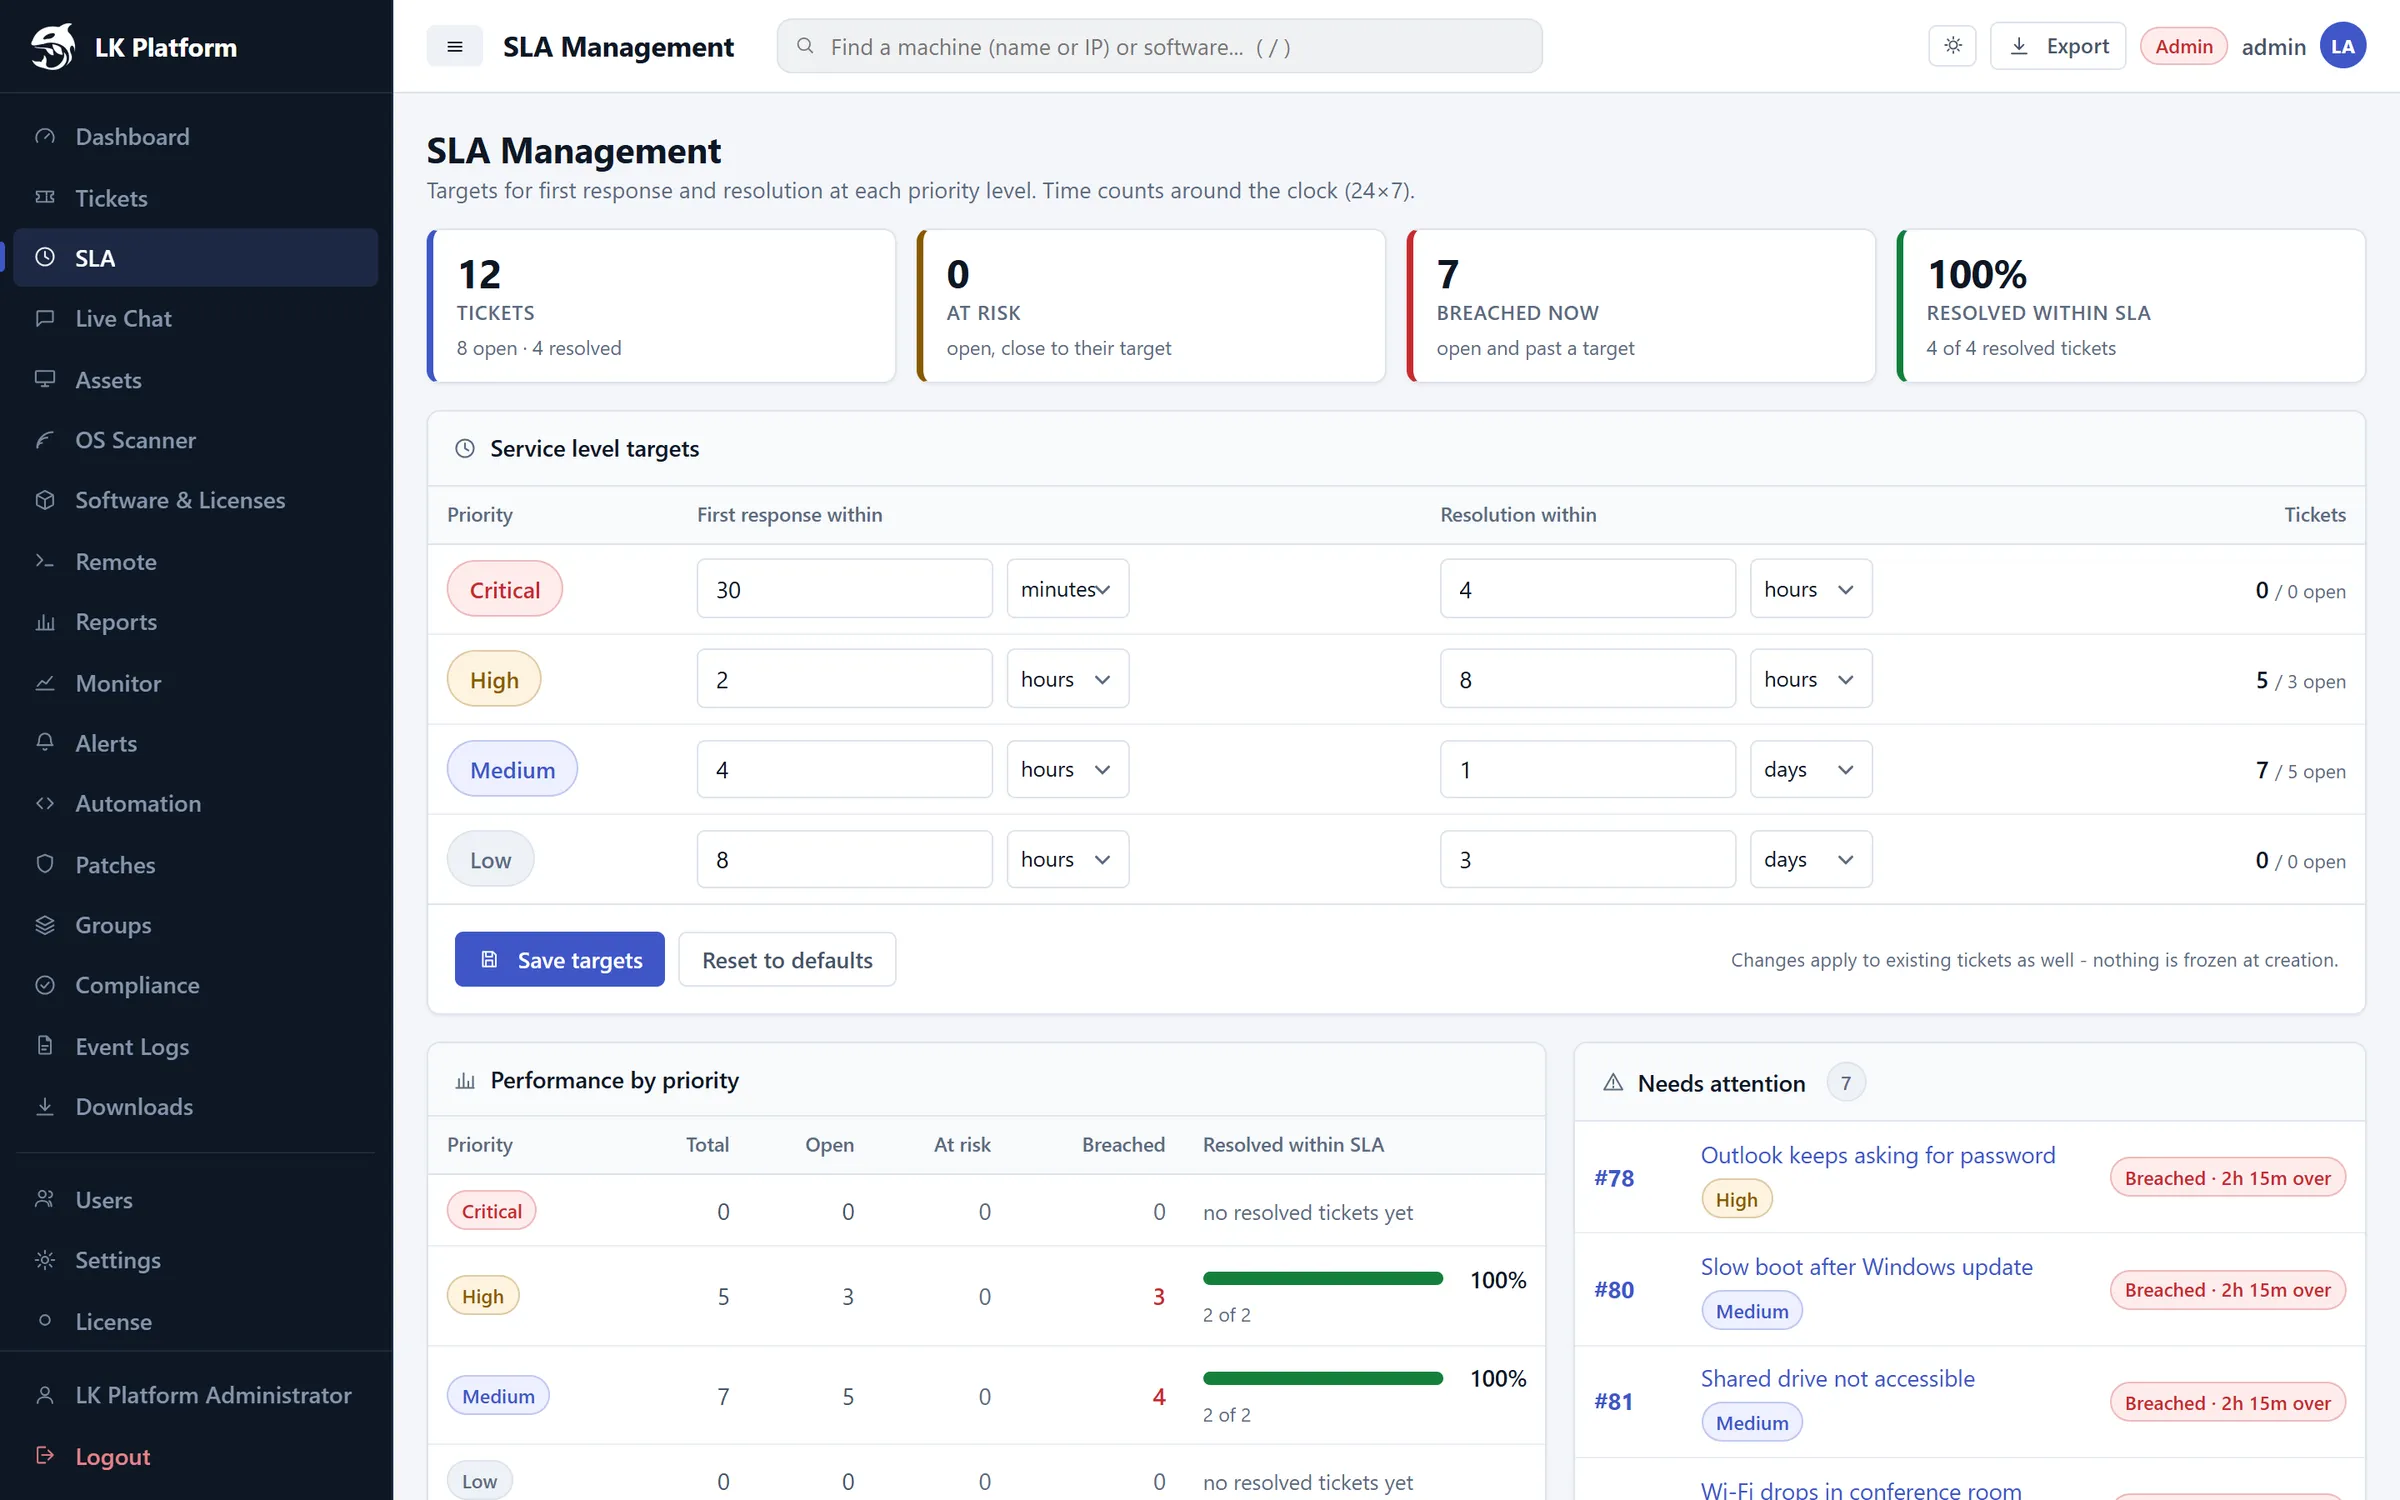
SLA management
SLA targets set how quickly your team must first respond to and resolve a ticket. Time counts around the clock (24×7). Default targets:
Priority
First response
Resolution
Critical
30 min
4 hours
High
2 hours
8 hours
Medium
4 hours
1 day
Low
8 hours
3 days
Open SLA in the sidebar.
Edit the numbers and units (minutes, hours, days) for each priority.
Click Save targets. Changes apply to existing tickets too; nothing is frozen at creation. Reset to defaults restores the table above.
SLA Management
The page also shows Performance by priority (total, open, at risk, breached, % resolved within SLA) and a Needs attention list of breached tickets.
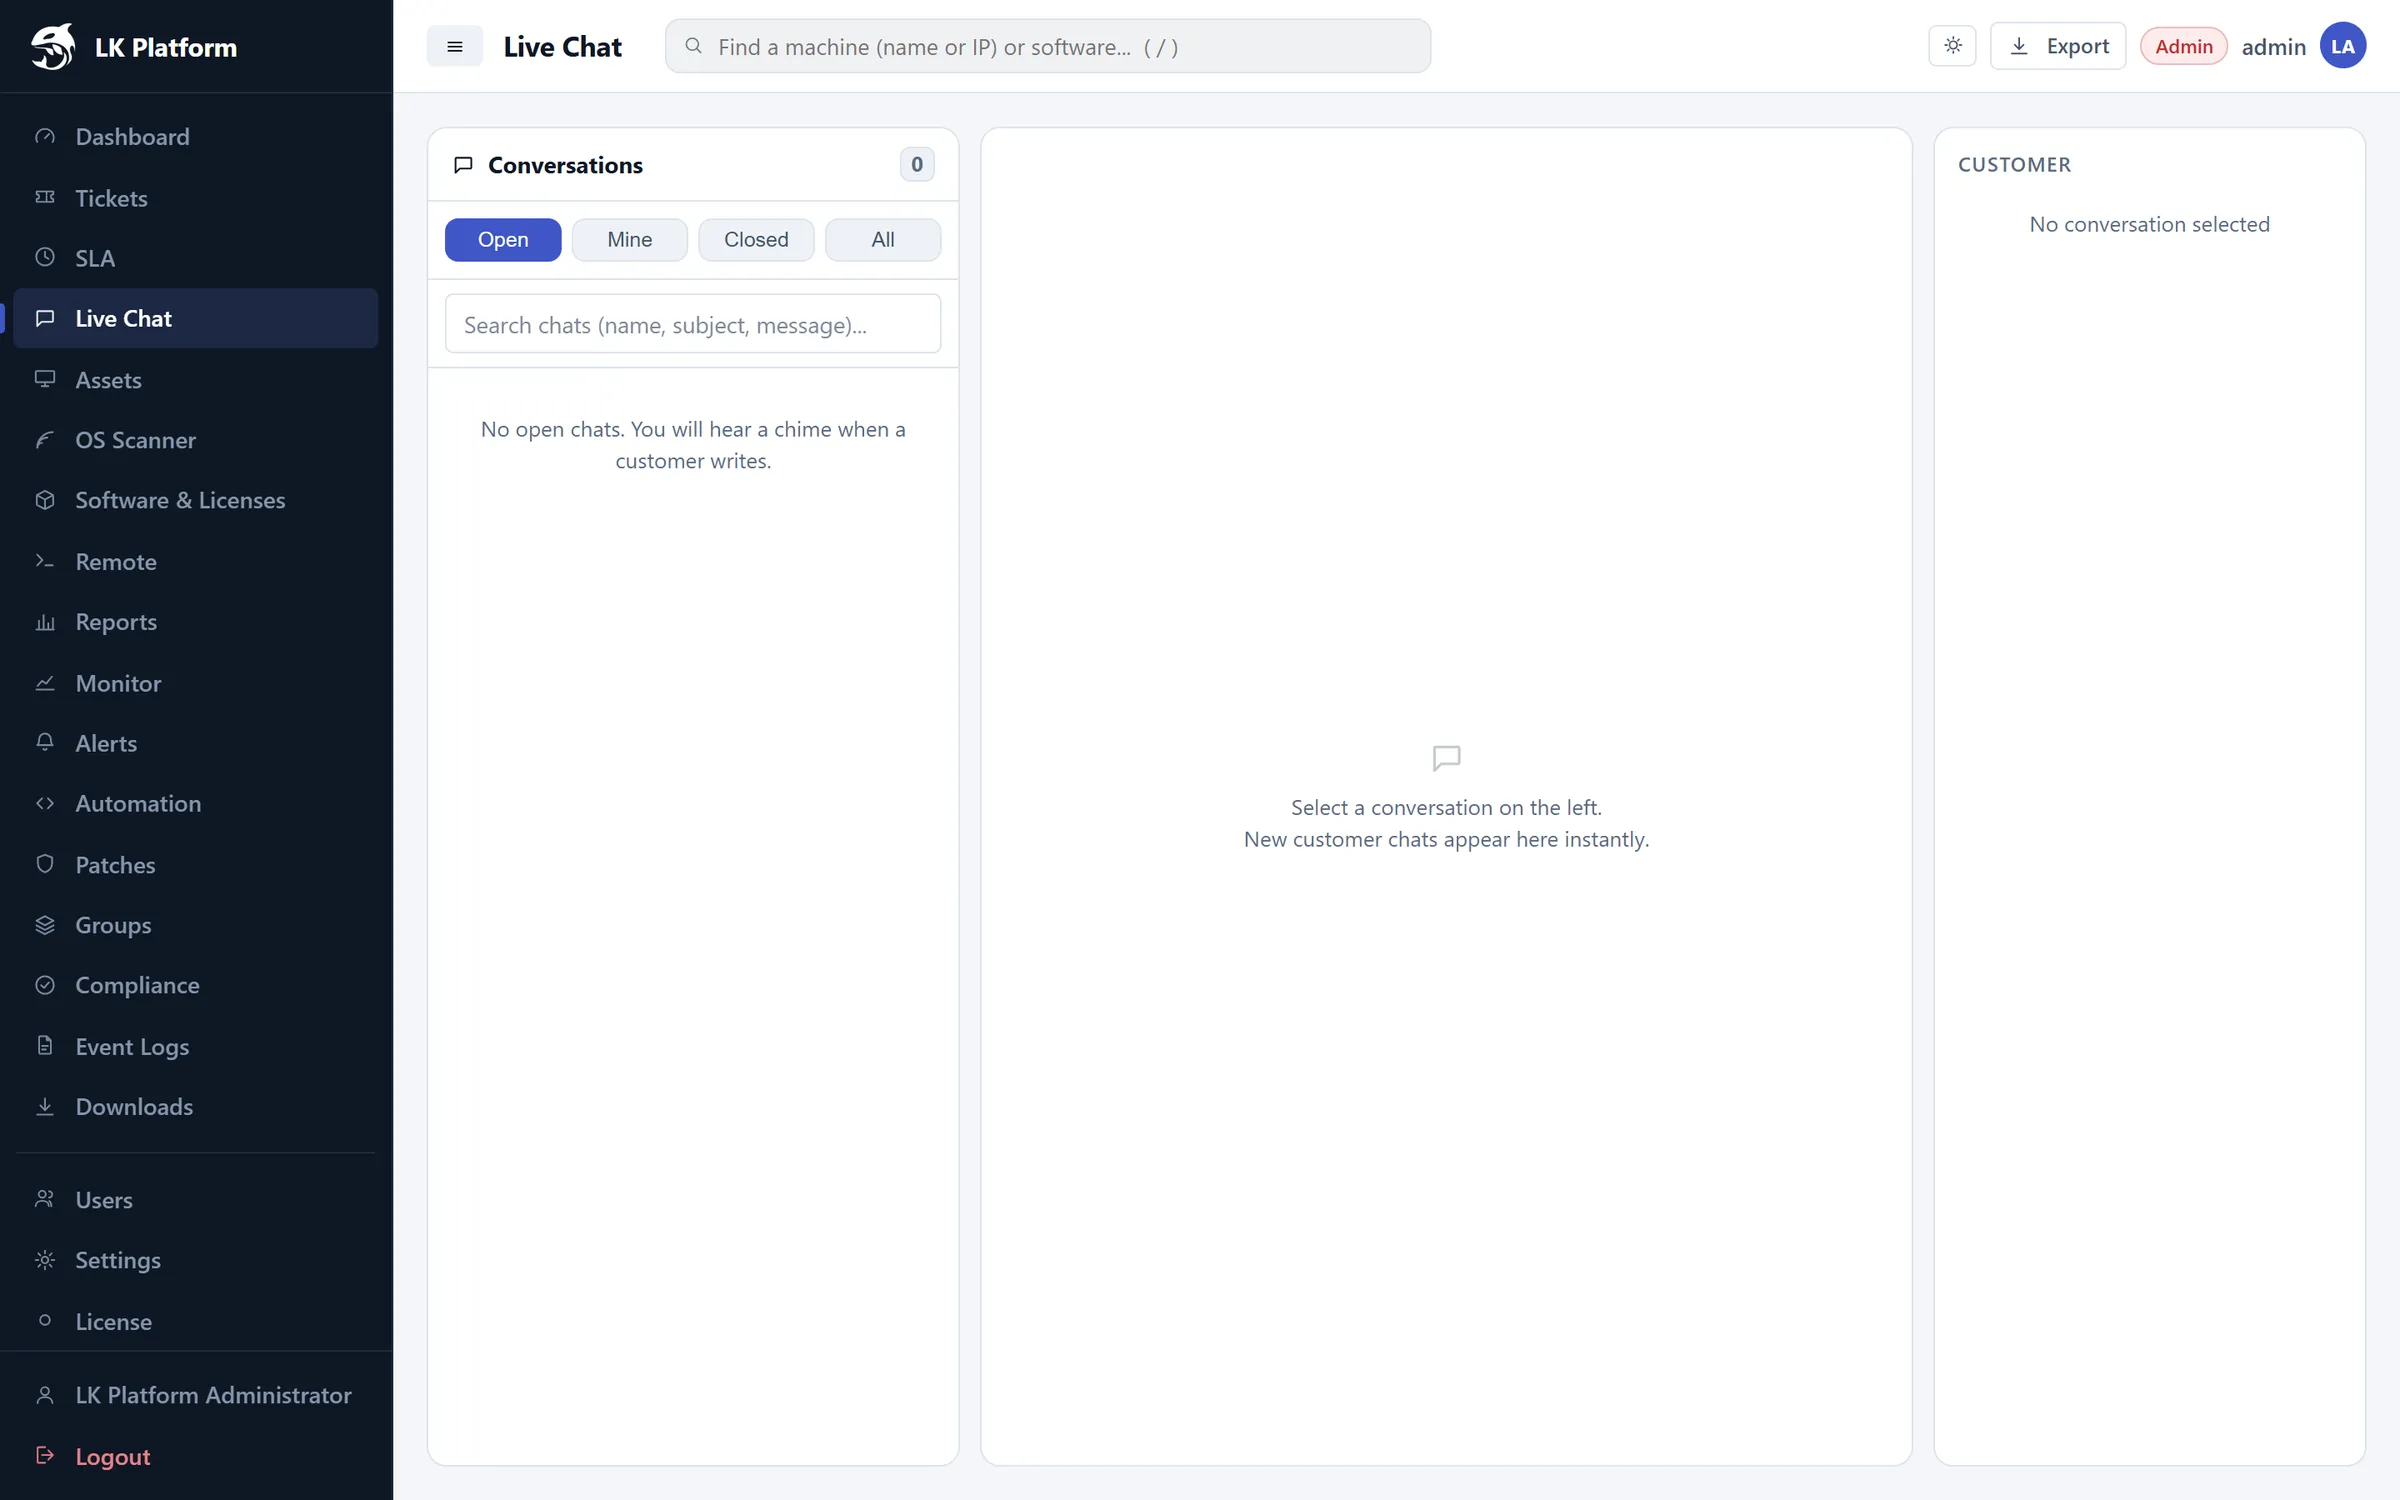
Live chat
Users can chat with IT in real time. Open Live Chat to see conversations, filtered by Open, Mine, Closed or All.
When a user writes, you hear a chime and the chat appears on the left.
Select it to read and reply on the right.
Convert it into a ticket if it needs follow-up. It will appear in Tickets as Chat: ….
Live Chat
Assets
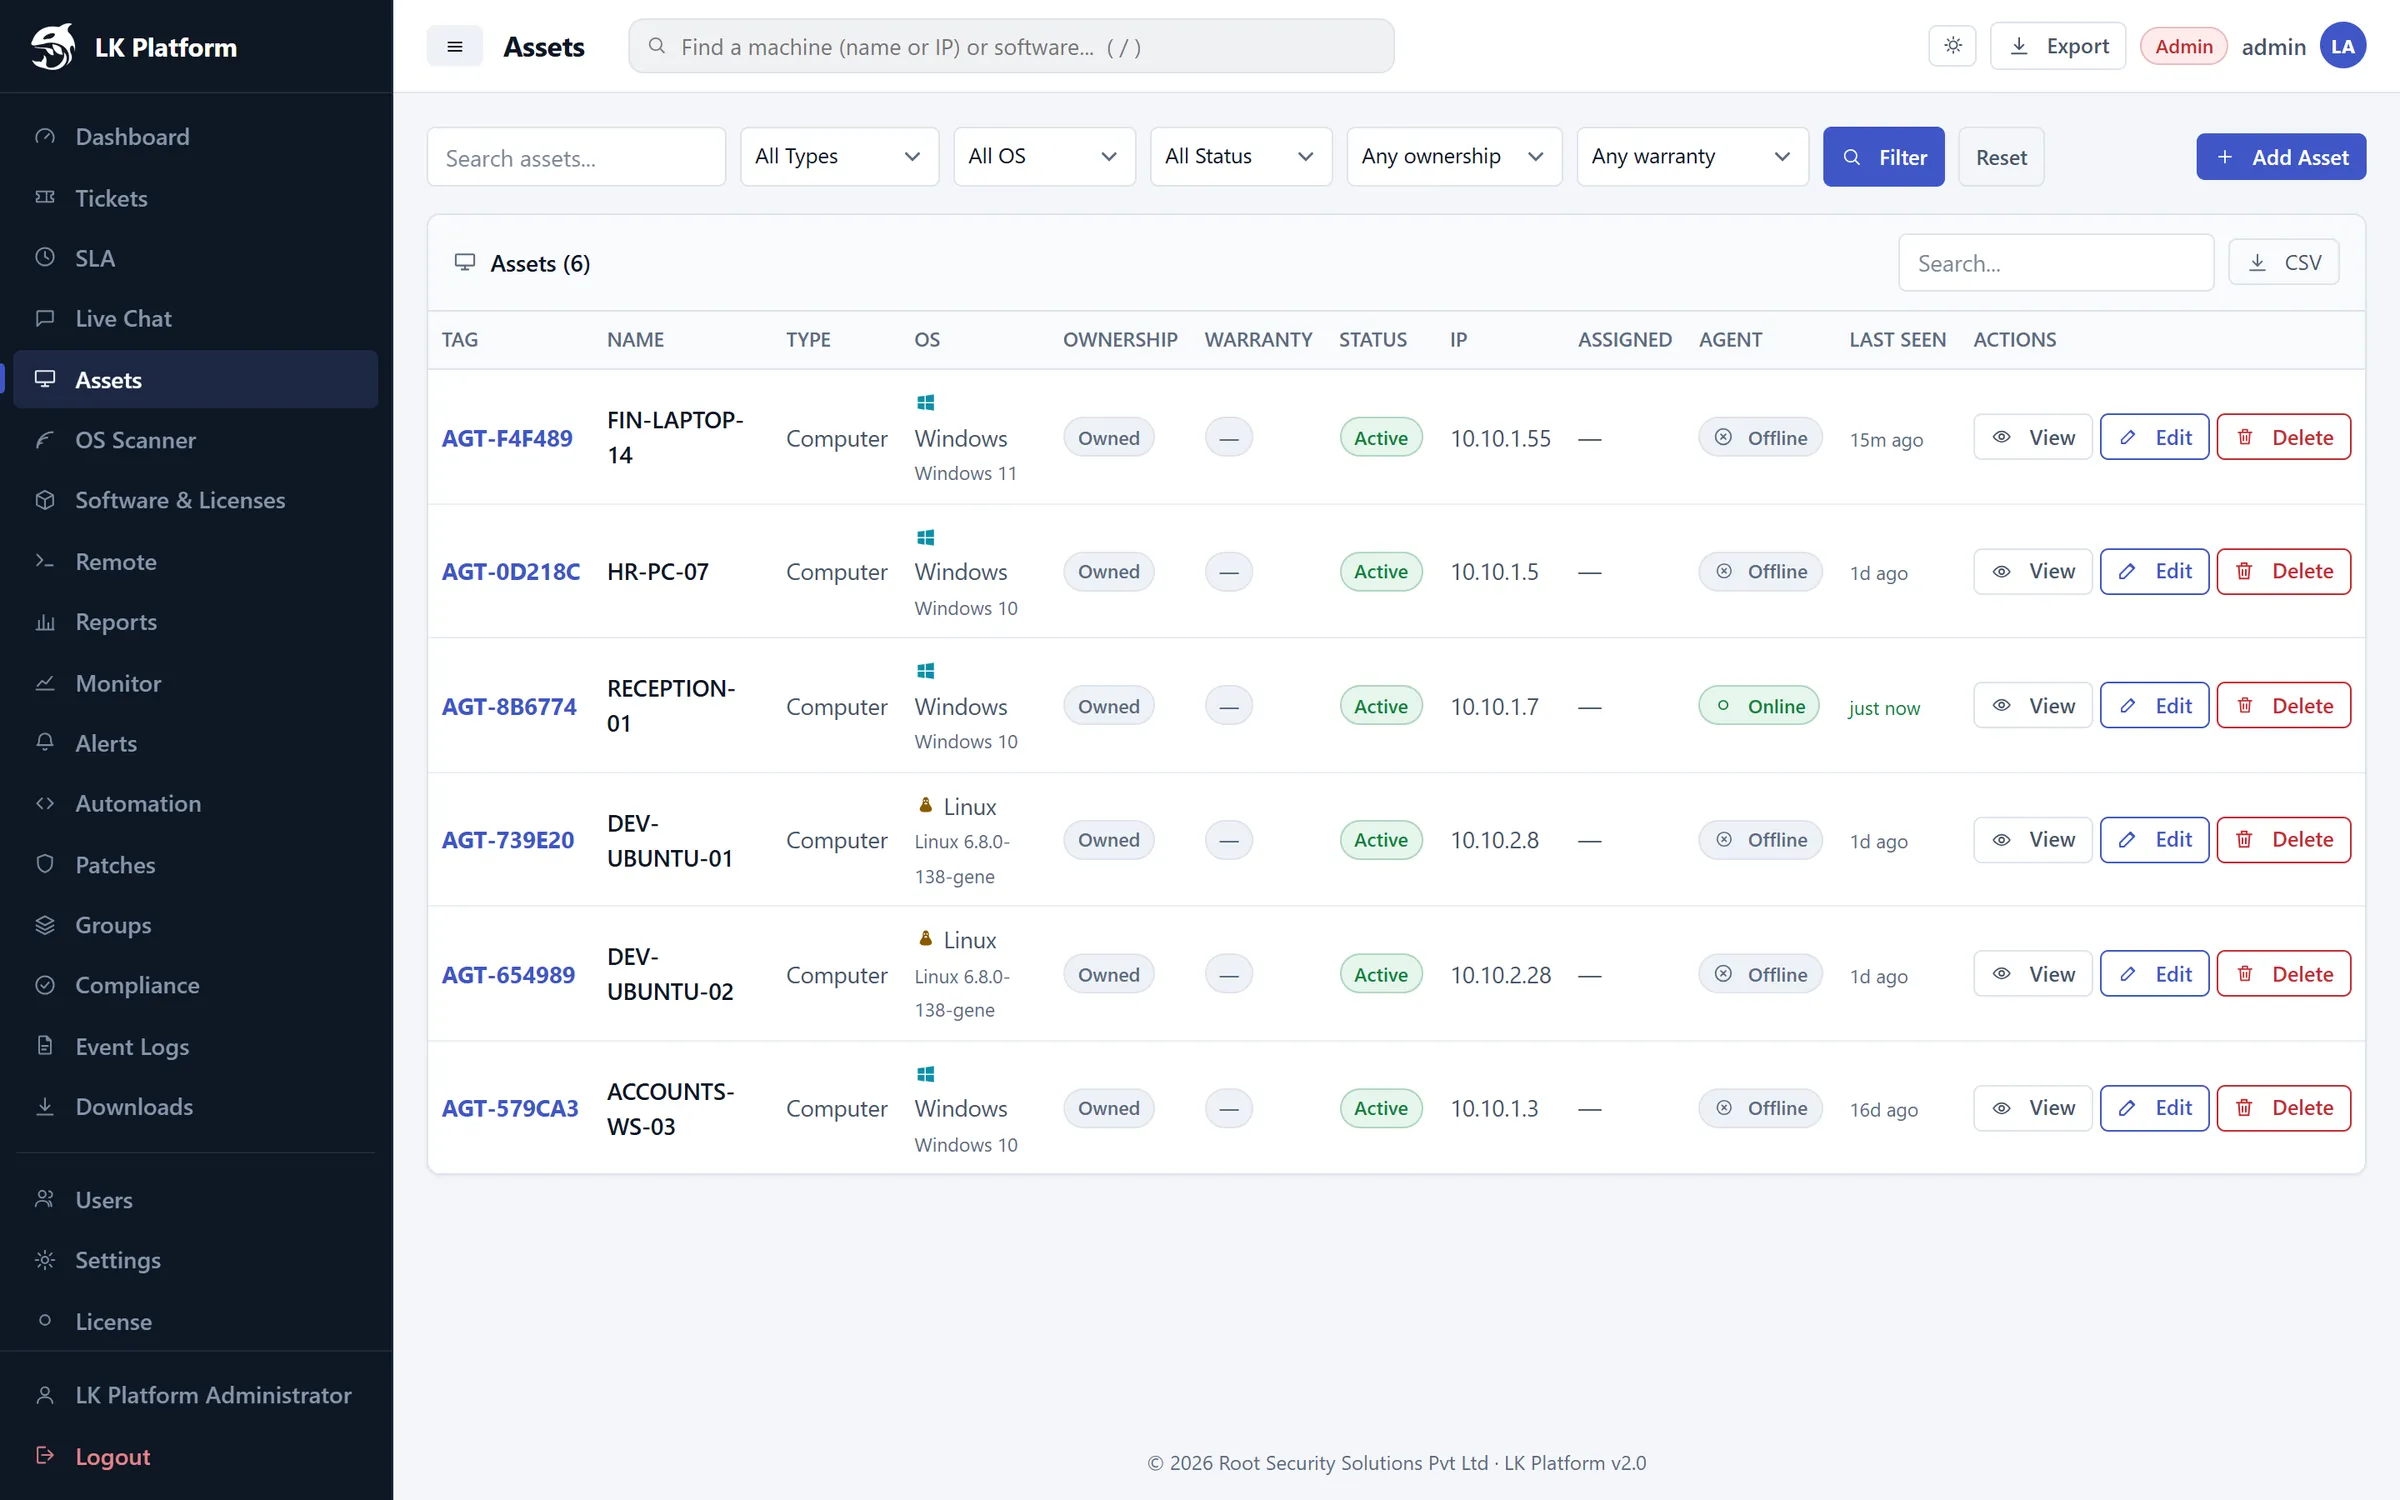
Computers with an agent are added automatically. You can also add printers, phones, network gear and other devices by hand.
Assets
Use the filters at the top (Type, OS, Status, Ownership, Warranty) and click Filter. View opens the full record, and CSV exports the list.
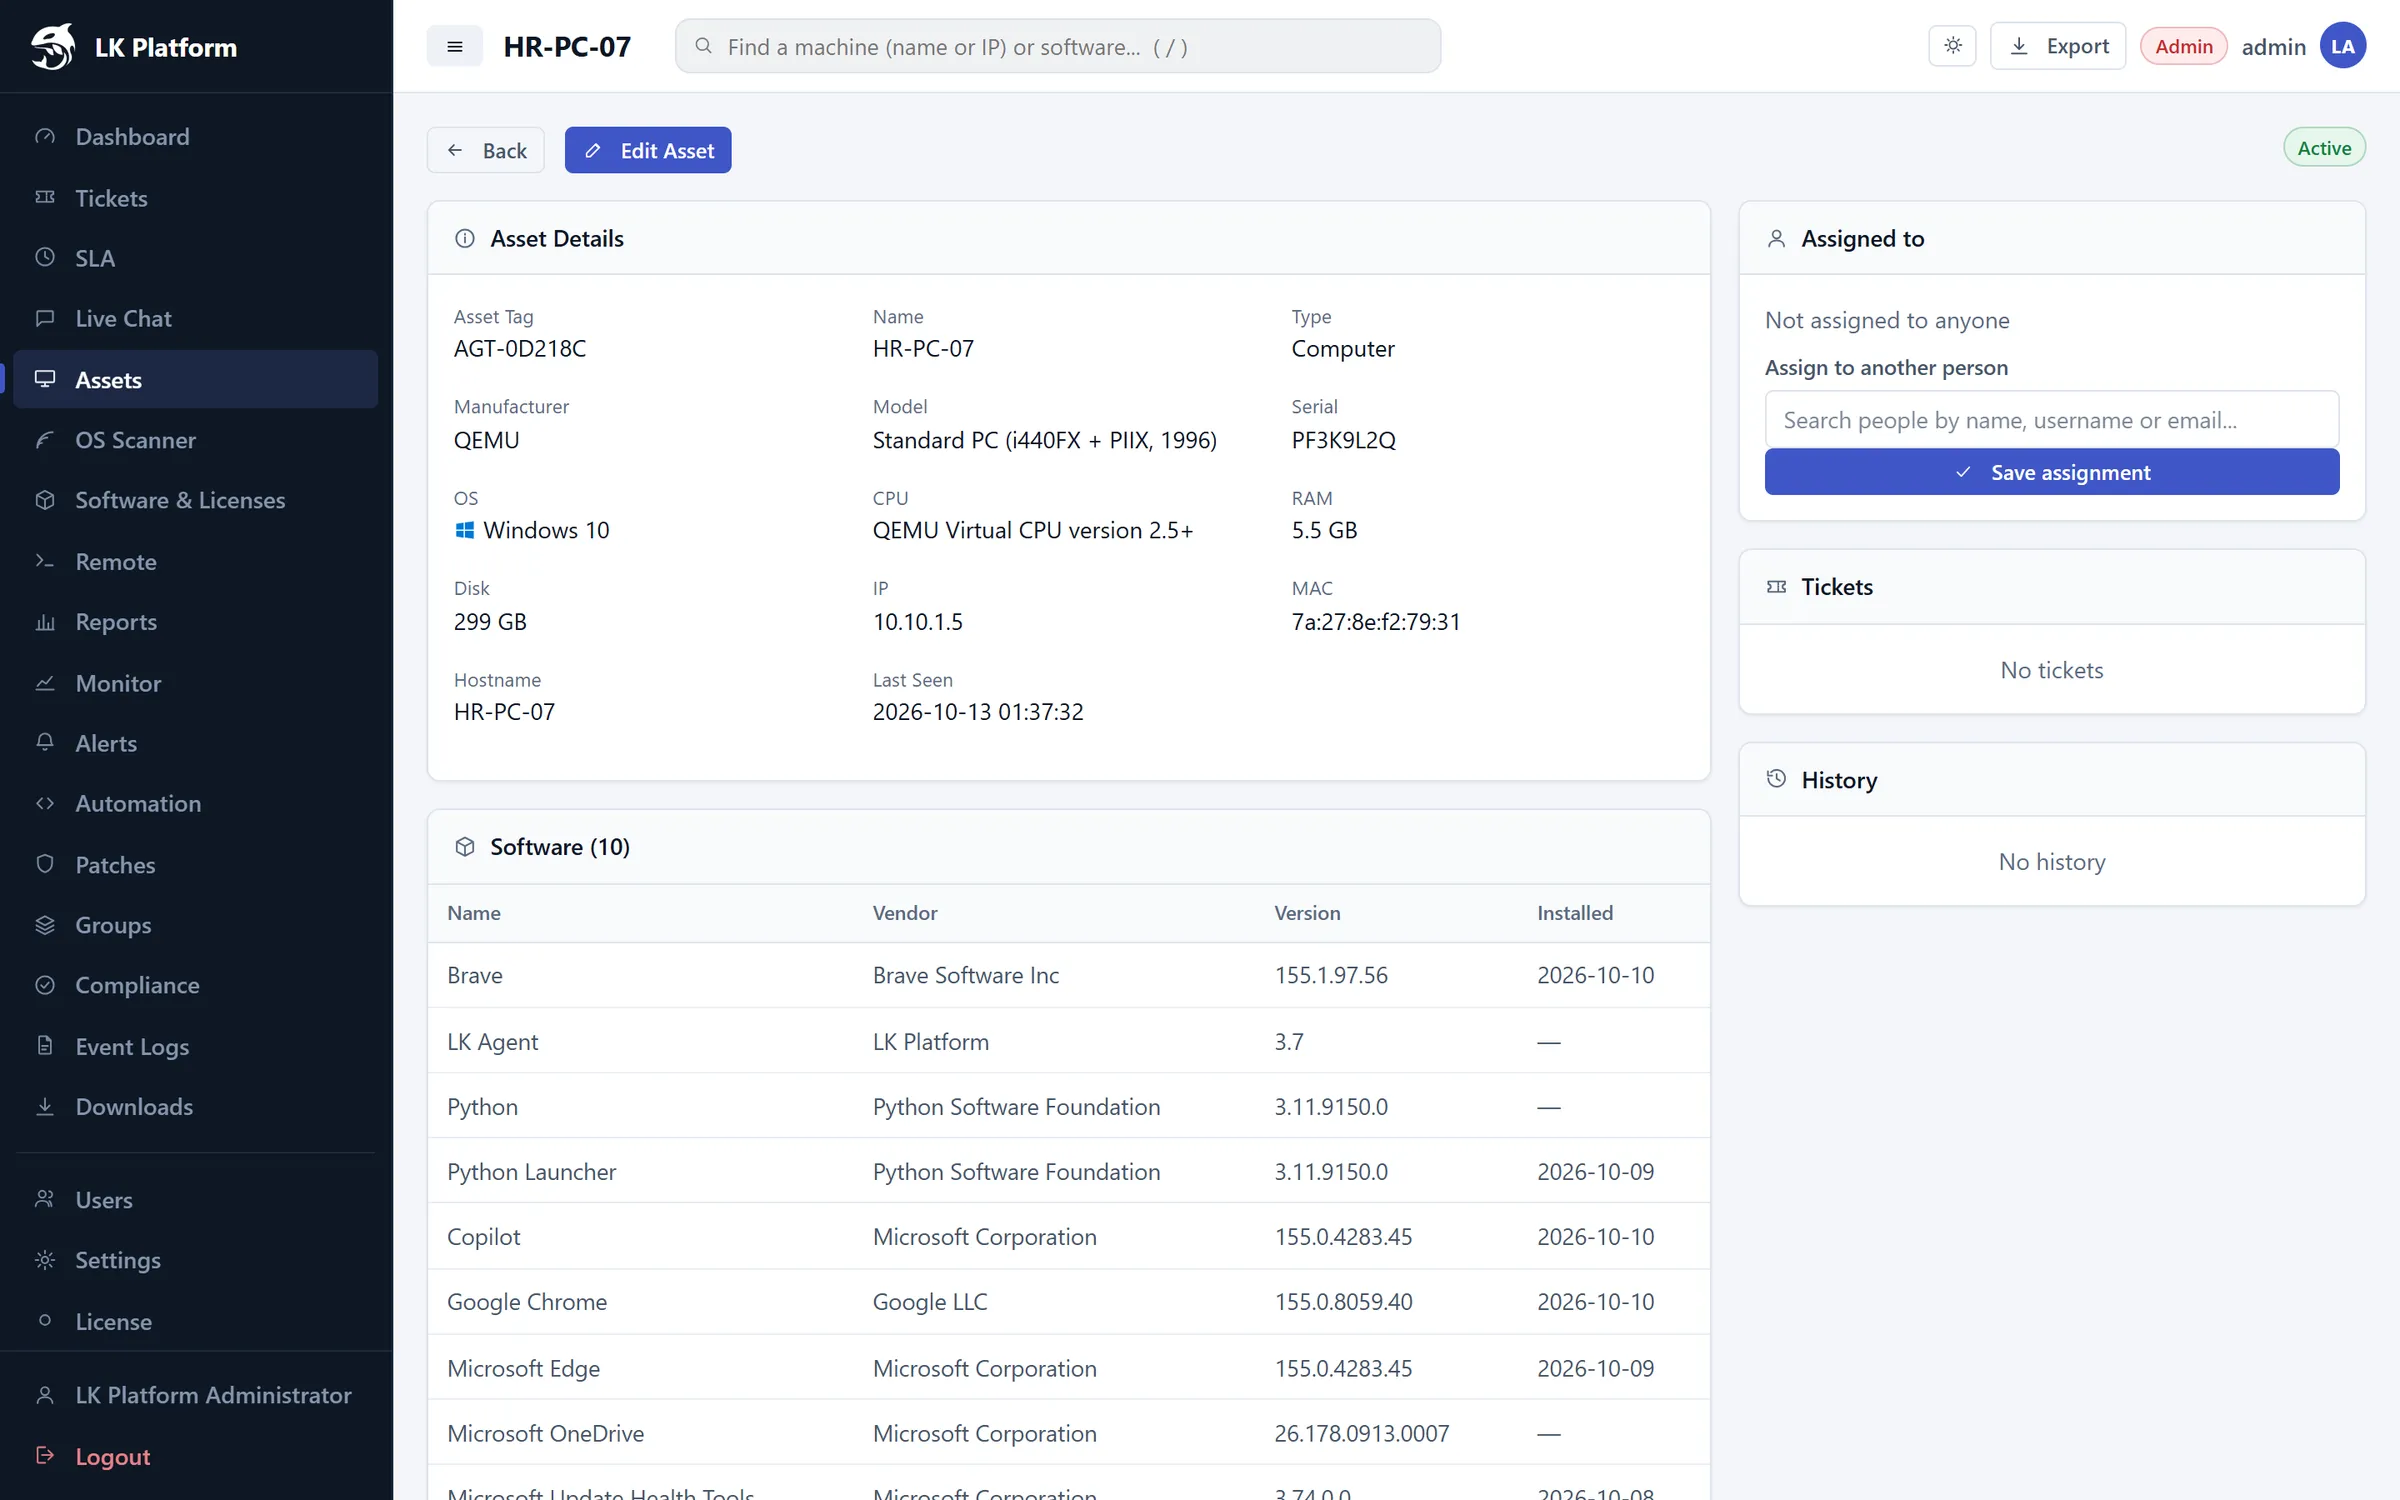
Asset details
The detail page shows hardware (manufacturer, model, serial, CPU, RAM, disk, IP, MAC), the full software list, ownership & warranty, who it's assigned to, related tickets and history.
Asset Details
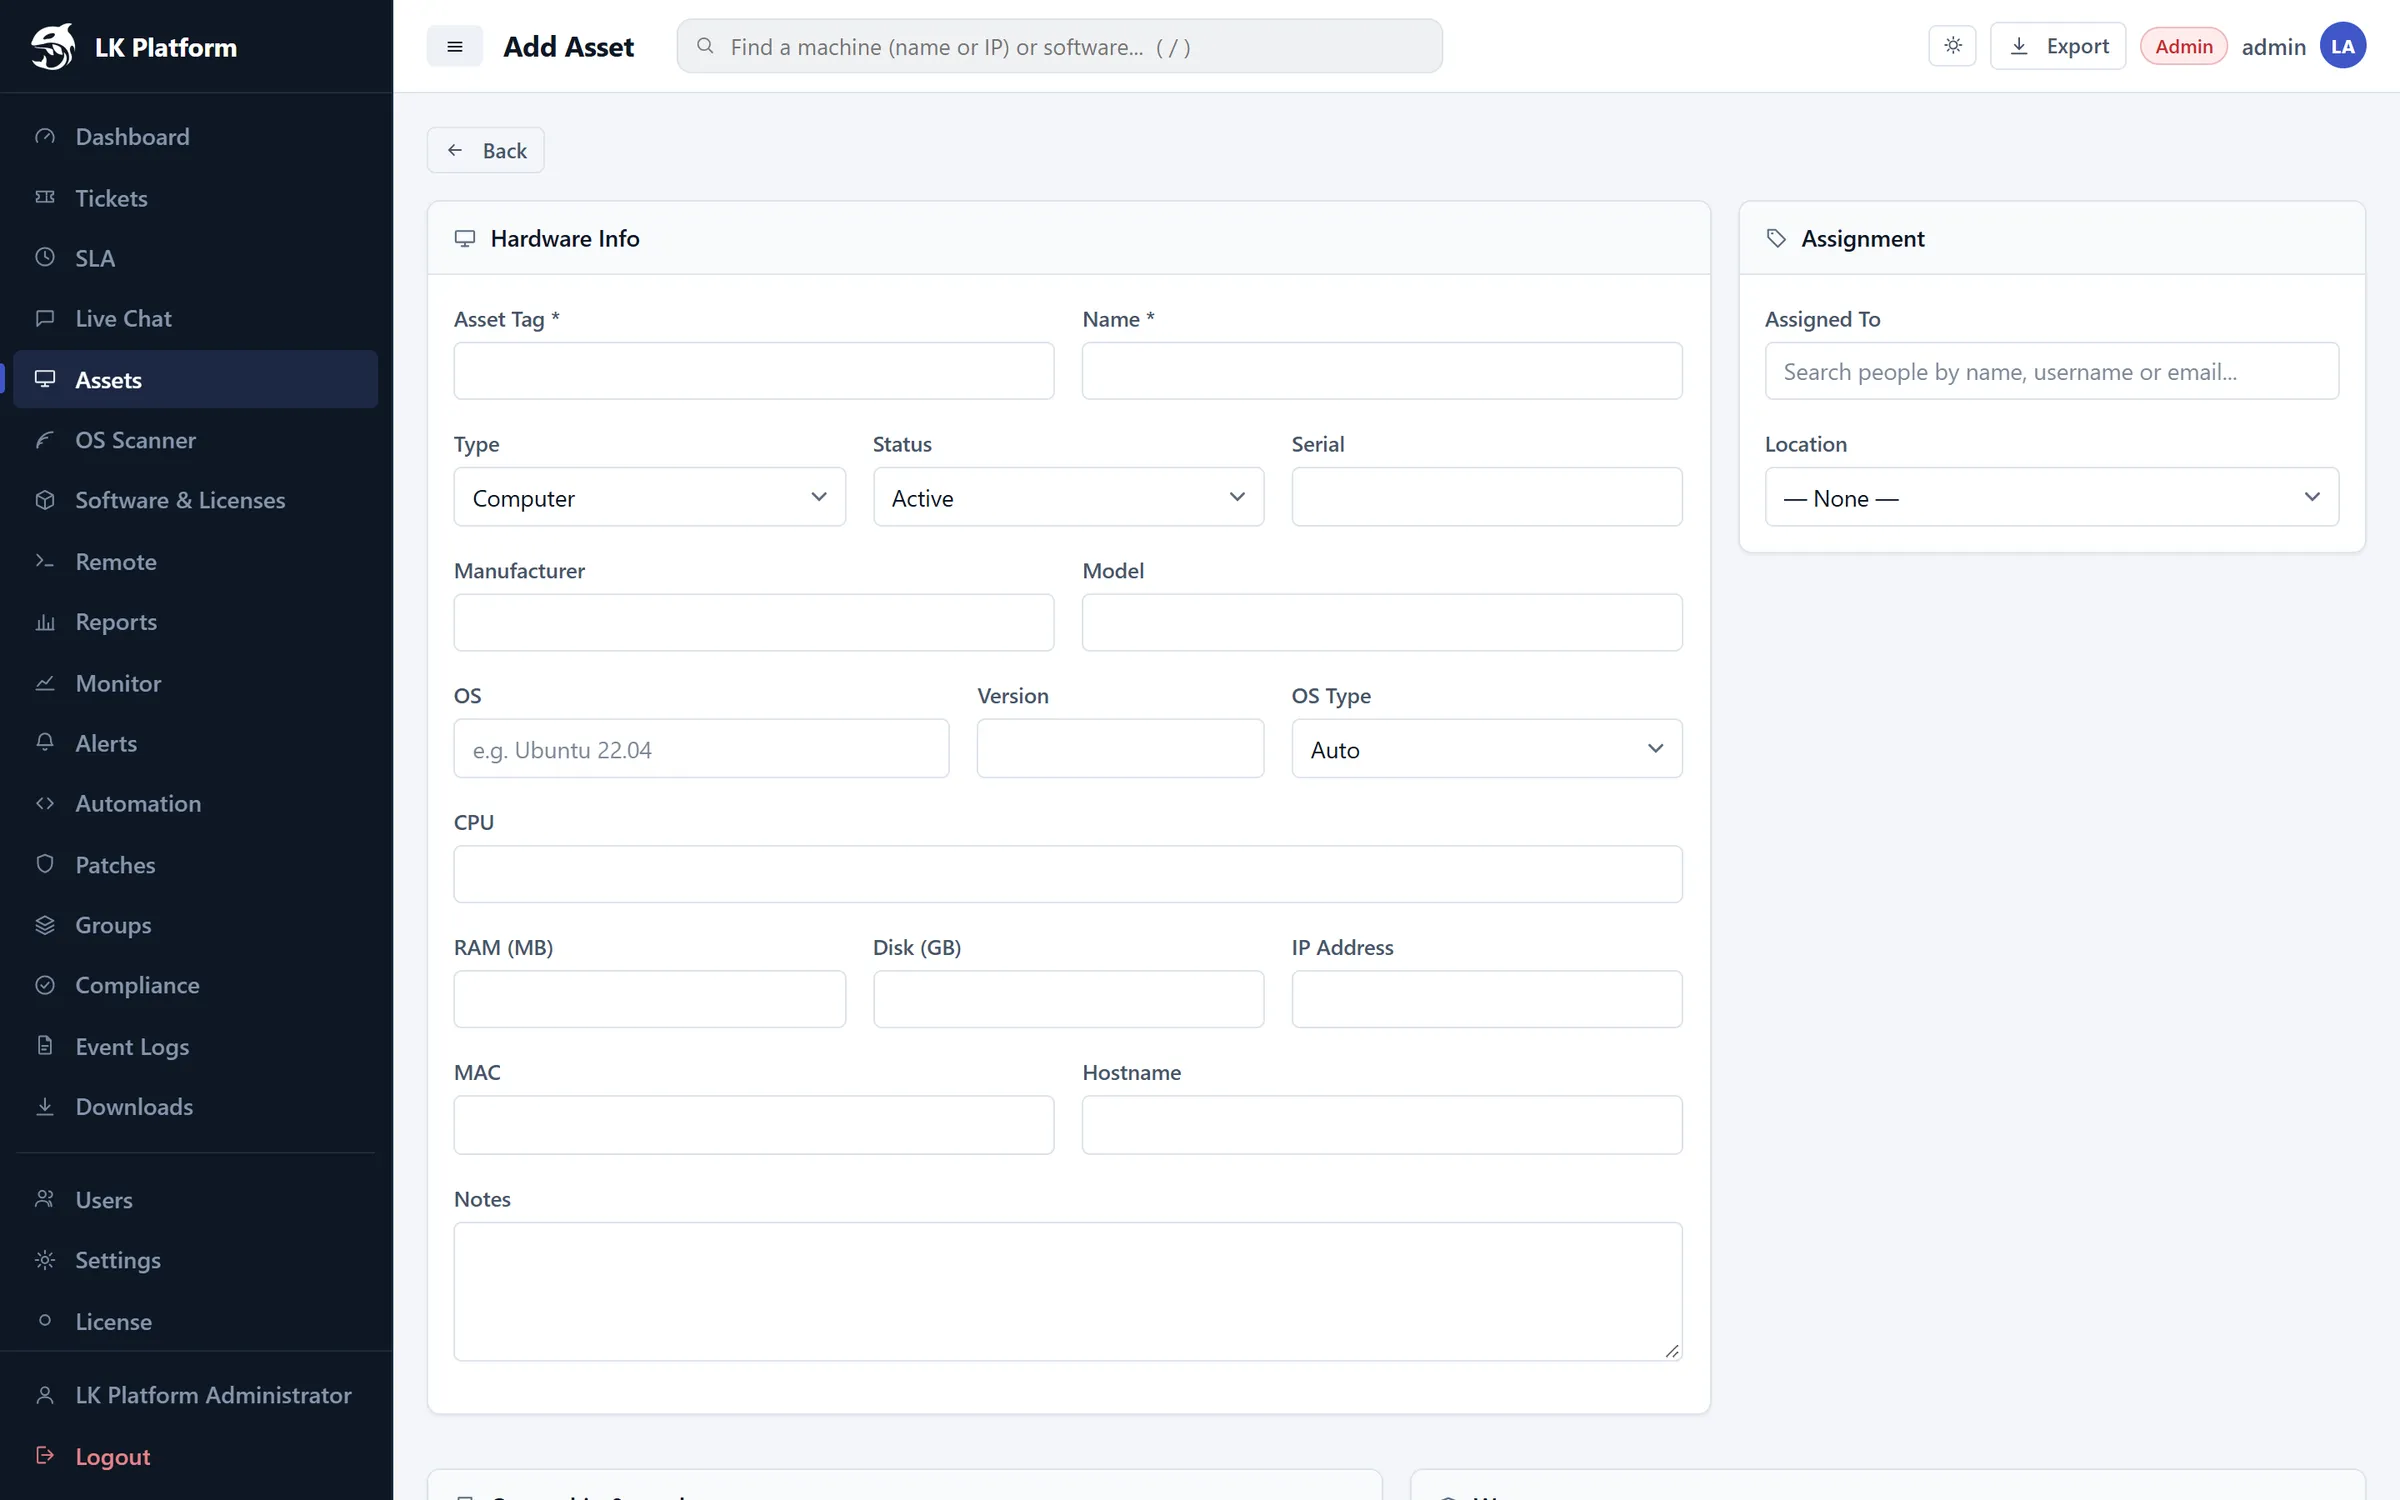
Adding or editing an asset
Click Add Asset (or Edit Asset on an existing one).
Fill in Hardware Info: Asset Tag and Name are required. Pick Type, Status and OS.
Under Assignment, choose the person and location (Main Office, Remote, Server Room, Warehouse).
Under Ownership & purchase, choose Company-owned or Rented / leased and enter vendor, date, cost, invoice and PO numbers.
Under Warranty, pick the cover type, provider, start/end dates and support contact.
Click Save Asset.
Add Asset
Tip: Fill in warranty end dates. The dashboard and reports will then warn you 60 days before a warranty or rental ends.
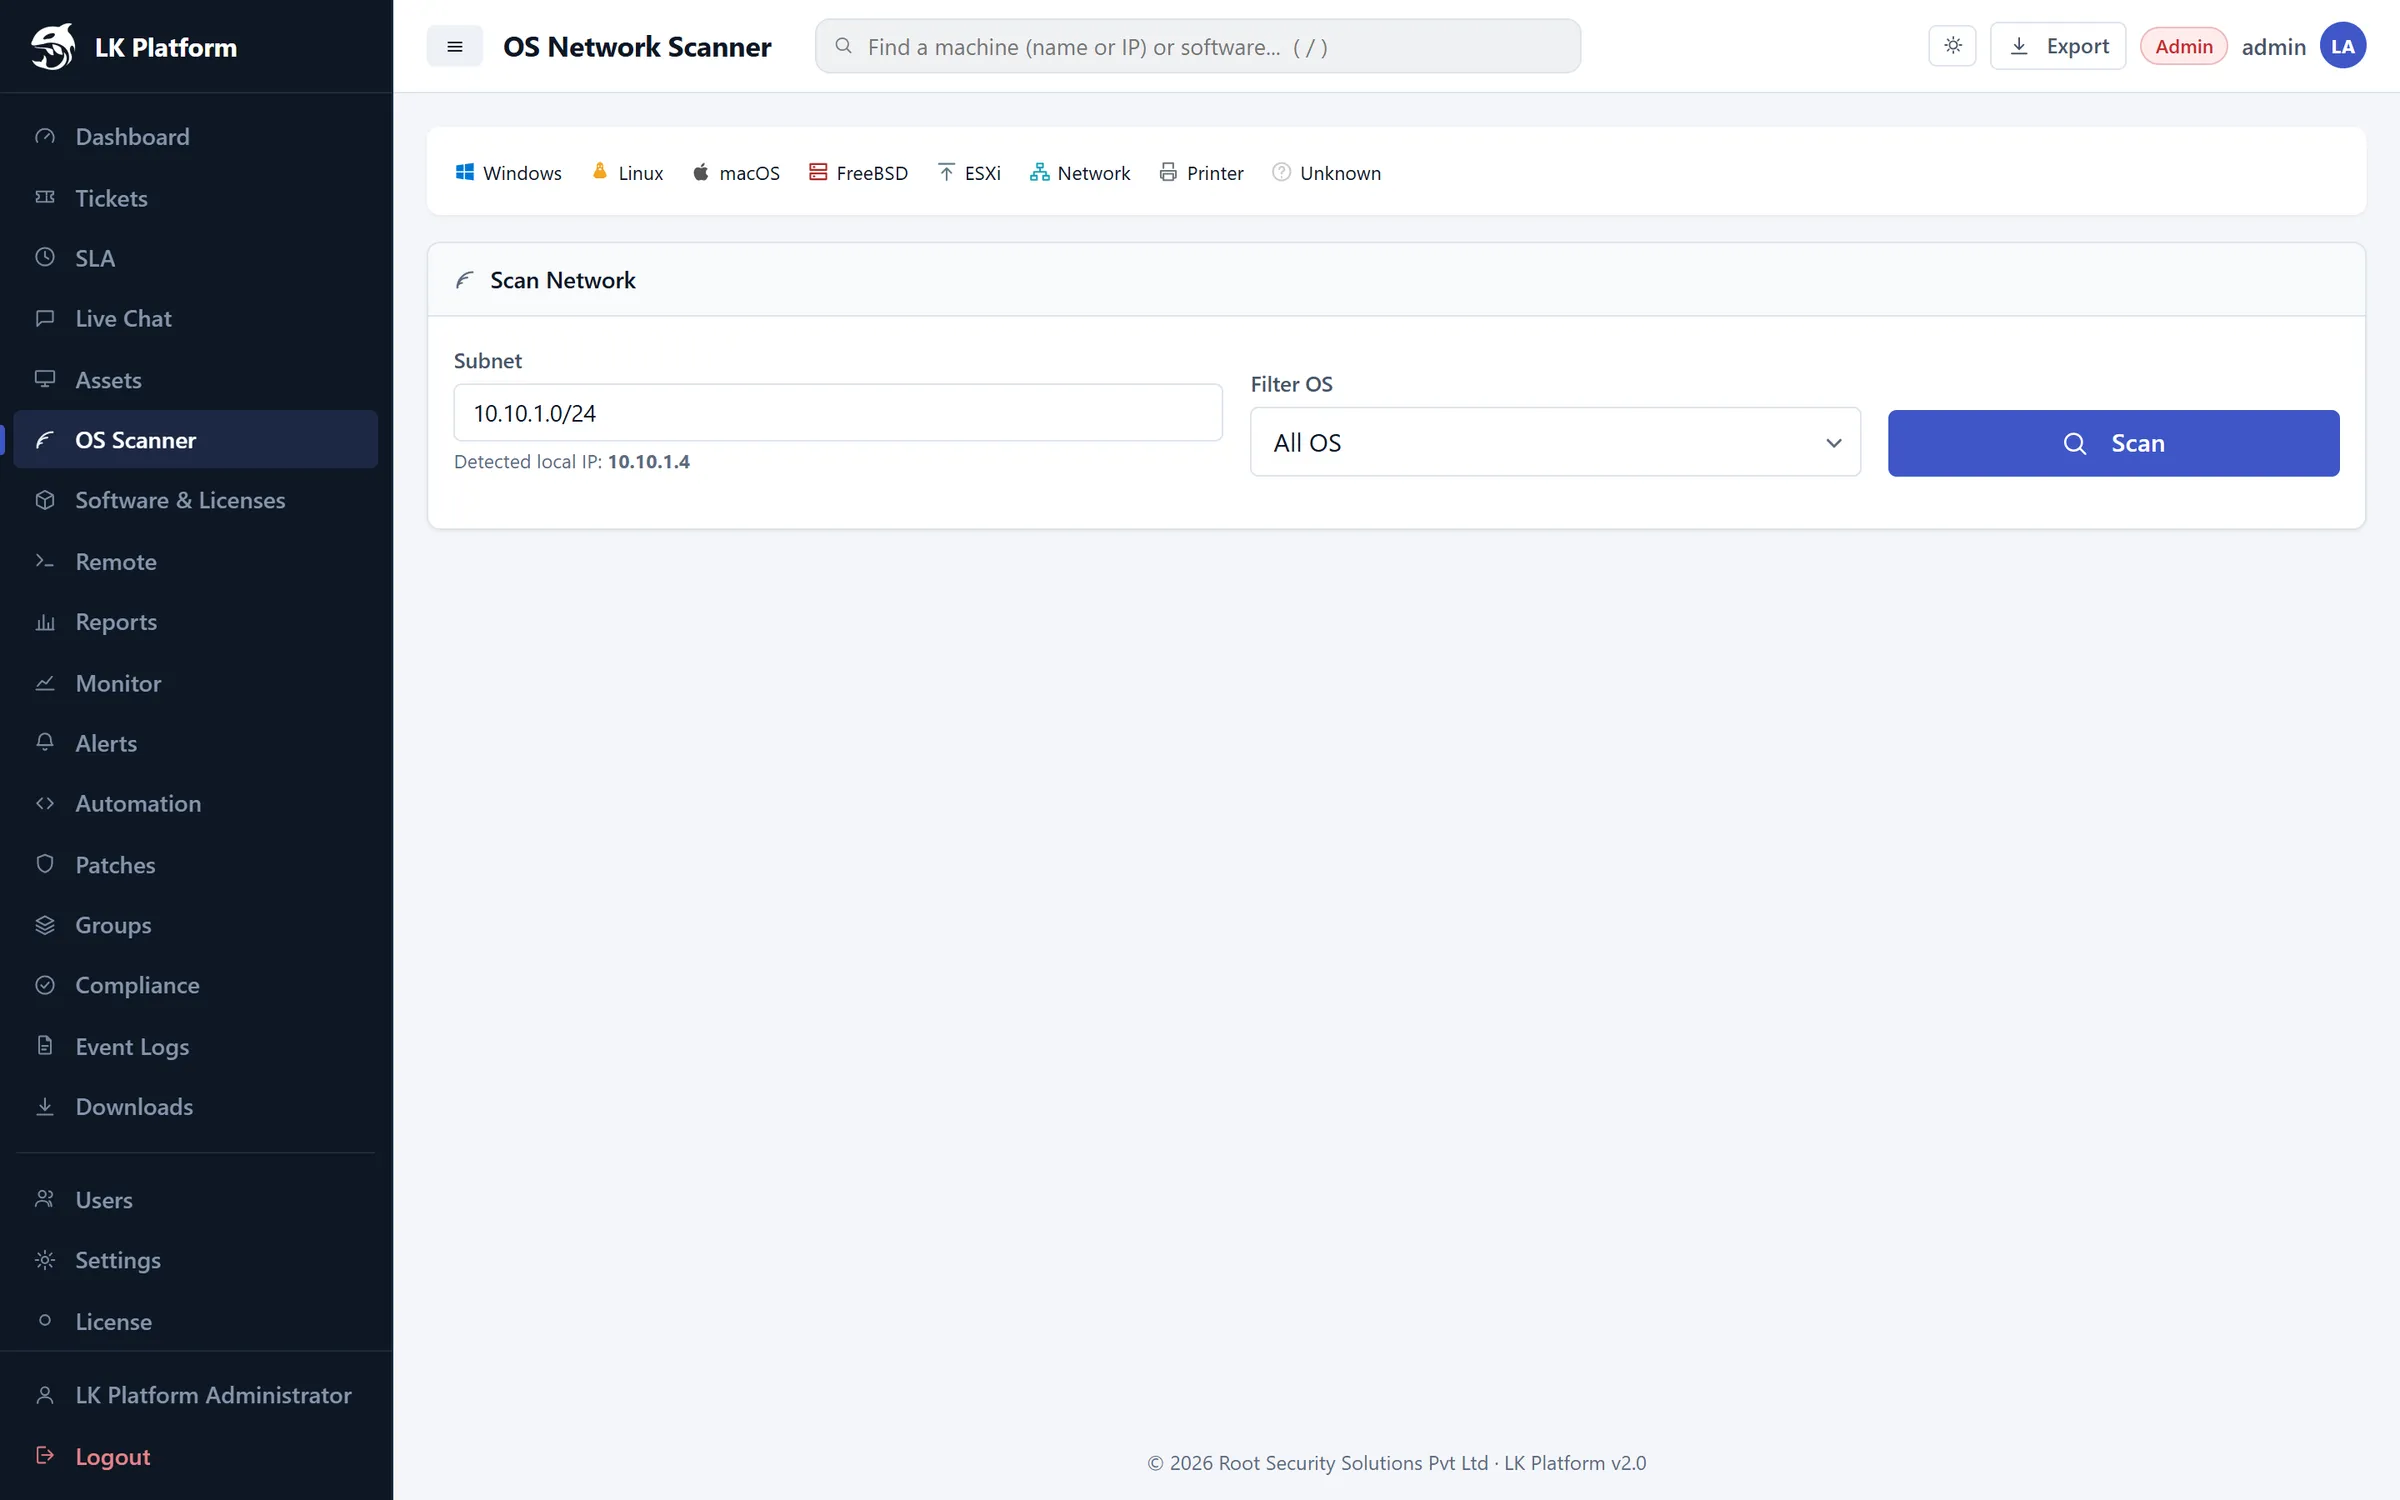
OS scanner
Discover devices on your network, including ones without an agent.
Open OS Scanner. Your server's local IP is detected automatically.
Enter the Subnet to scan (e.g. 10.10.1.0/24) and optionally filter by OS.
Click Scan. Results are grouped as Windows, Linux, macOS, FreeBSD, ESXi, Network, Printer and Unknown.
OS Scanner
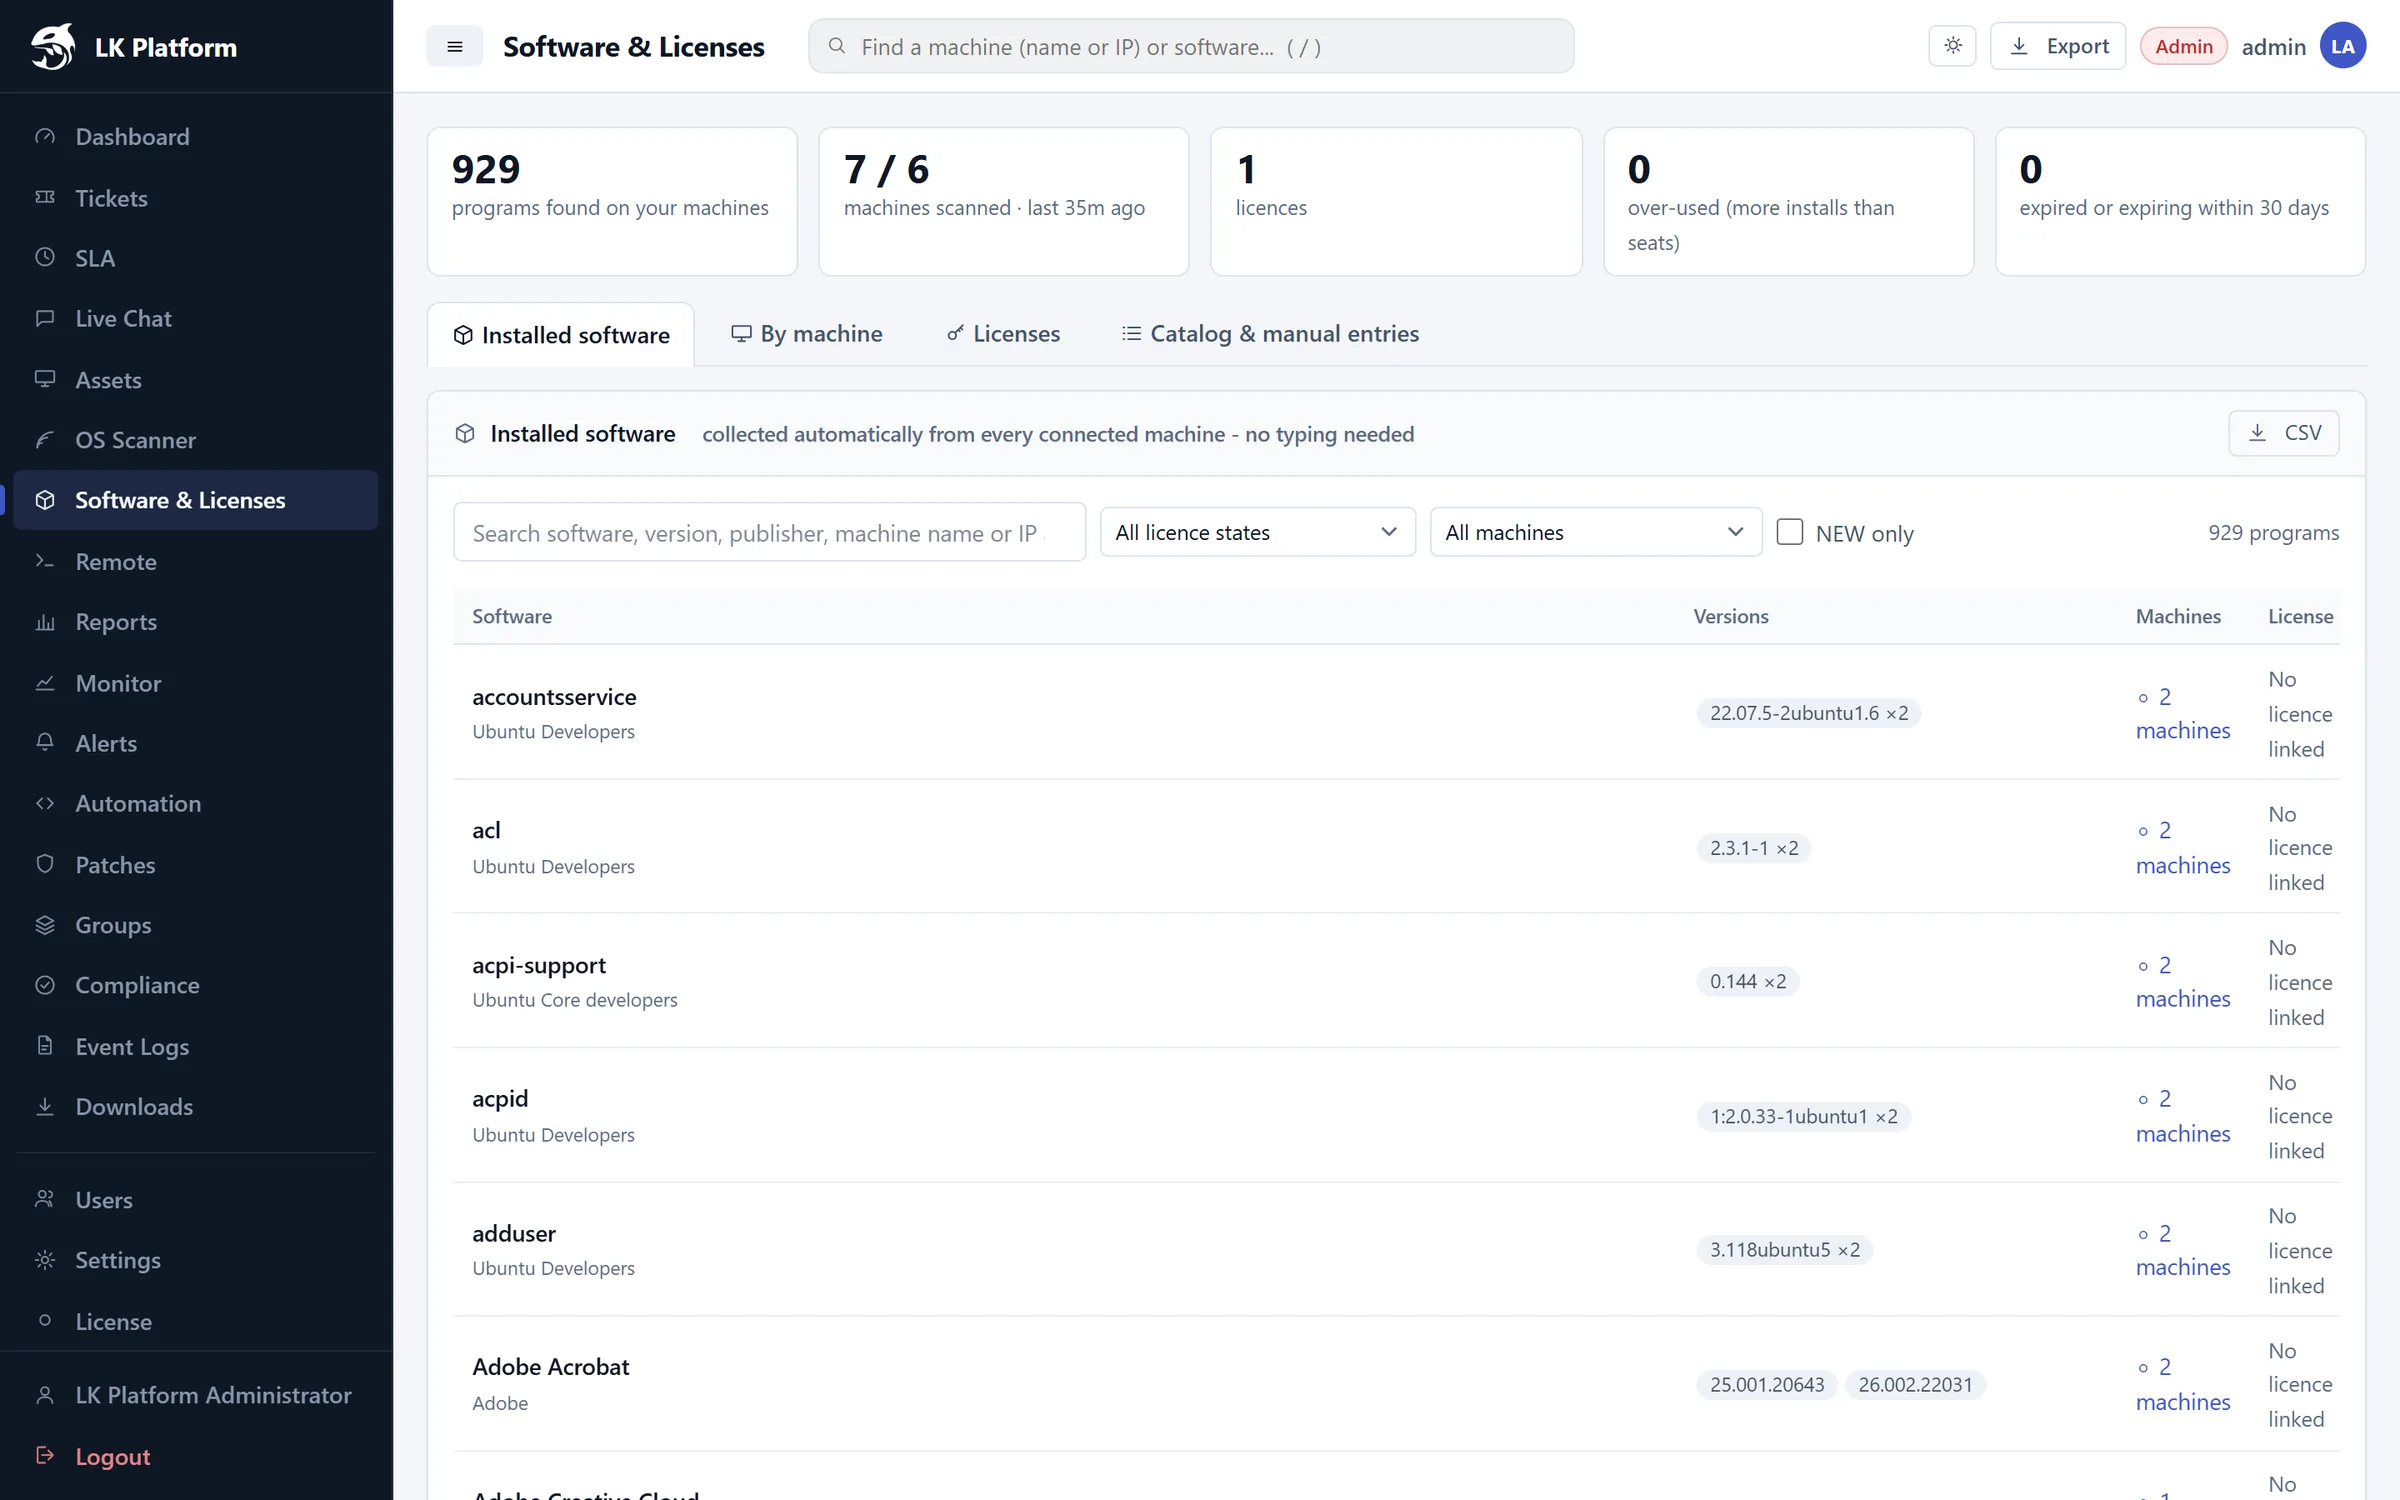
Software & licences
Every program on every agent machine is collected automatically. Tabs: Installed software, By machine, Licenses and Catalog & manual entries.
Software & Licenses
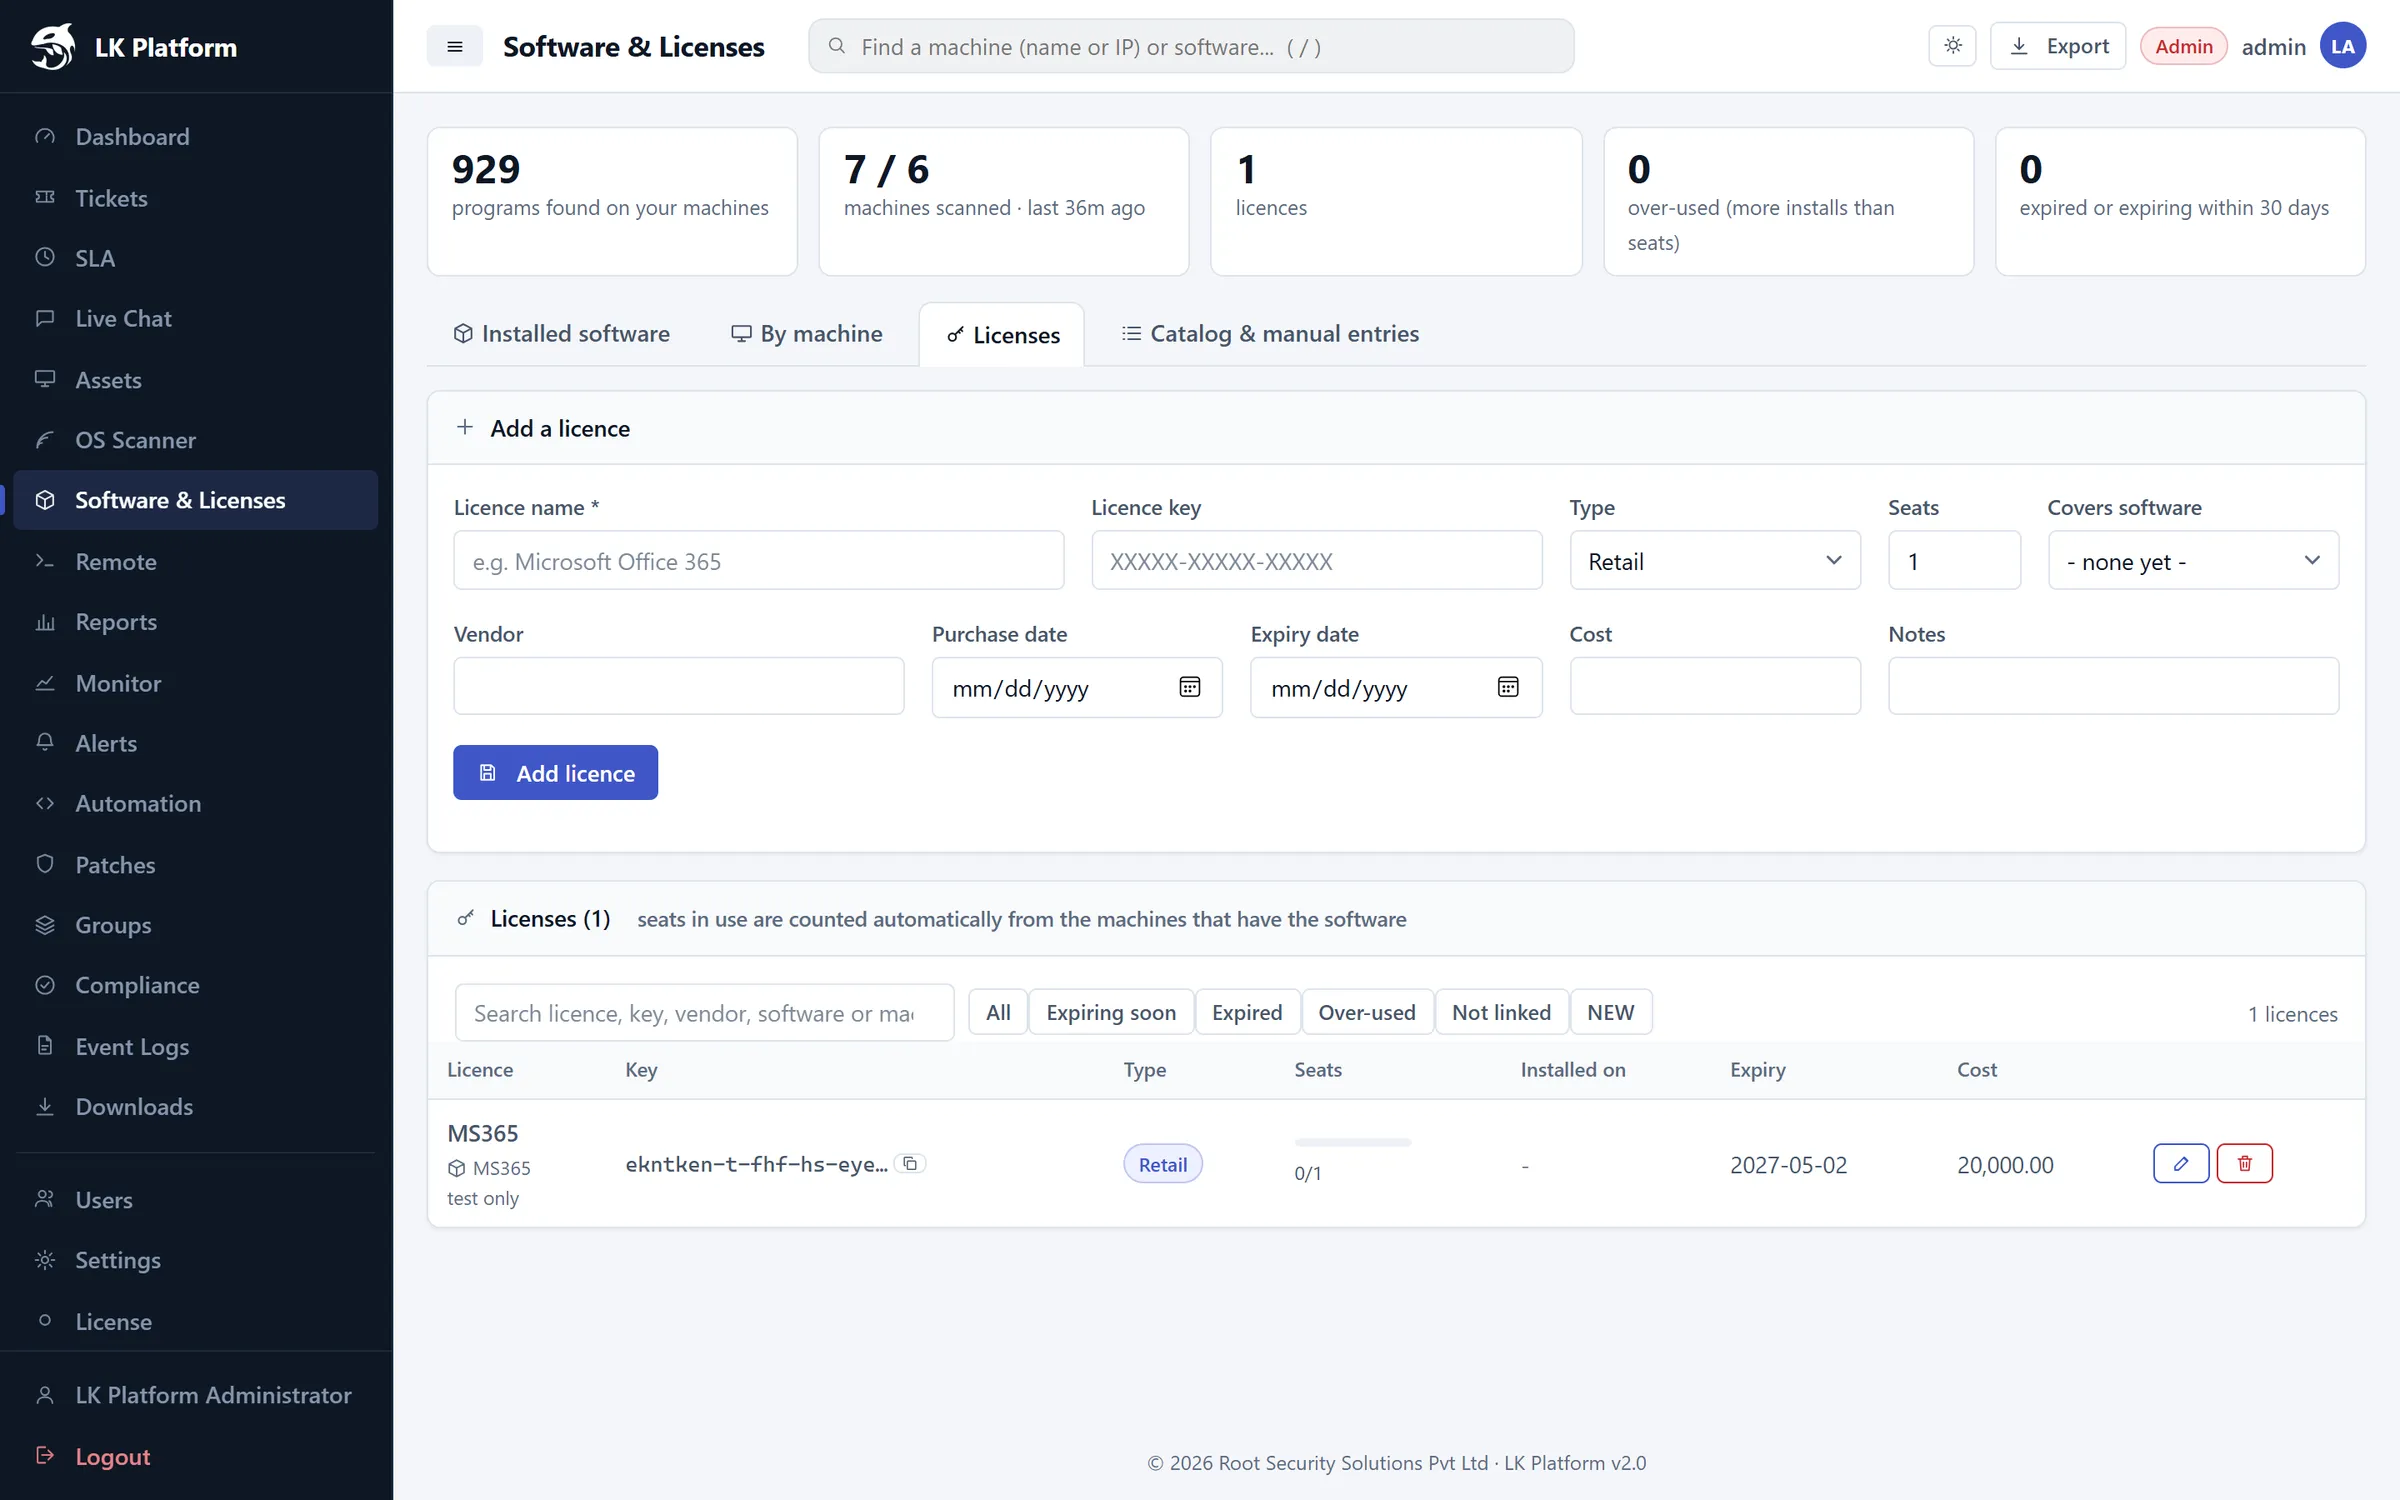
Adding a licence
Go to the Licenses tab.
Enter the Licence name, key, Type (Retail, OEM, Volume, Subscription, Free) and number of Seats.
Under Covers software, select the installed programs this licence covers, then save.
LK Platform then flags over-used licences (more installs than seats) and those expired or expiring within 30 days.
Licenses
Groups & tags
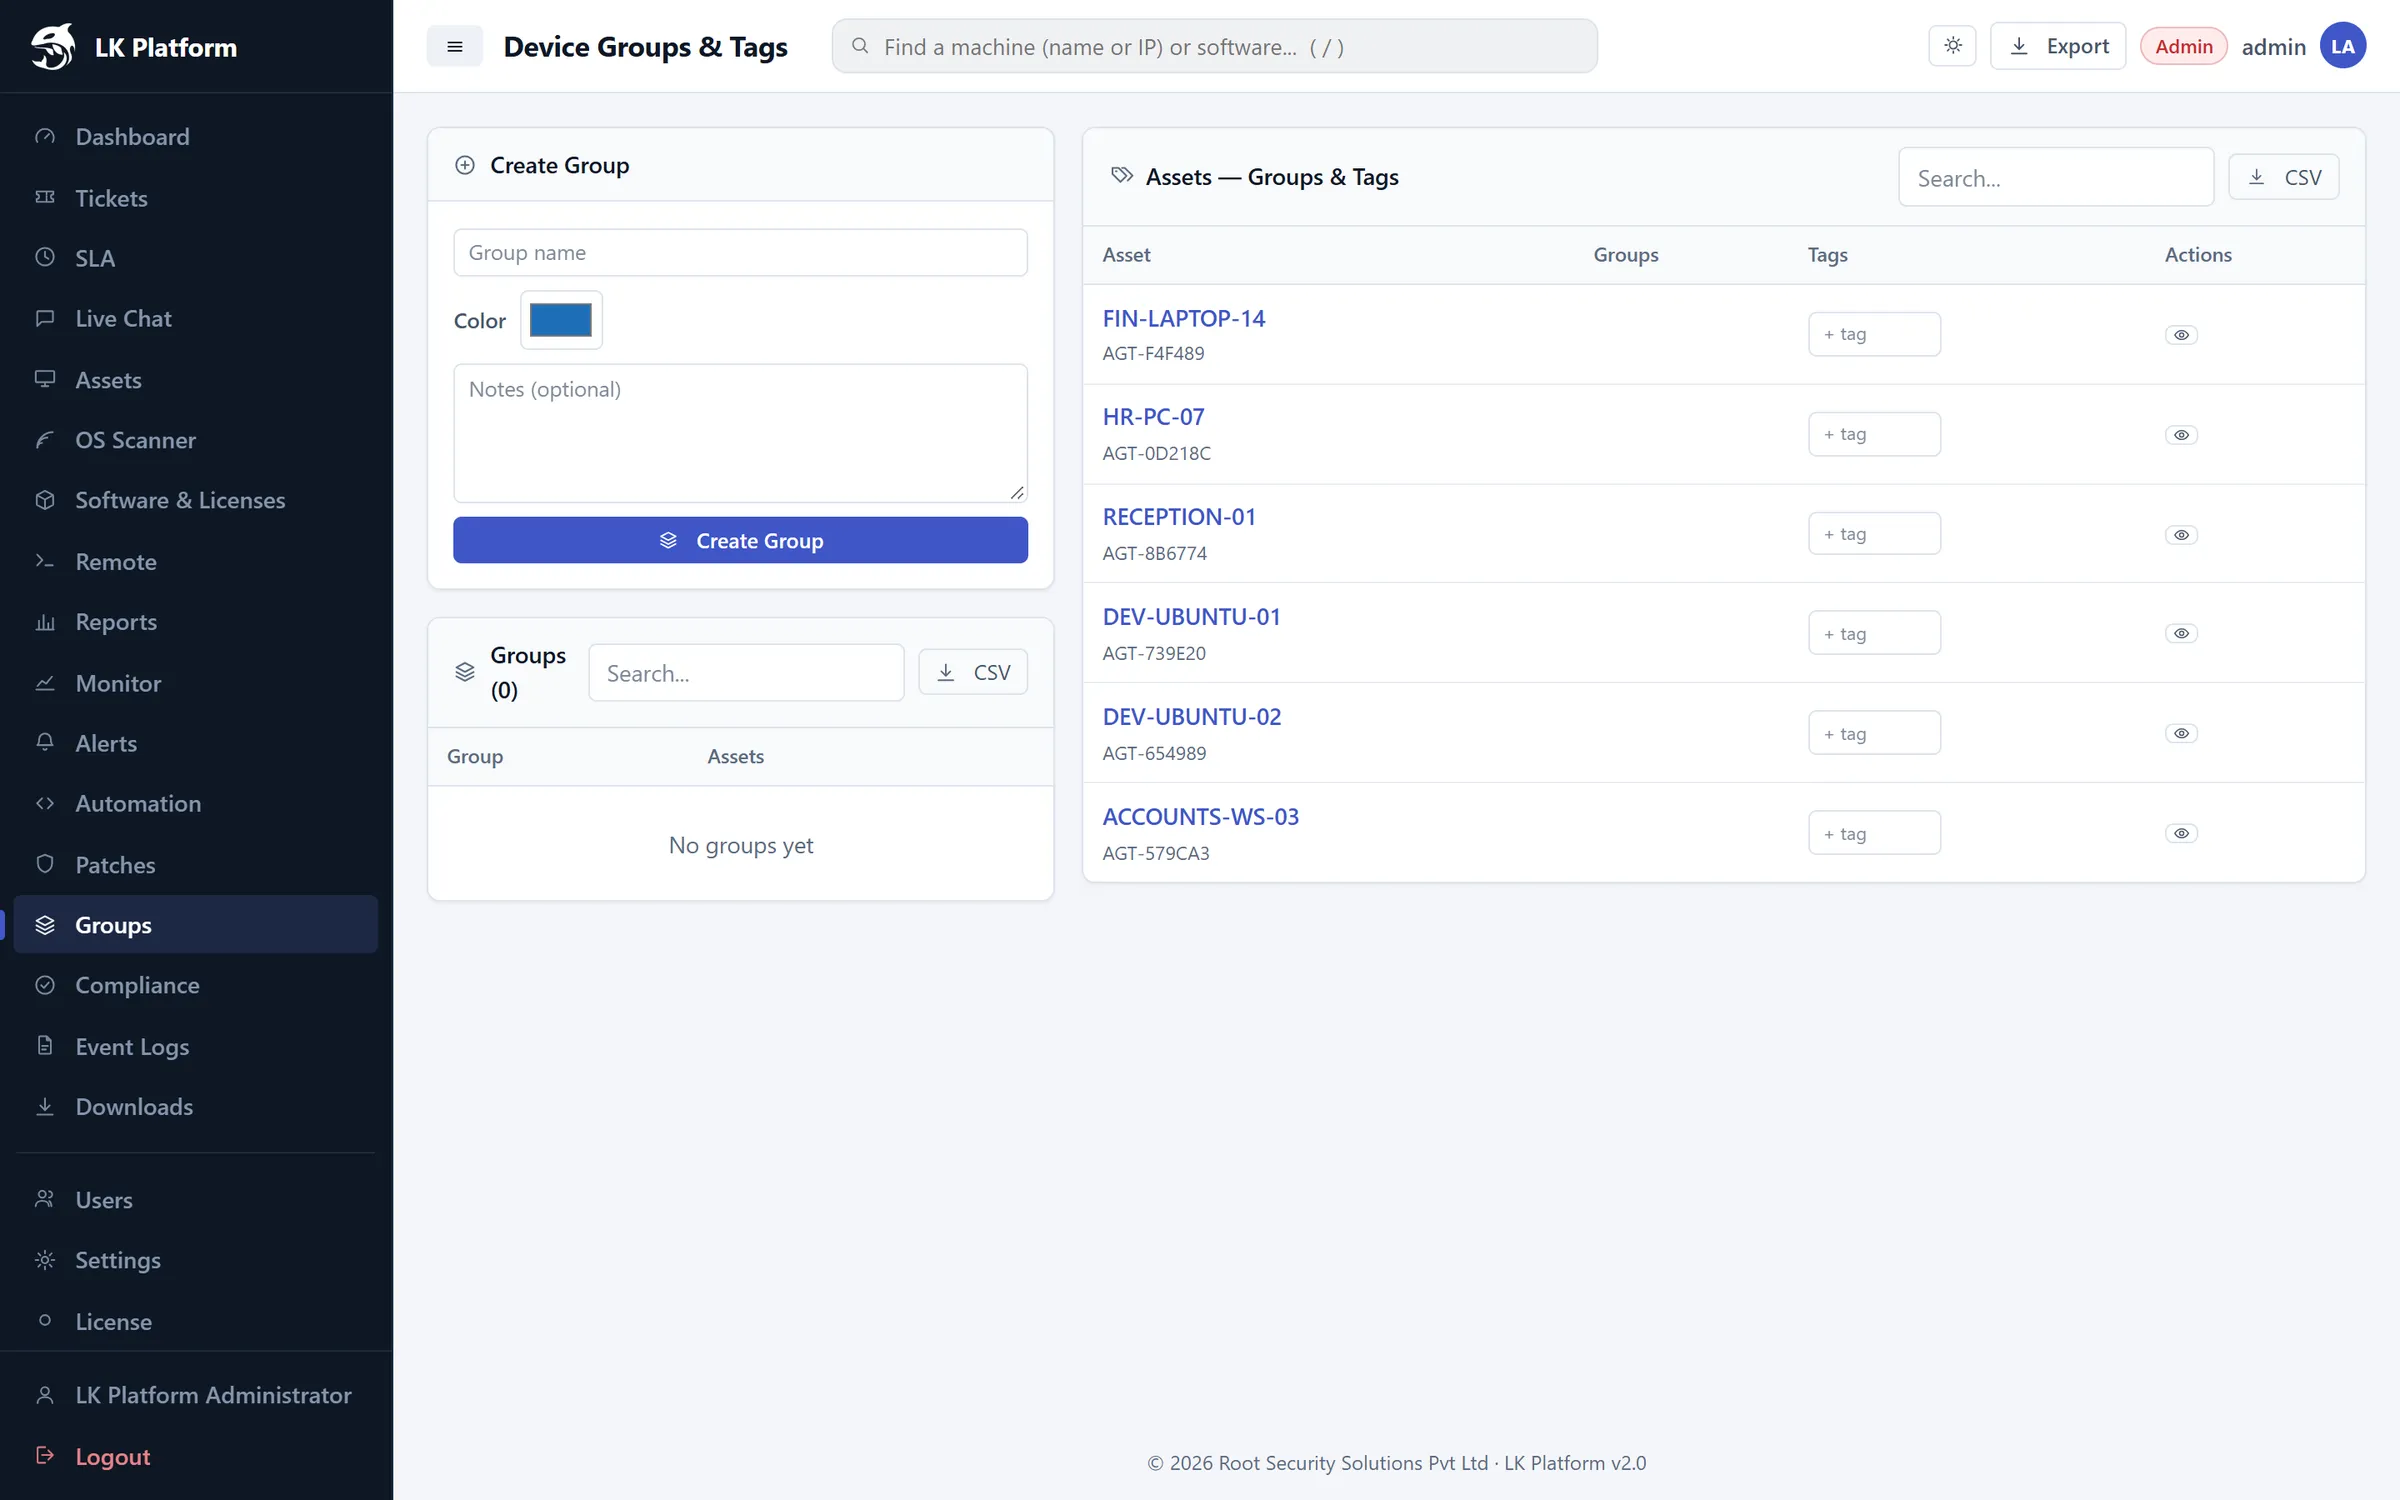
Open Groups, enter a name, pick a Color and click Create Group.
In Assets — Groups & Tags, add each asset to one or more groups and give it free-text tags.
Use the groups in Automation to run a script on the whole group at once.
Groups
Remote access
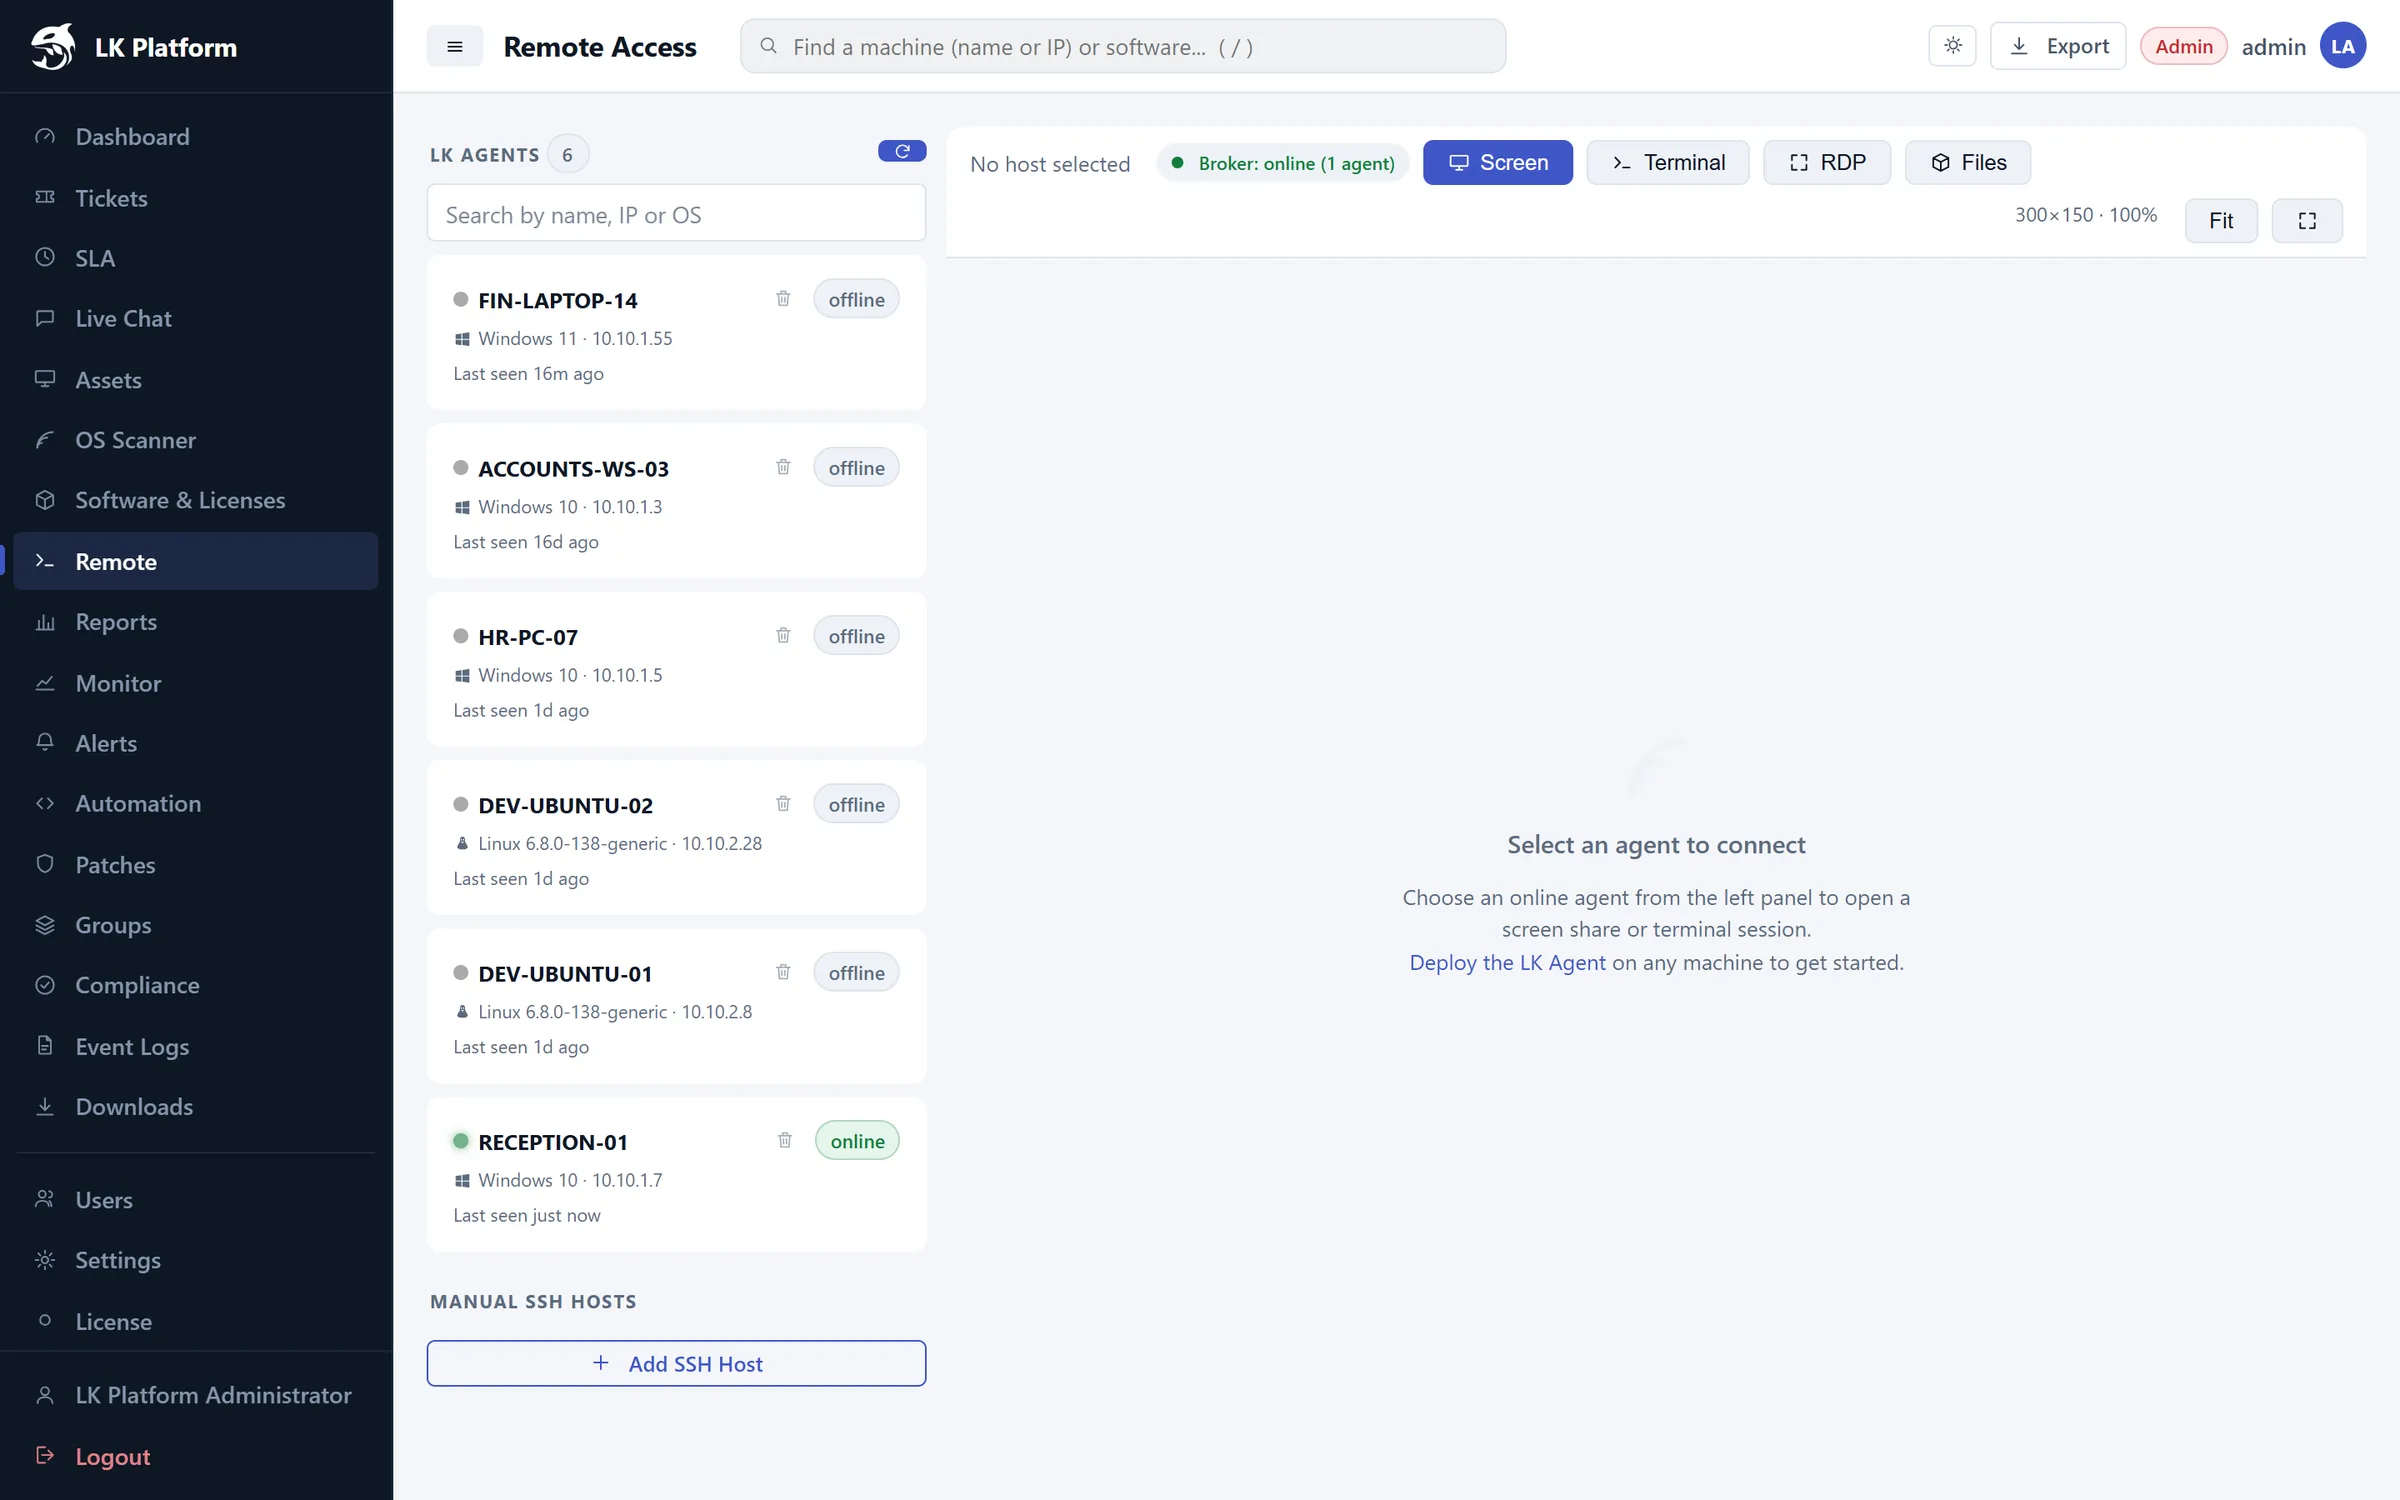
Connect to any online agent without a separate remote-desktop product.
Remote Access
12345
1
LK Agents: every machine with its OS, IP and last-seen time.
2
Search by name, IP or OS.
3
Online agents (green) can be connected to right away.
4
Mode: Screen, Terminal, RDP or Files.
5
Add SSH Host: connect to servers that don't run the agent.
Select an online agent on the left.
Choose Screen to view and control the desktop, Terminal for a command line, RDP for a Windows remote desktop, or Files to transfer files.
Use Fit to scale the screen to your window, or the full-screen button for more room.
Note: Screen sharing on Linux needs the Desktop/GUI agent. The server agent provides SSH terminal only.
Monitor & alerts
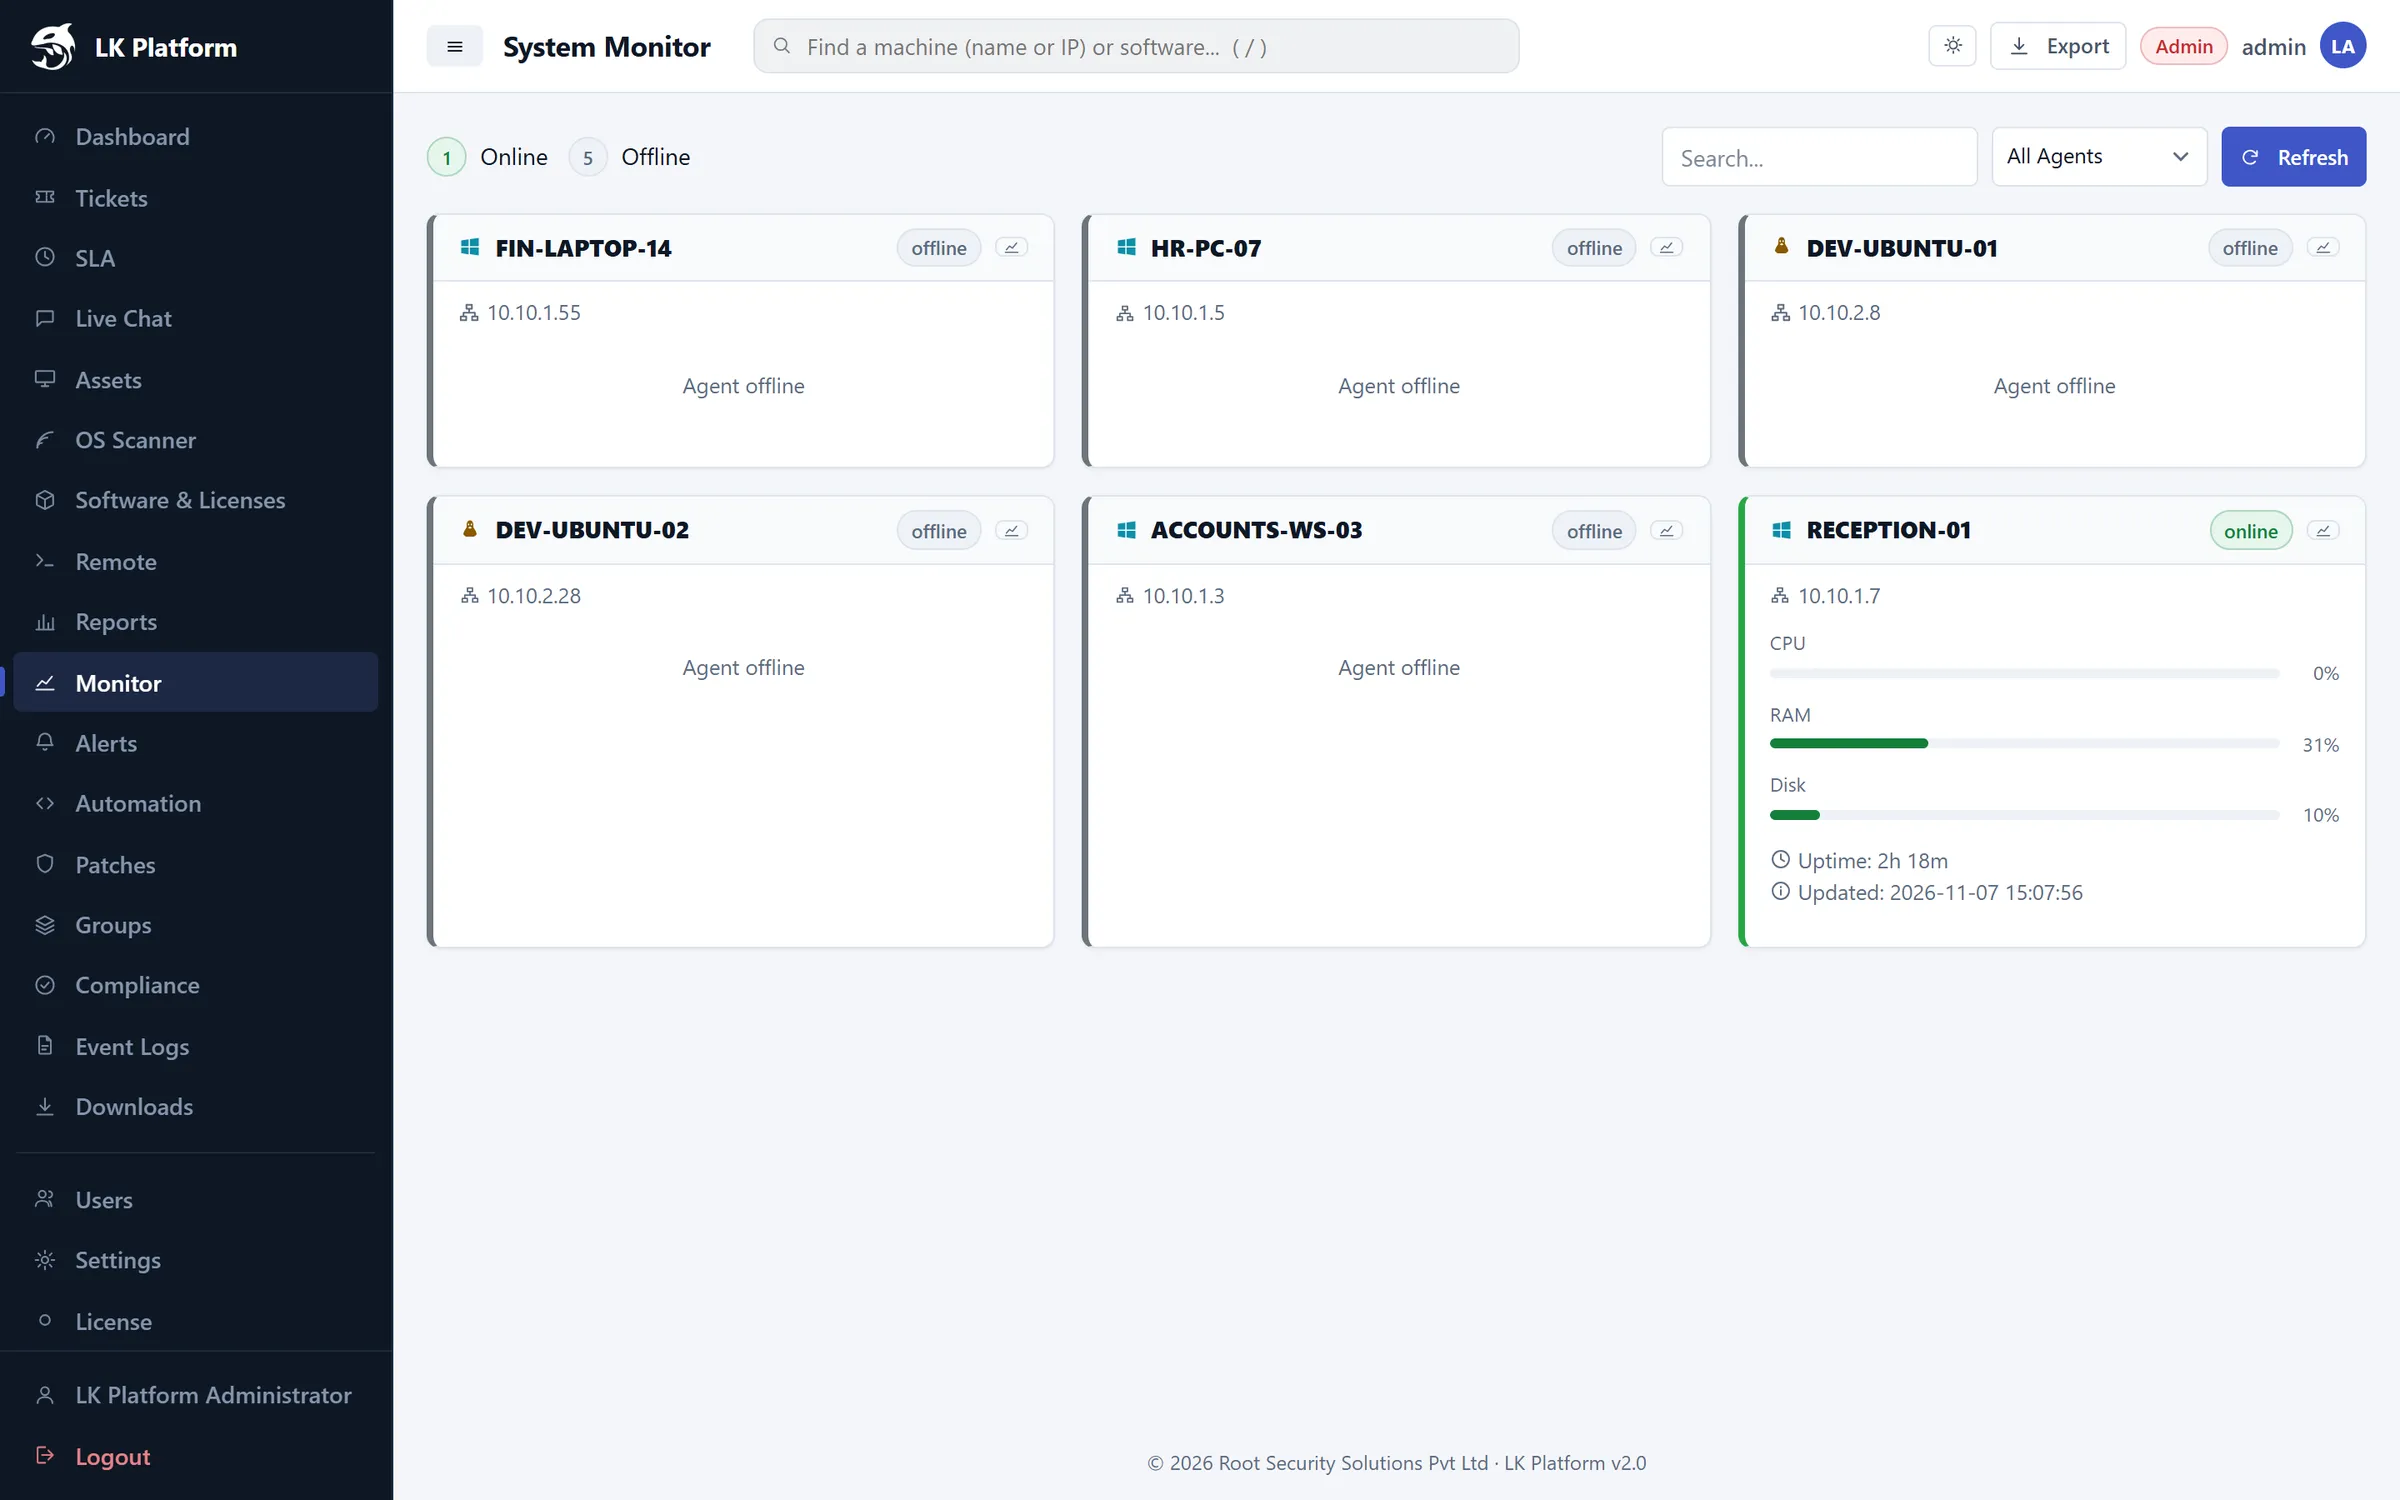
Monitor shows a live card for every machine with CPU, RAM, disk, uptime and last update. Filter by Online only / Offline only or search.
System Monitor
Creating an alert rule
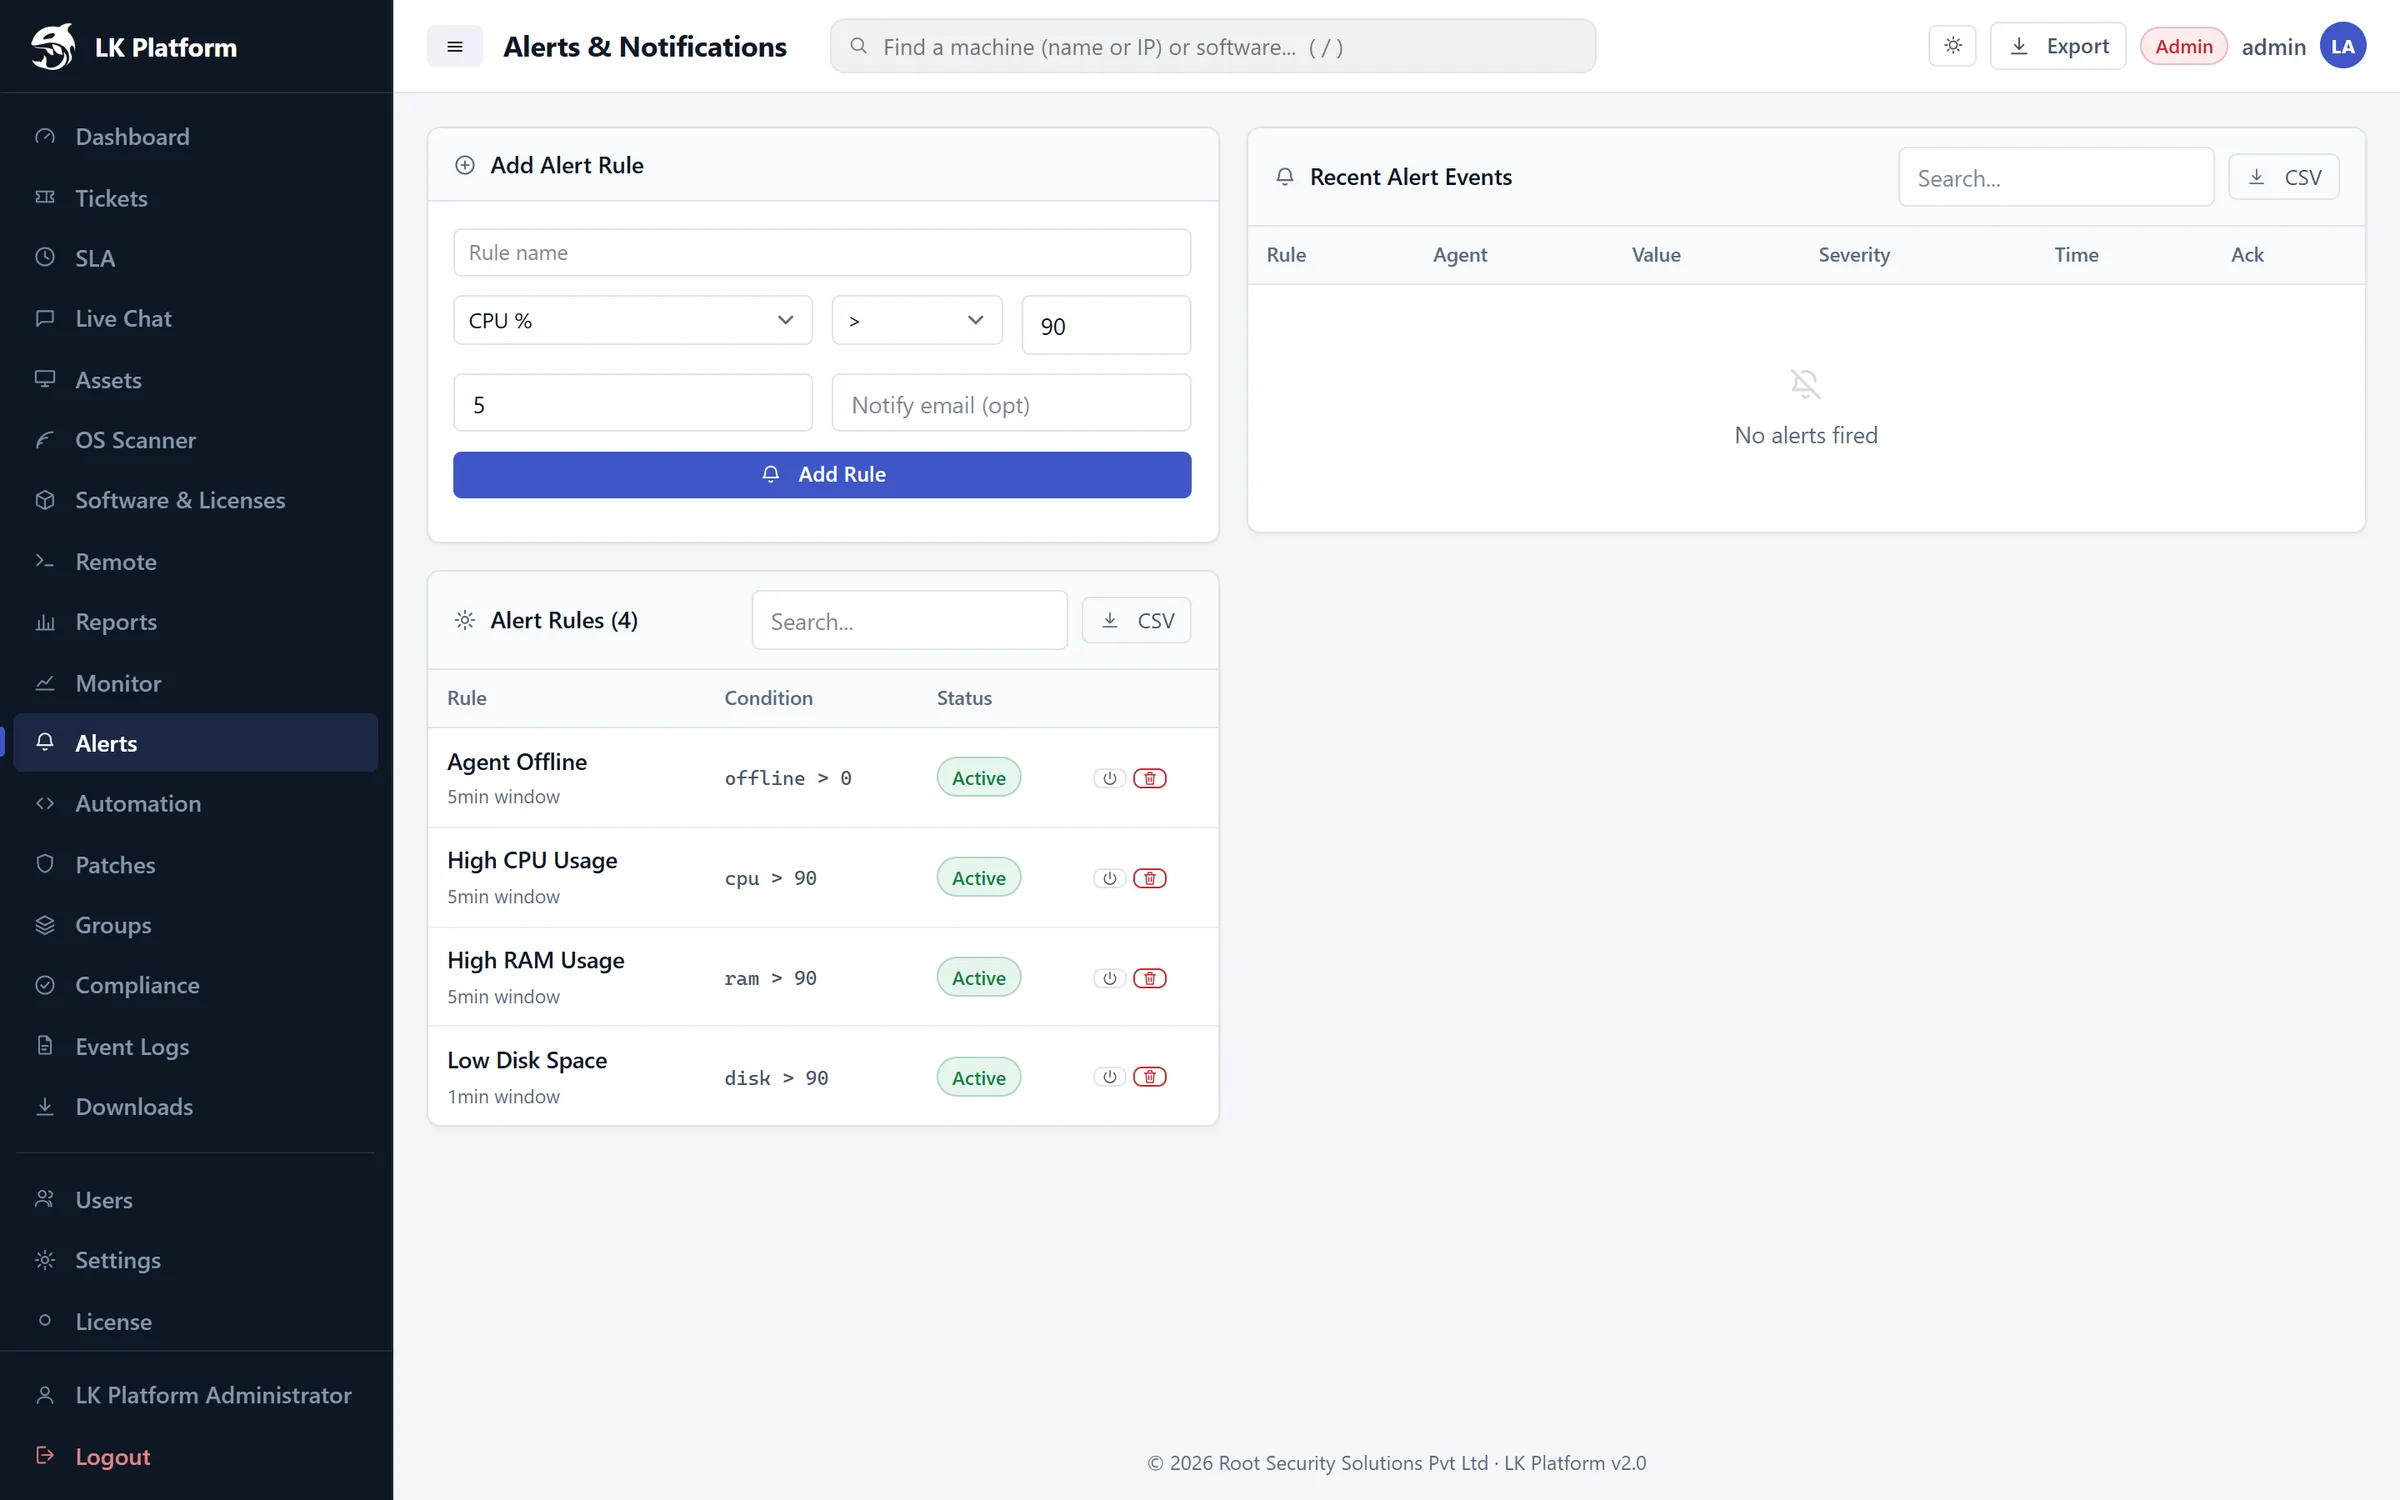
Open Alerts.
Under Add Alert Rule, choose a metric: CPU %, RAM %, Disk %, Agent Offline or Pending Patches.
Pick an operator (>, >=, <, <=), a threshold and a time window, then click Add Rule.
Fired alerts appear in Recent Alert Events. Acknowledge them once handled.
Alerts
Built-in rules: Agent Offline, High CPU (> 90%), High RAM (> 90%) and Low Disk Space (> 90% used) are active out of the box.
Event logs
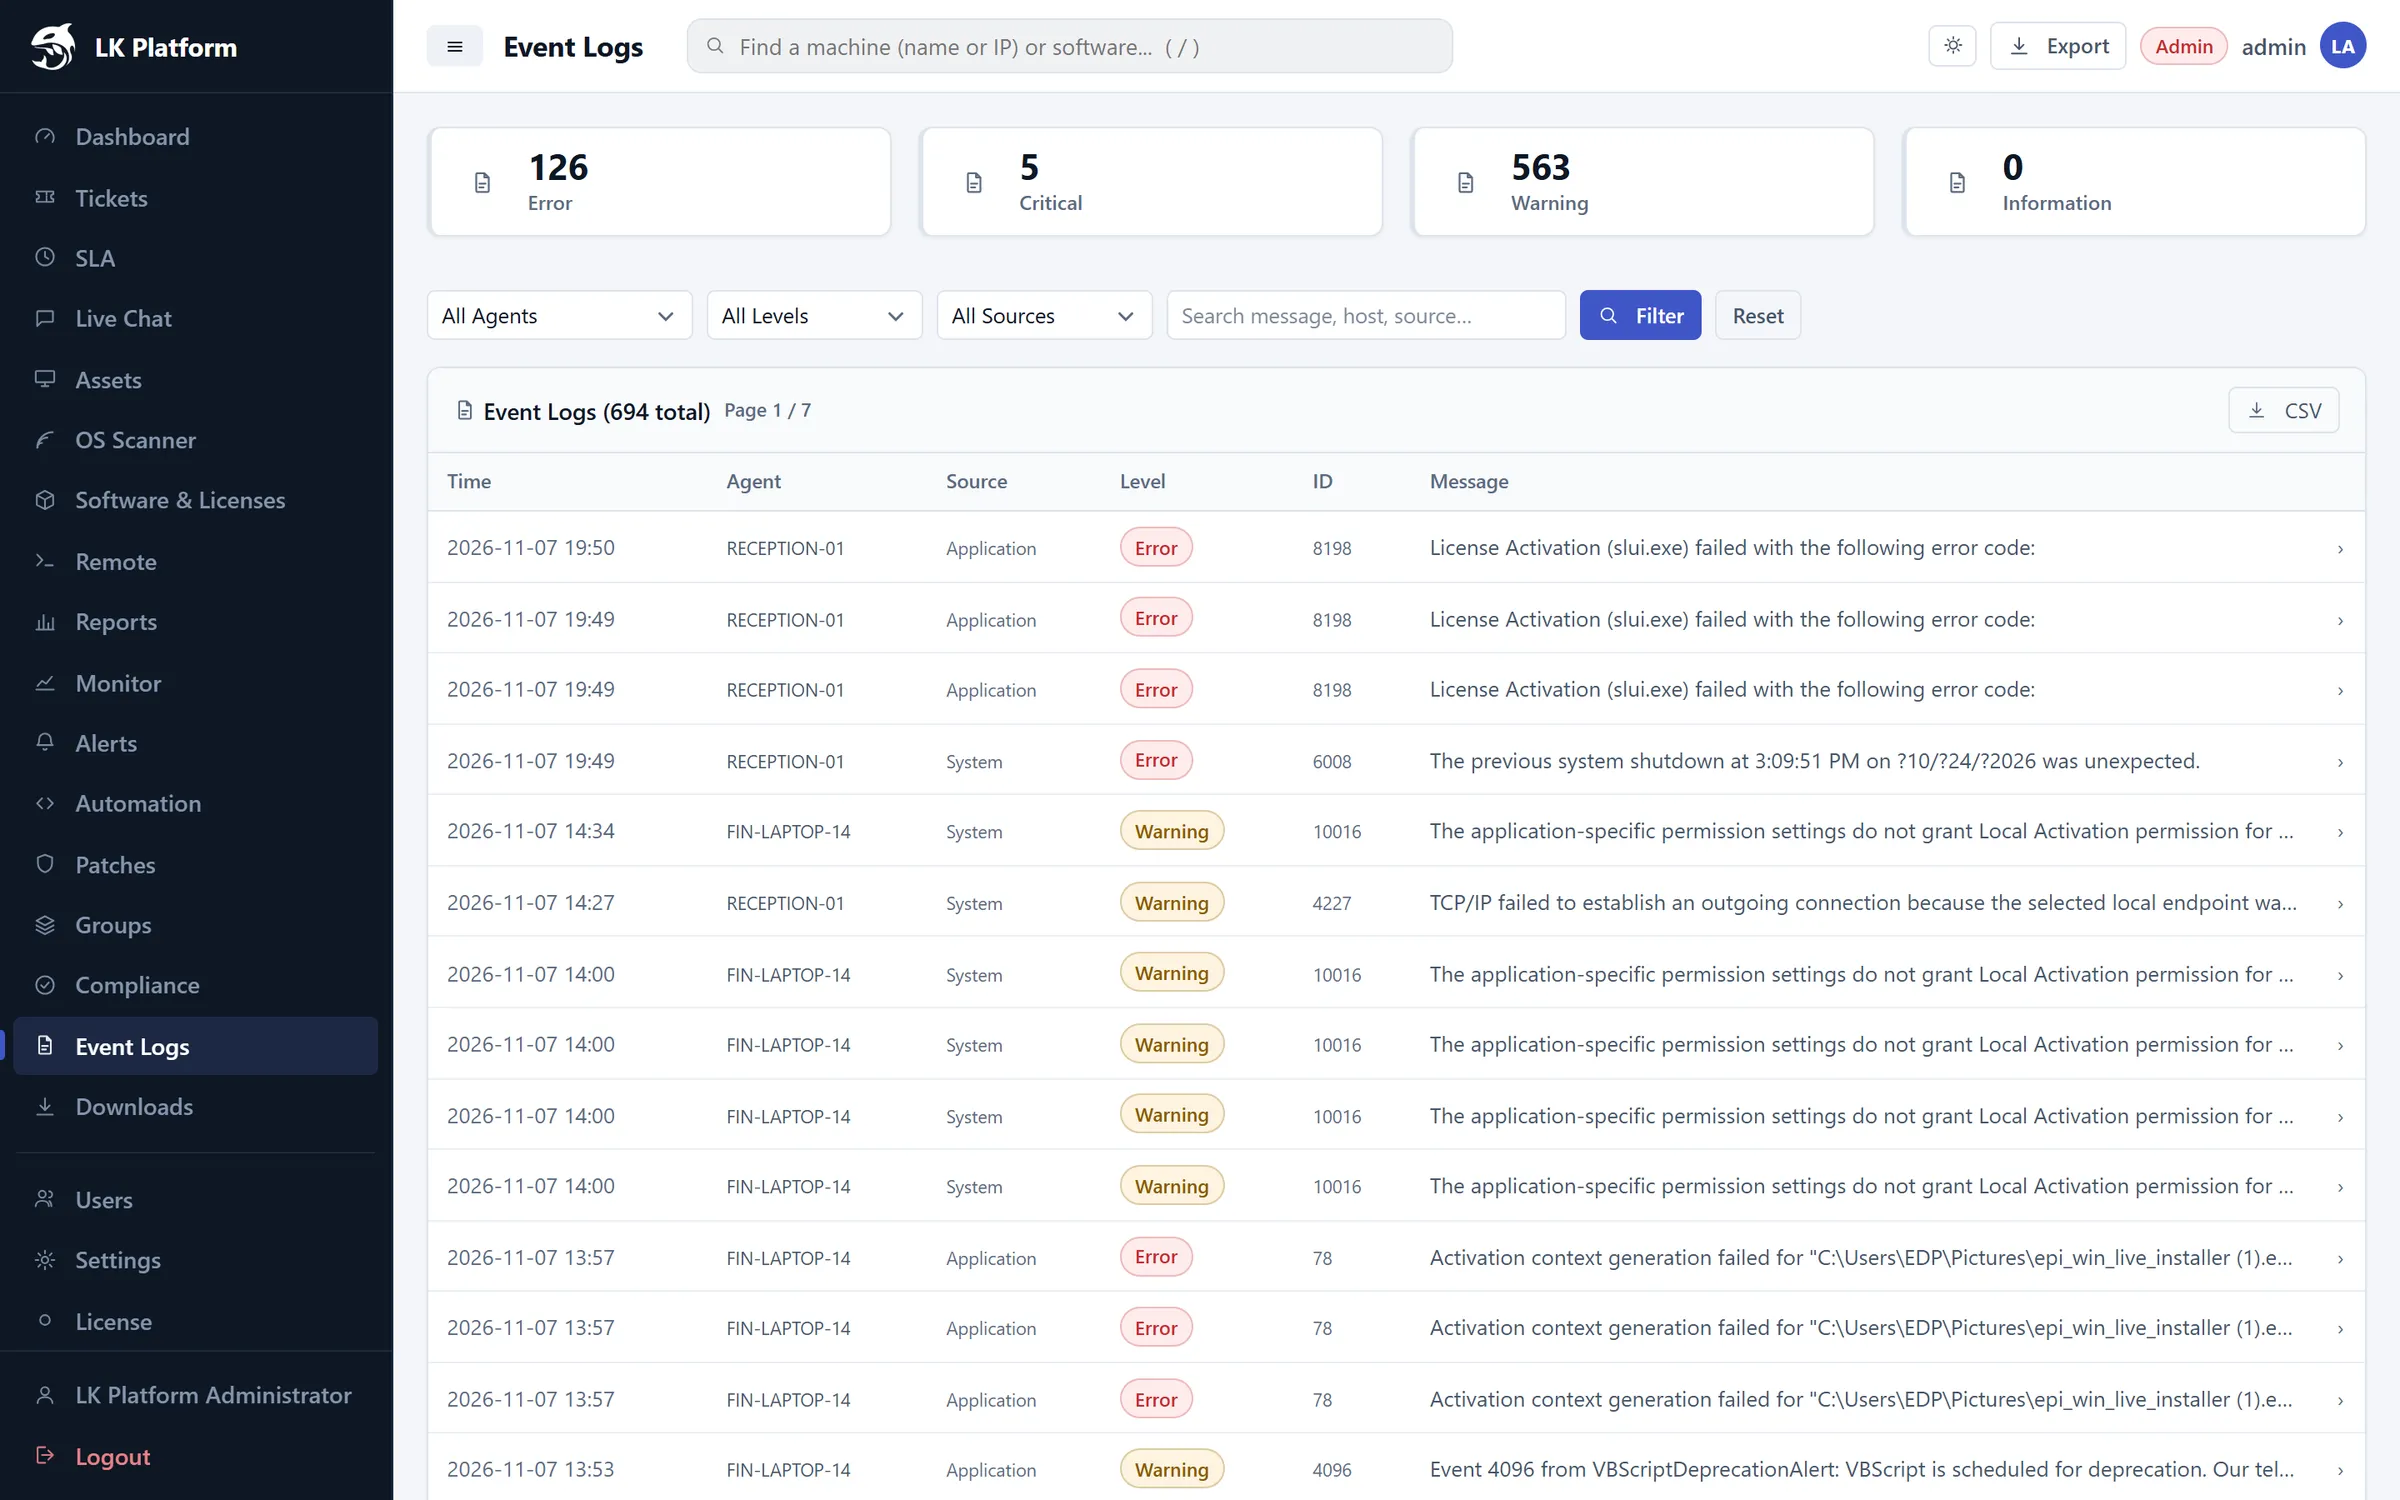
Windows Application/System events and the Linux journal from every machine are collected in one place. Summary counters show Errors, Critical, Warnings and Information.
Filter by Agent, Level and Source, then click Filter.
Click › on any row to read the full message.
Use CSV to export for audits or deeper analysis.
Event Logs
Automation
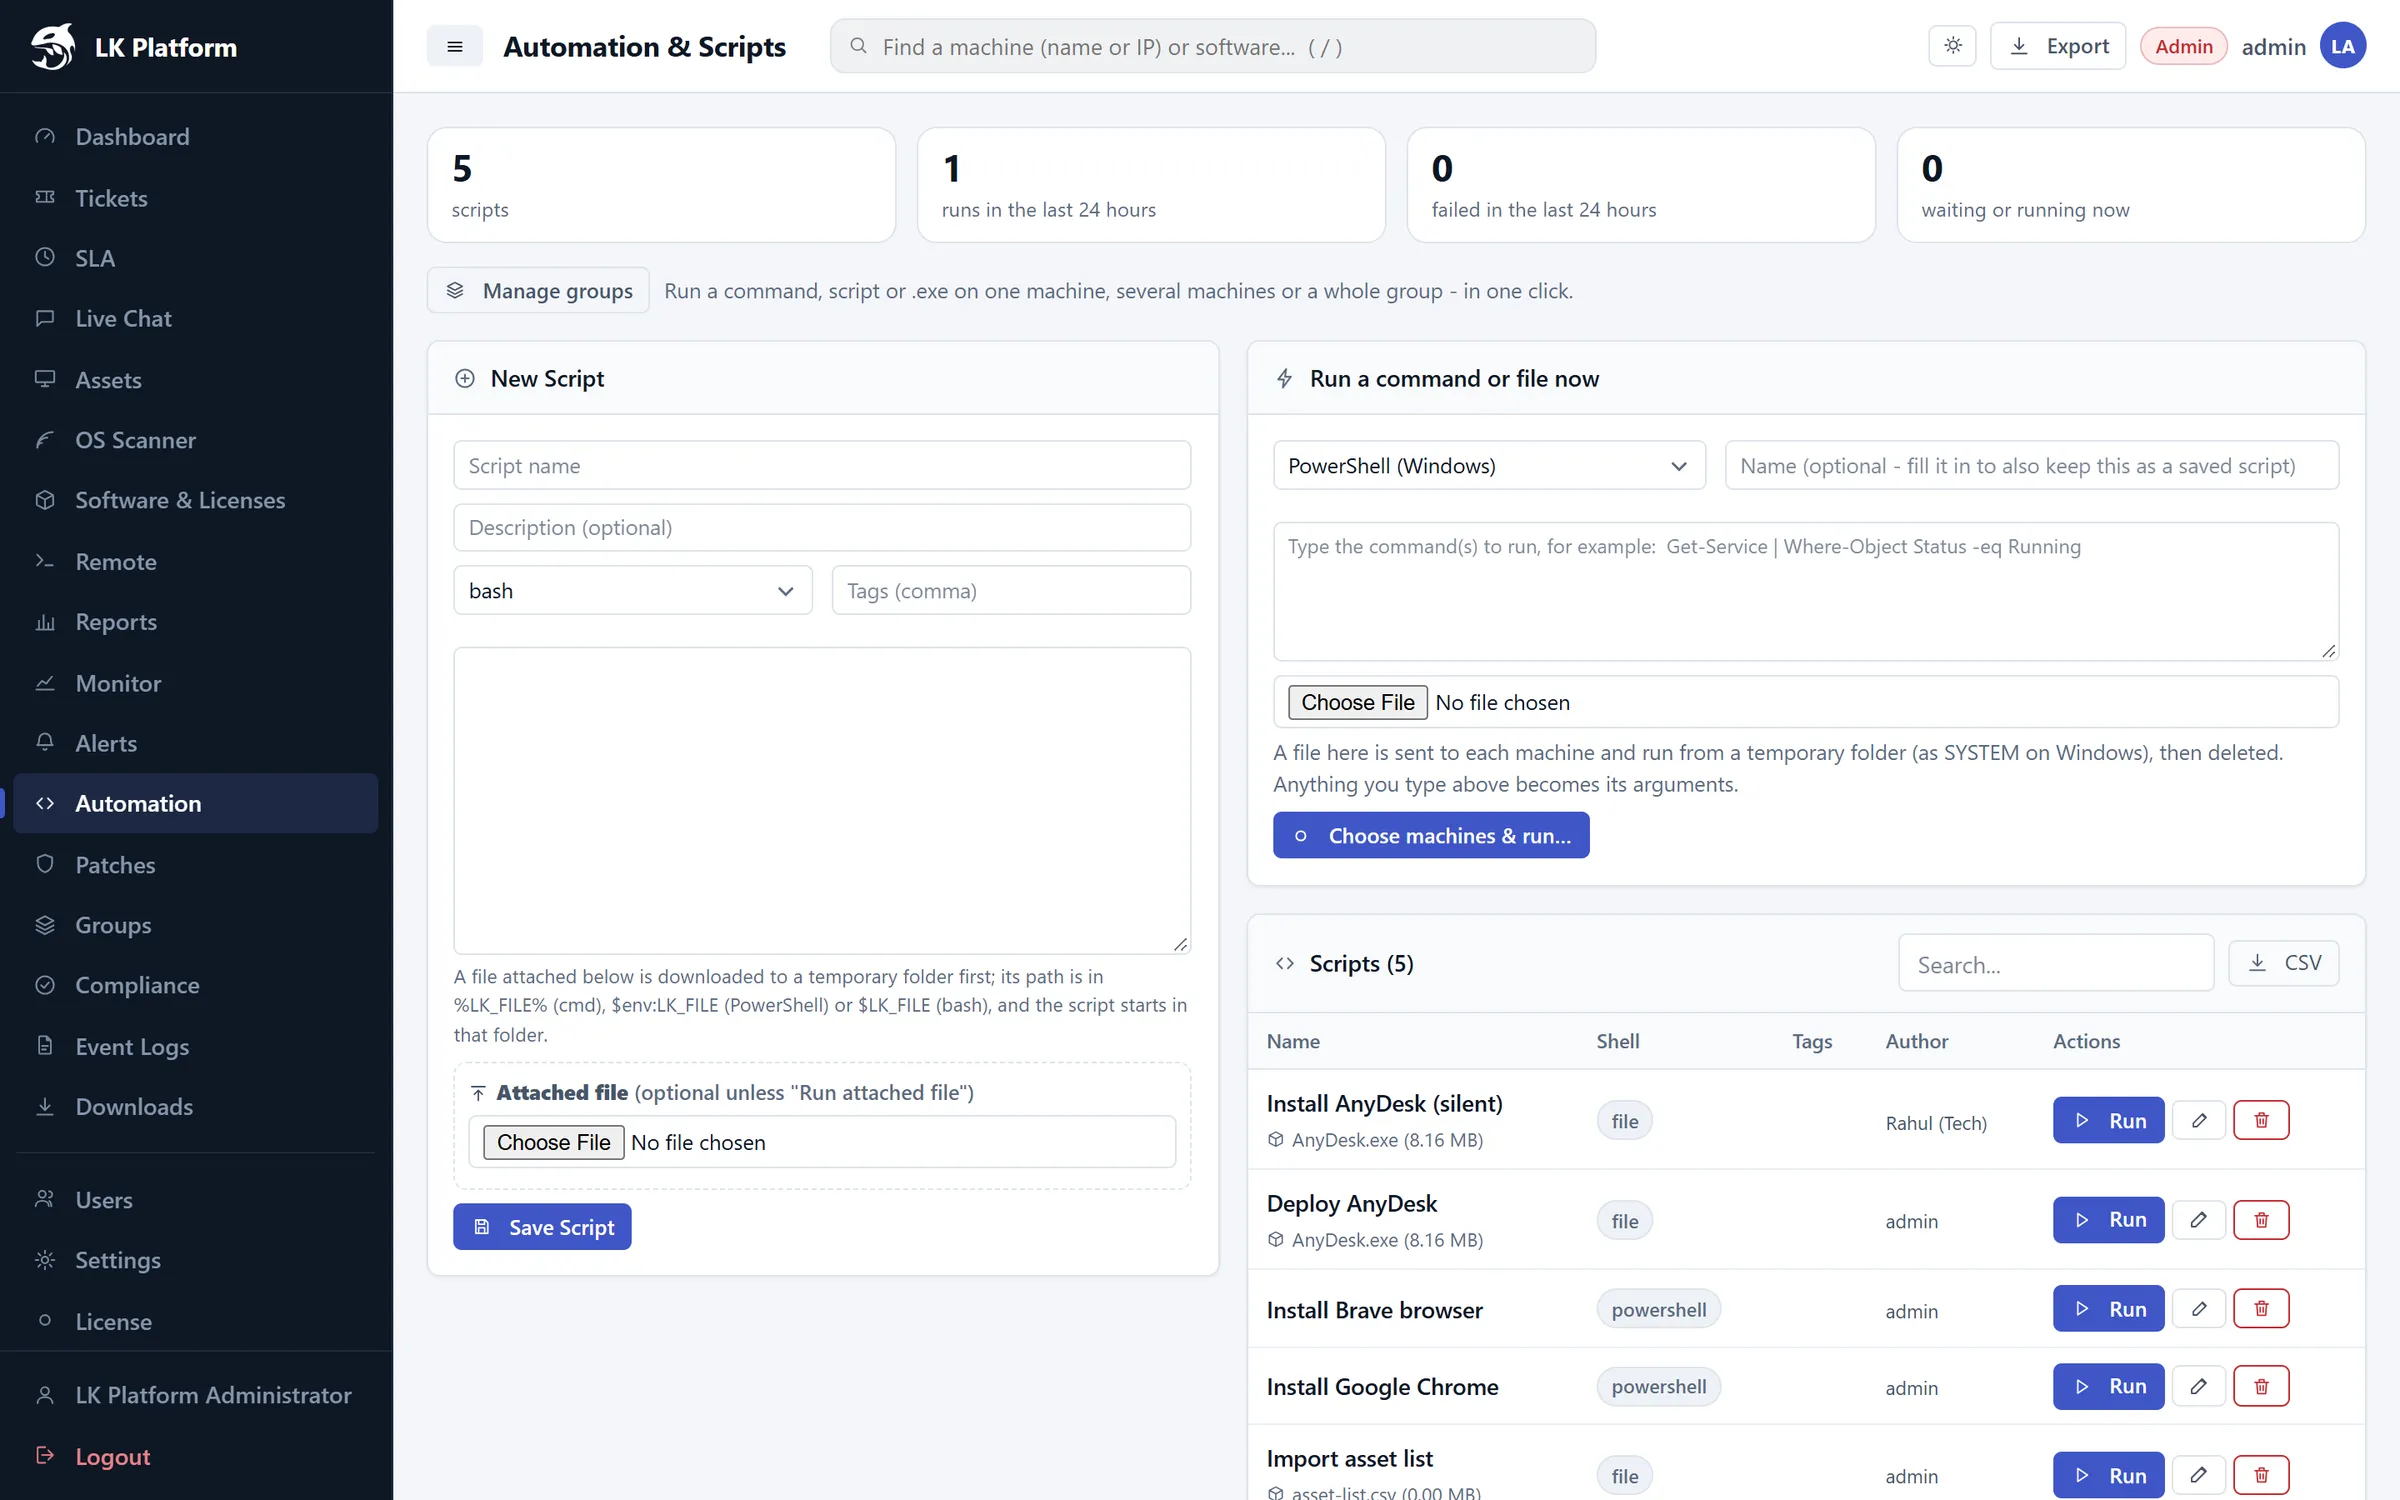
Run a command, script or installer on one machine, several machines or a whole group in one click.
Automation & Scripts
Run something right now
In Run a command or file now, choose the shell: PowerShell, Command prompt, bash or Python, or Run the file below.
Type the command(s), or choose a file (.exe, .msi, .bat…). Anything you type becomes its arguments.
Click Choose machines & run…, select machines or a group, and confirm.
Watch progress in Recent Runs, with status, exit code and duration.
Save a reusable script
In New Script, enter a name, description, shell and tags.
Paste the script, and optionally attach a file. The script can reach it via %LK_FILE% (cmd), $env:LK_FILE (PowerShell) or $LK_FILE (bash).
Click Save Script. It appears in the Scripts list with a Run button.
Careful: On Windows, files and scripts run as SYSTEM. Test on one machine before running on a group.
Patches
See missing updates on every machine and control what gets installed.
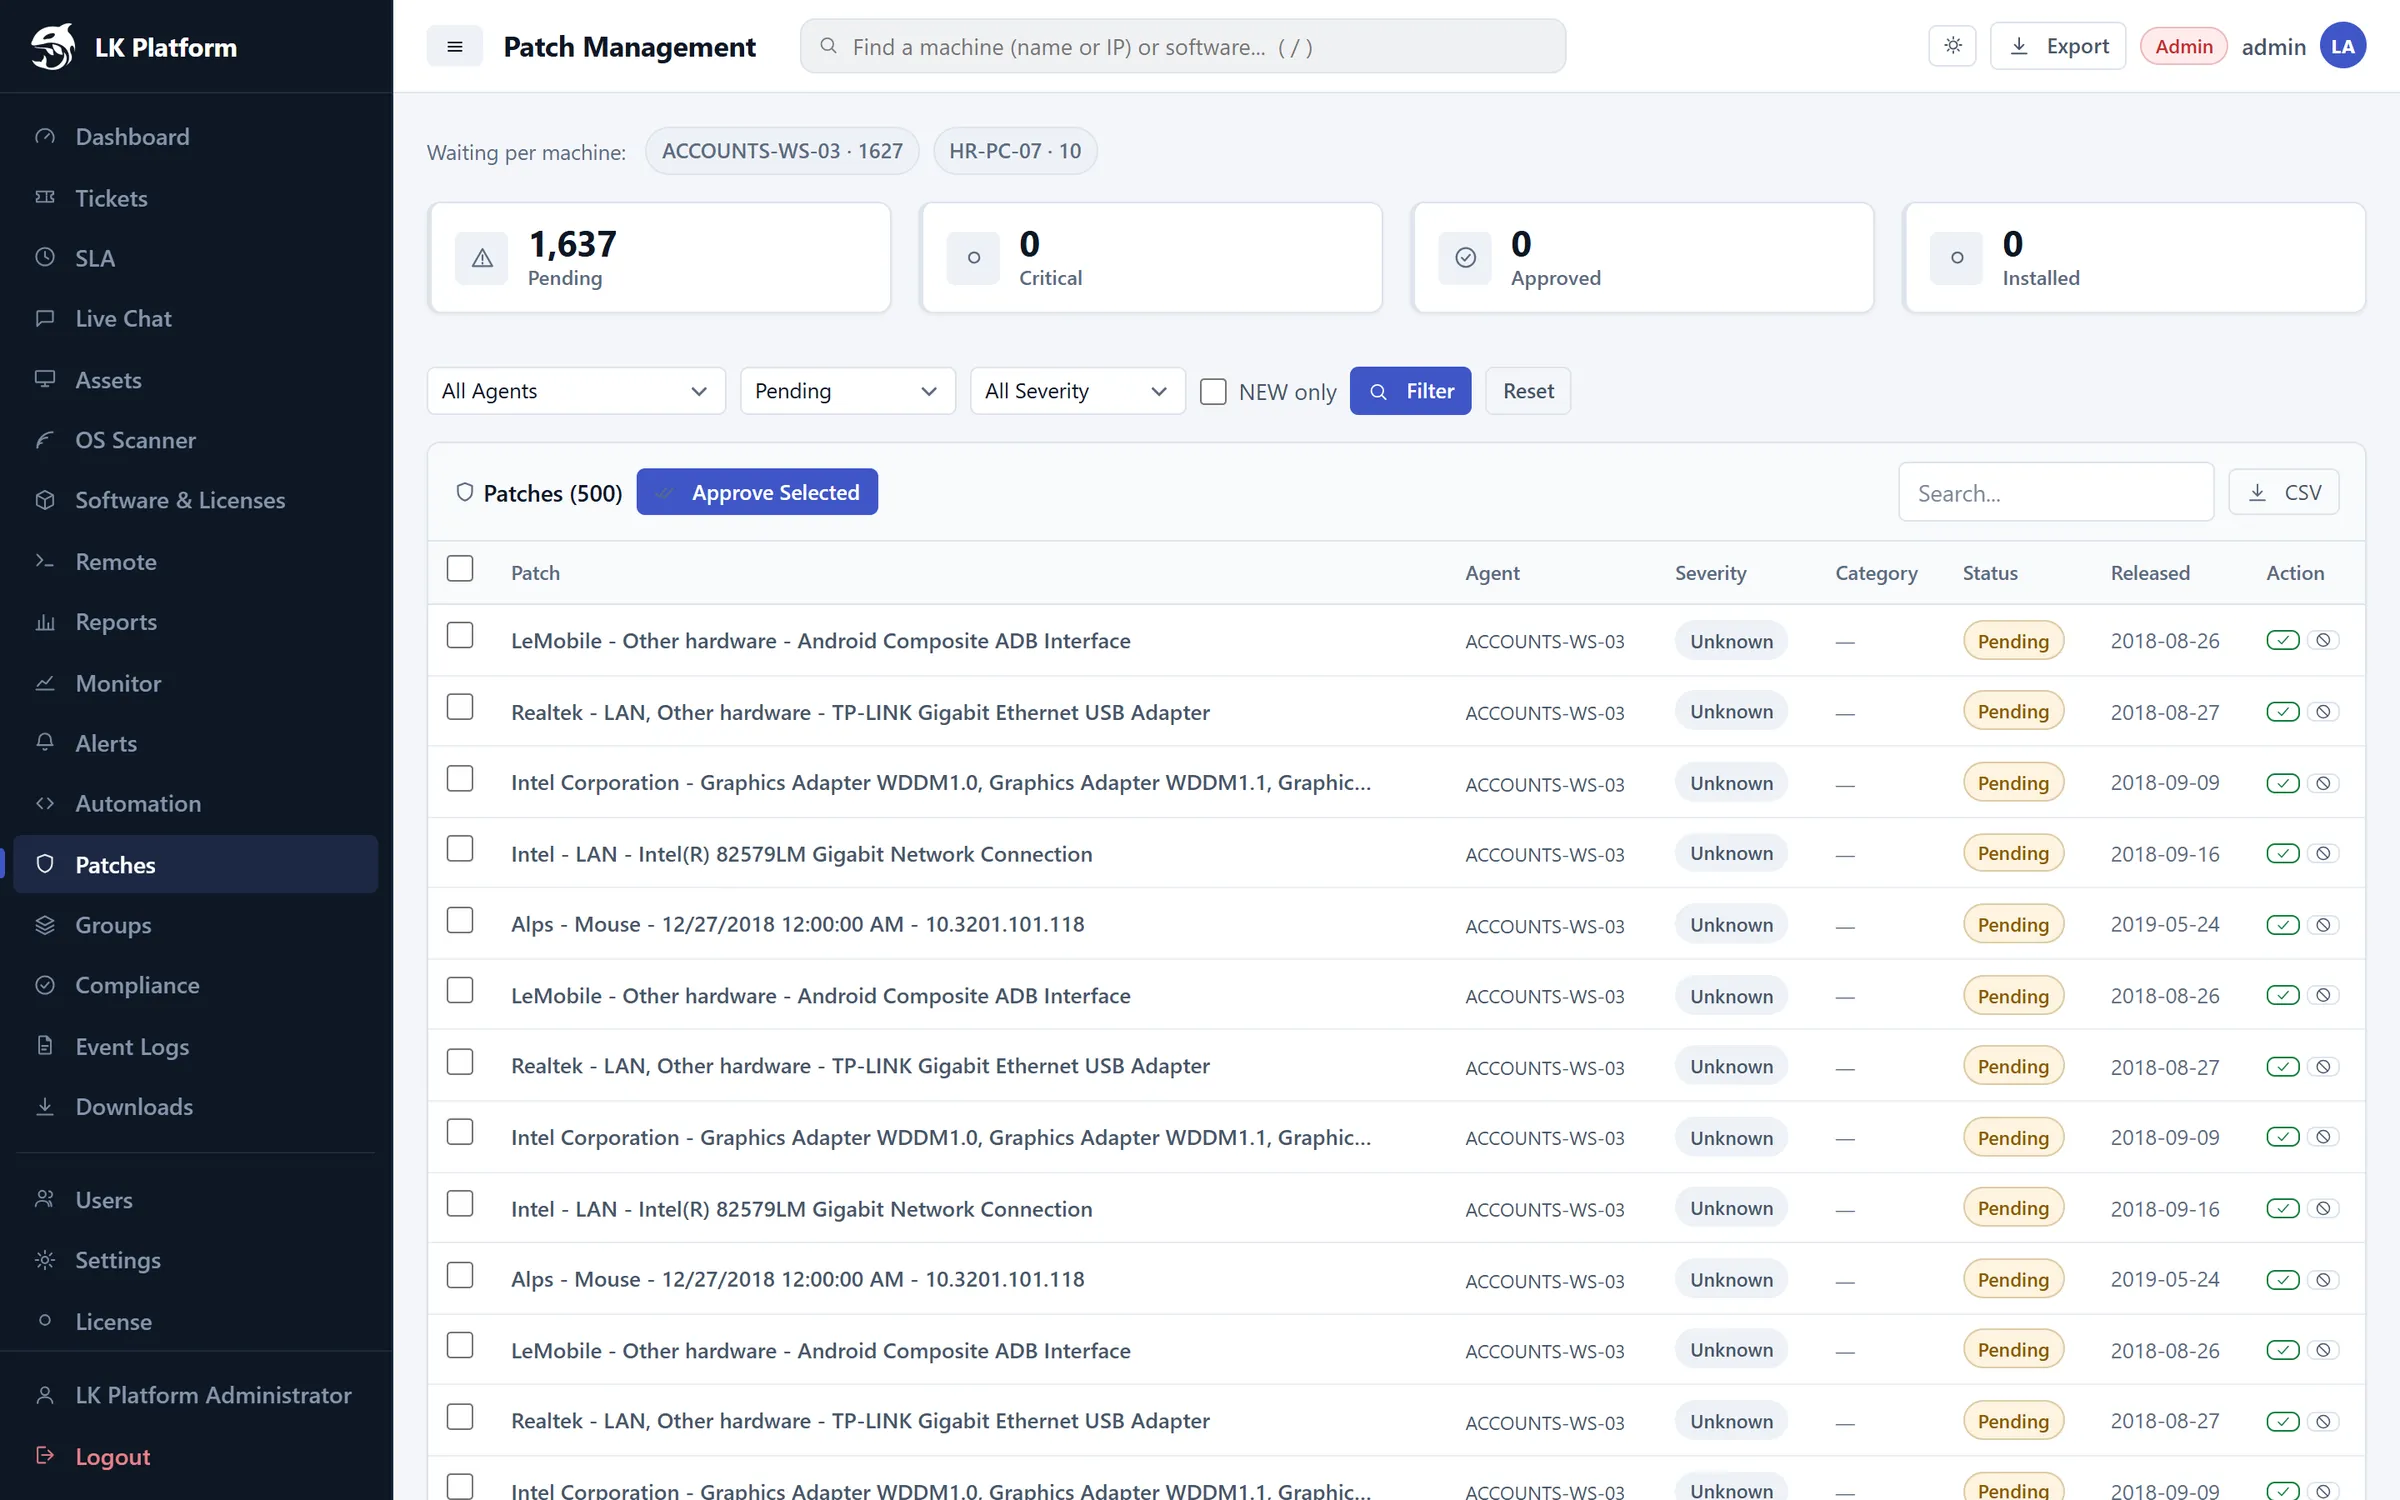
Open Patches. The top shows Pending, Critical, Approved and Installed counts, plus the waiting count per machine.
Filter by Agent, Status and Severity (Critical, Important, Moderate, Low).
Tick the patches you want and click Approve Selected. Agents install them and report back Installing → Installed or Failed.
Mark updates you never want as Excluded.
Patch Management
Compliance
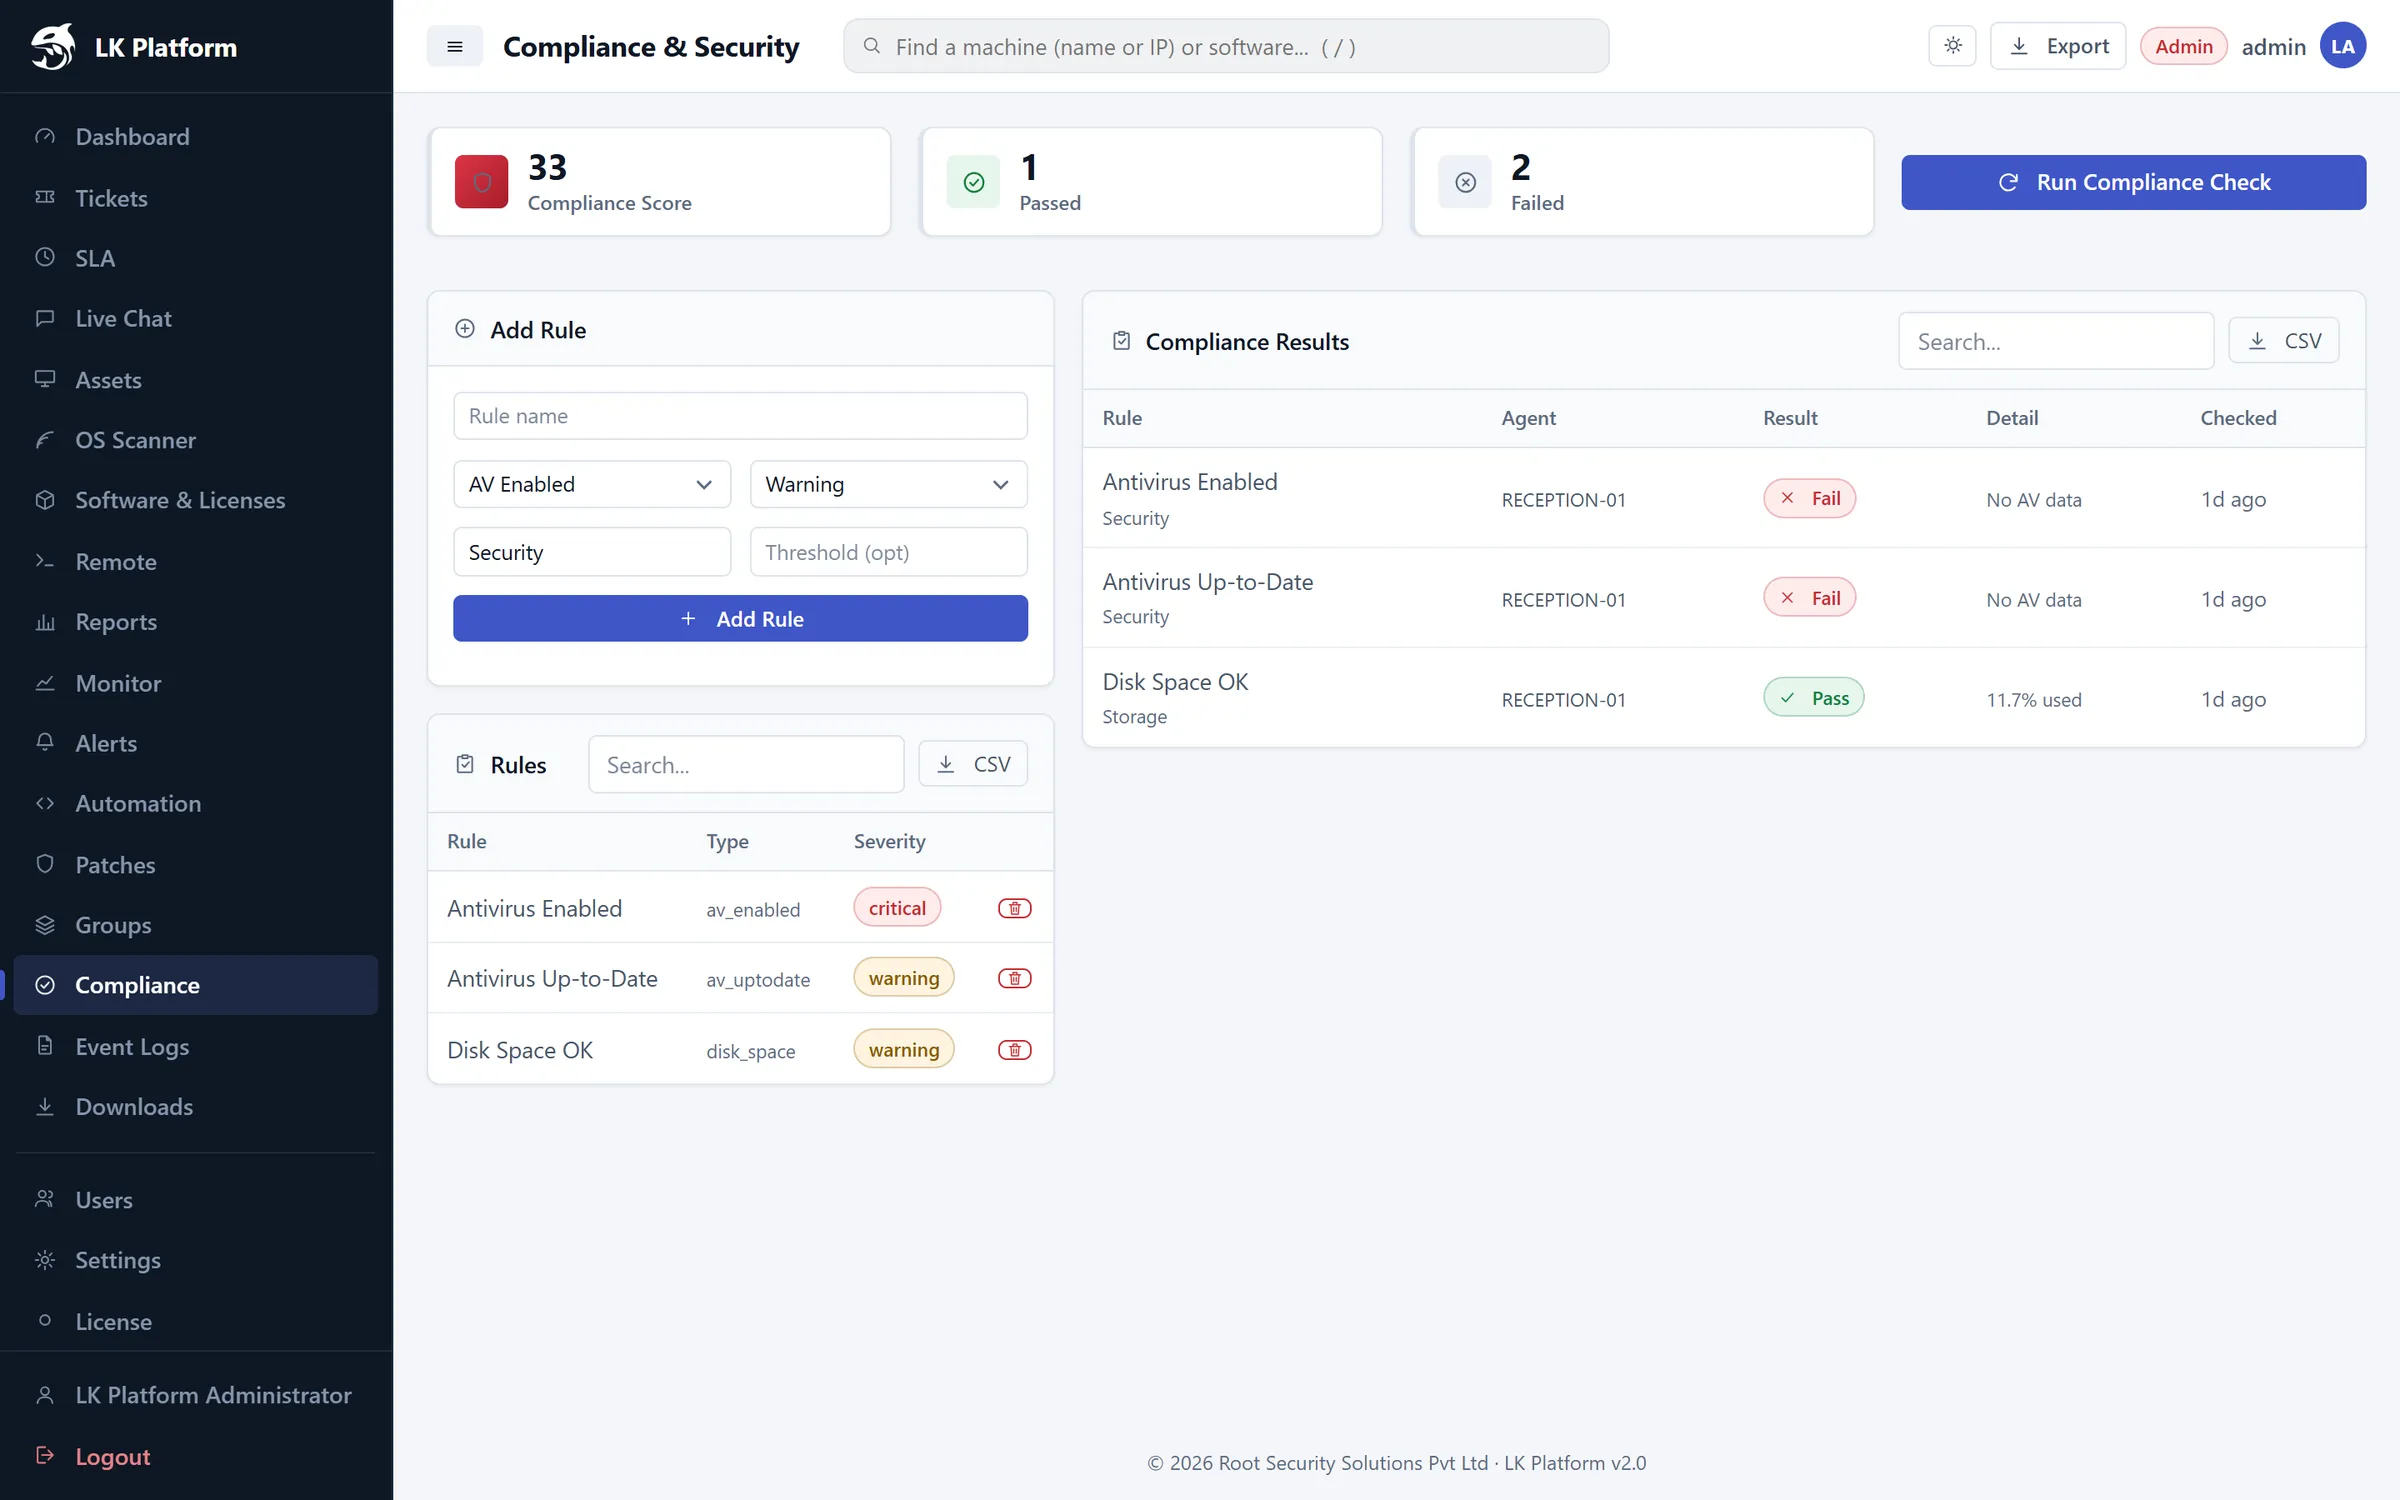
Check every machine against your security policy and get a single Compliance Score.
Under Add Rule, choose a check: AV Enabled, AV Up-to-date, Disk Space or OS Patched.
Set its severity (Info, Warning, Critical) and click Add Rule.
Click Run Compliance Check. Compliance Results lists Pass/Fail per machine with details.
Compliance
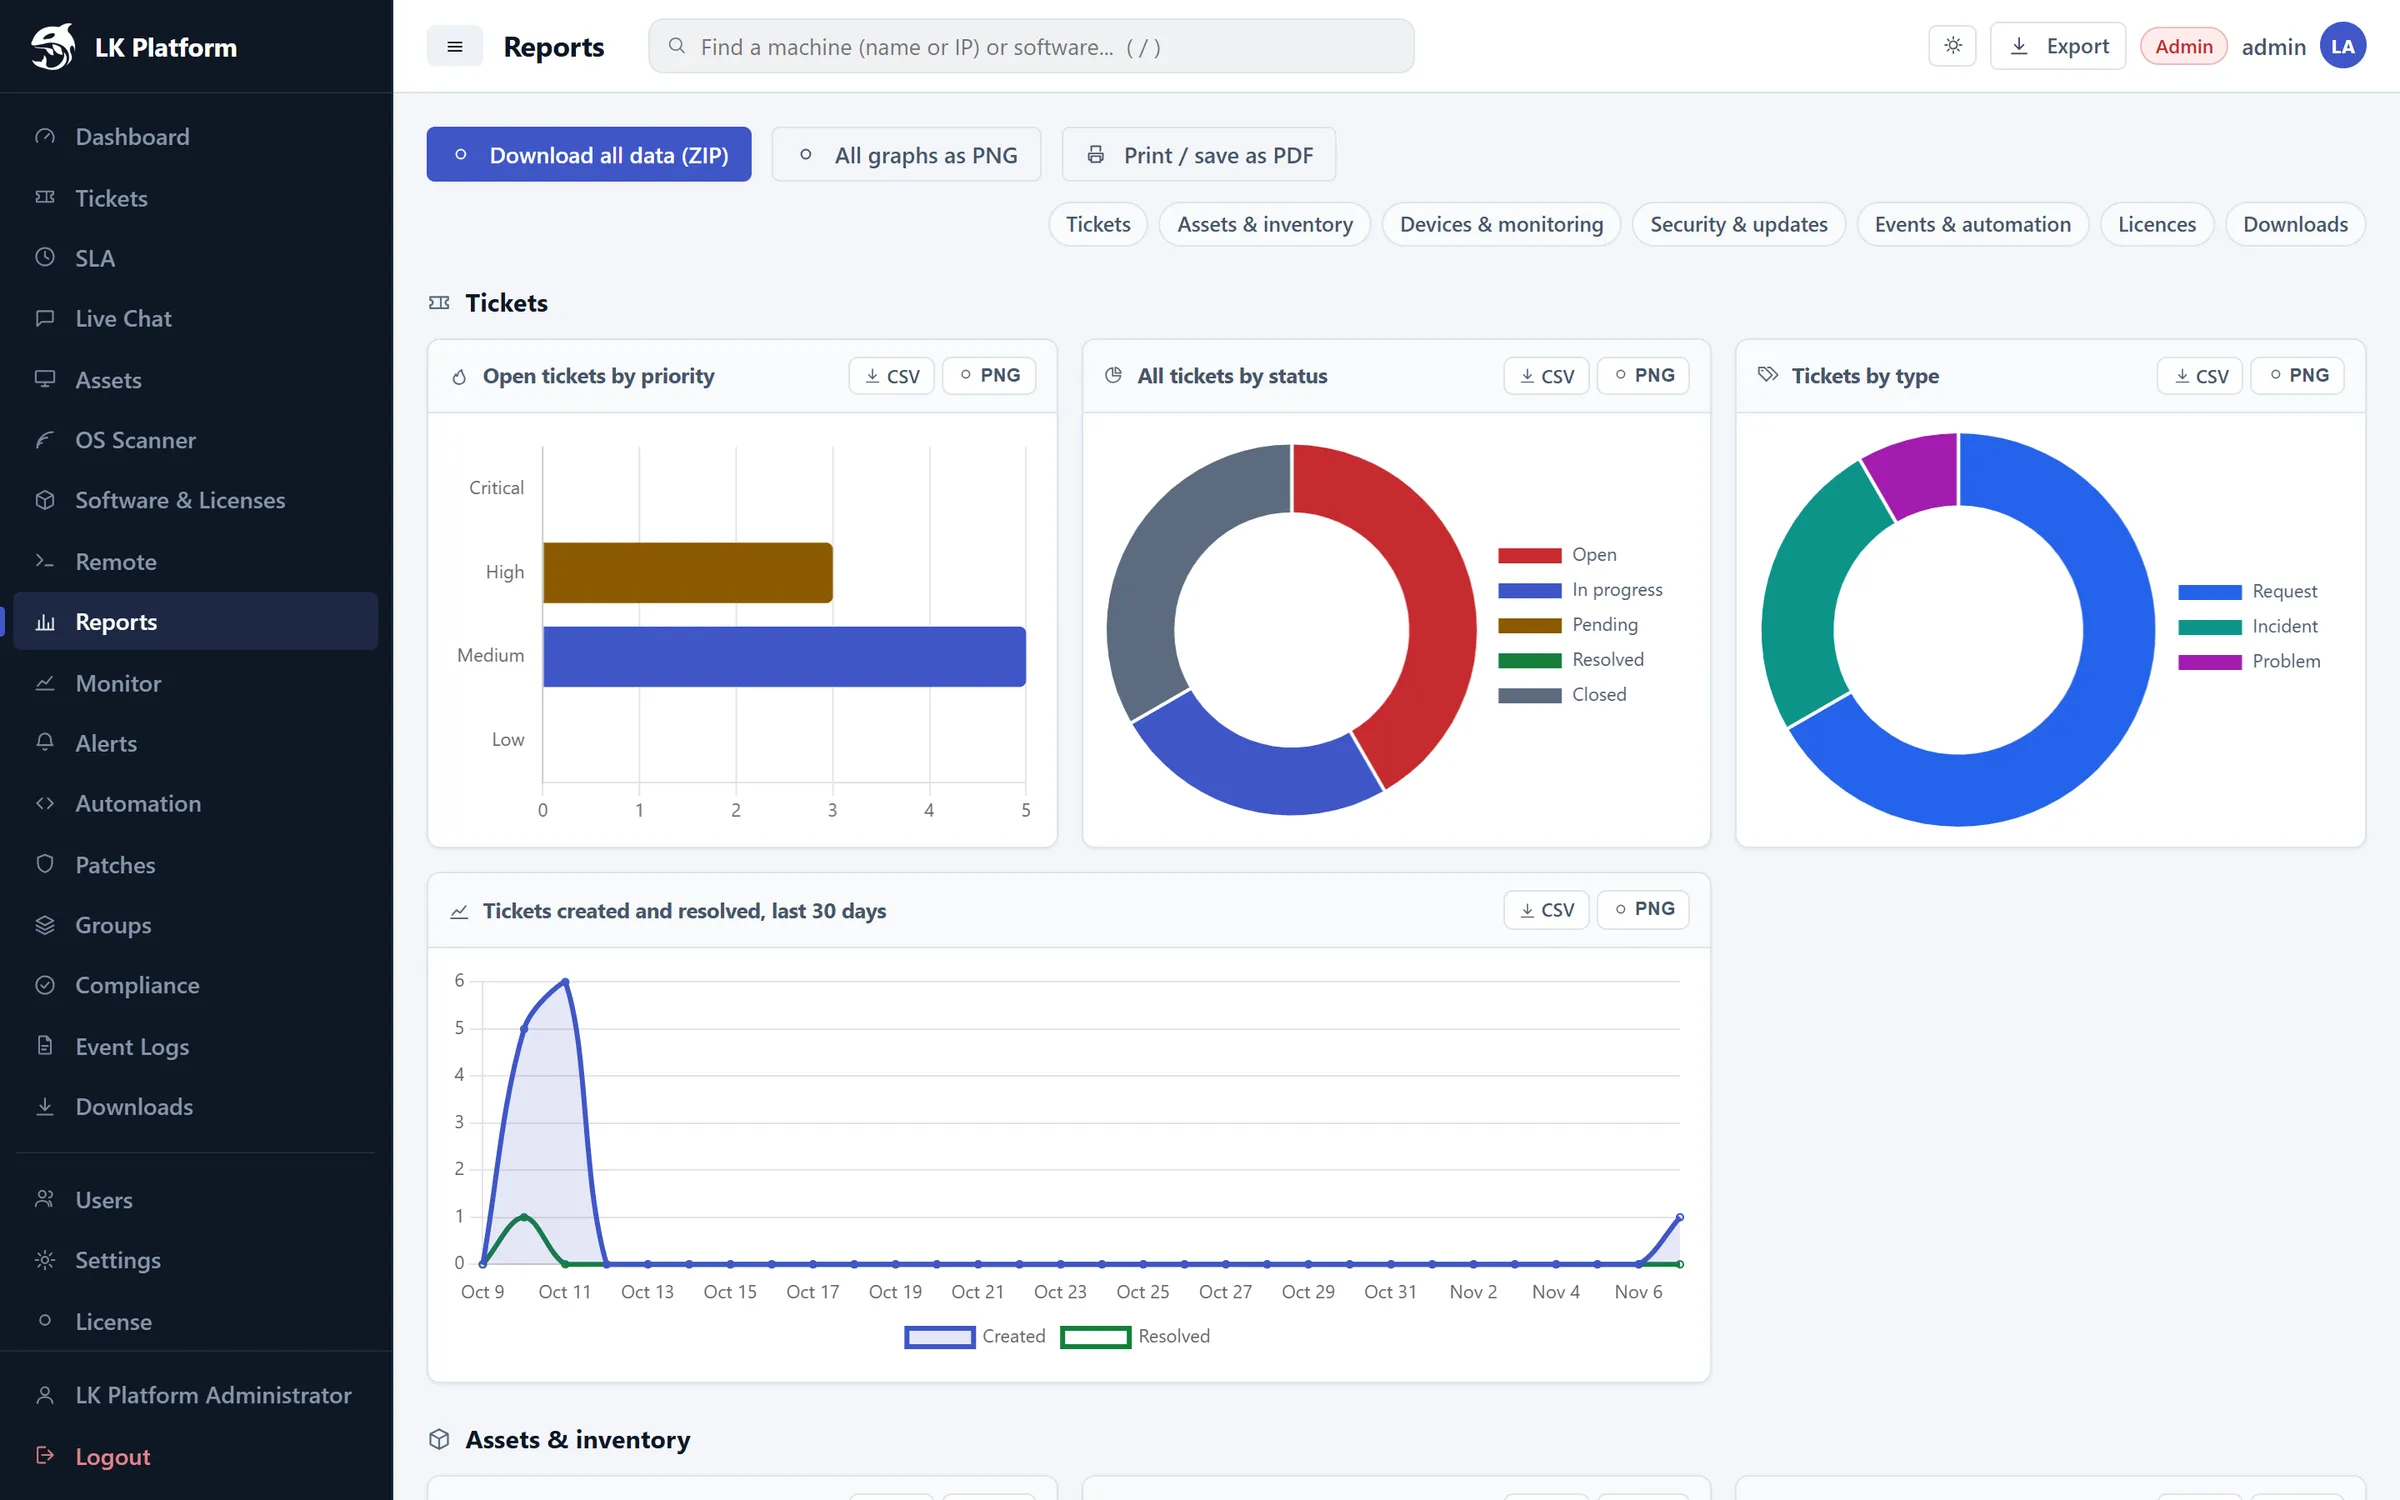
Reports
Ready-made charts grouped as Tickets, Assets & inventory, Devices & monitoring, Security & updates, Events & automation and Licences.
Every chart has CSV and PNG buttons.
All graphs as PNG downloads every chart at once.
Print / save as PDF produces a management-ready report.
Download all data (ZIP) gives one CSV per module (17 files plus a README), which opens in Excel or Google Sheets.
Reports
Privacy: The data export never includes user passwords or the API key, and licence keys beyond the first four characters are left out.
Settings & licence
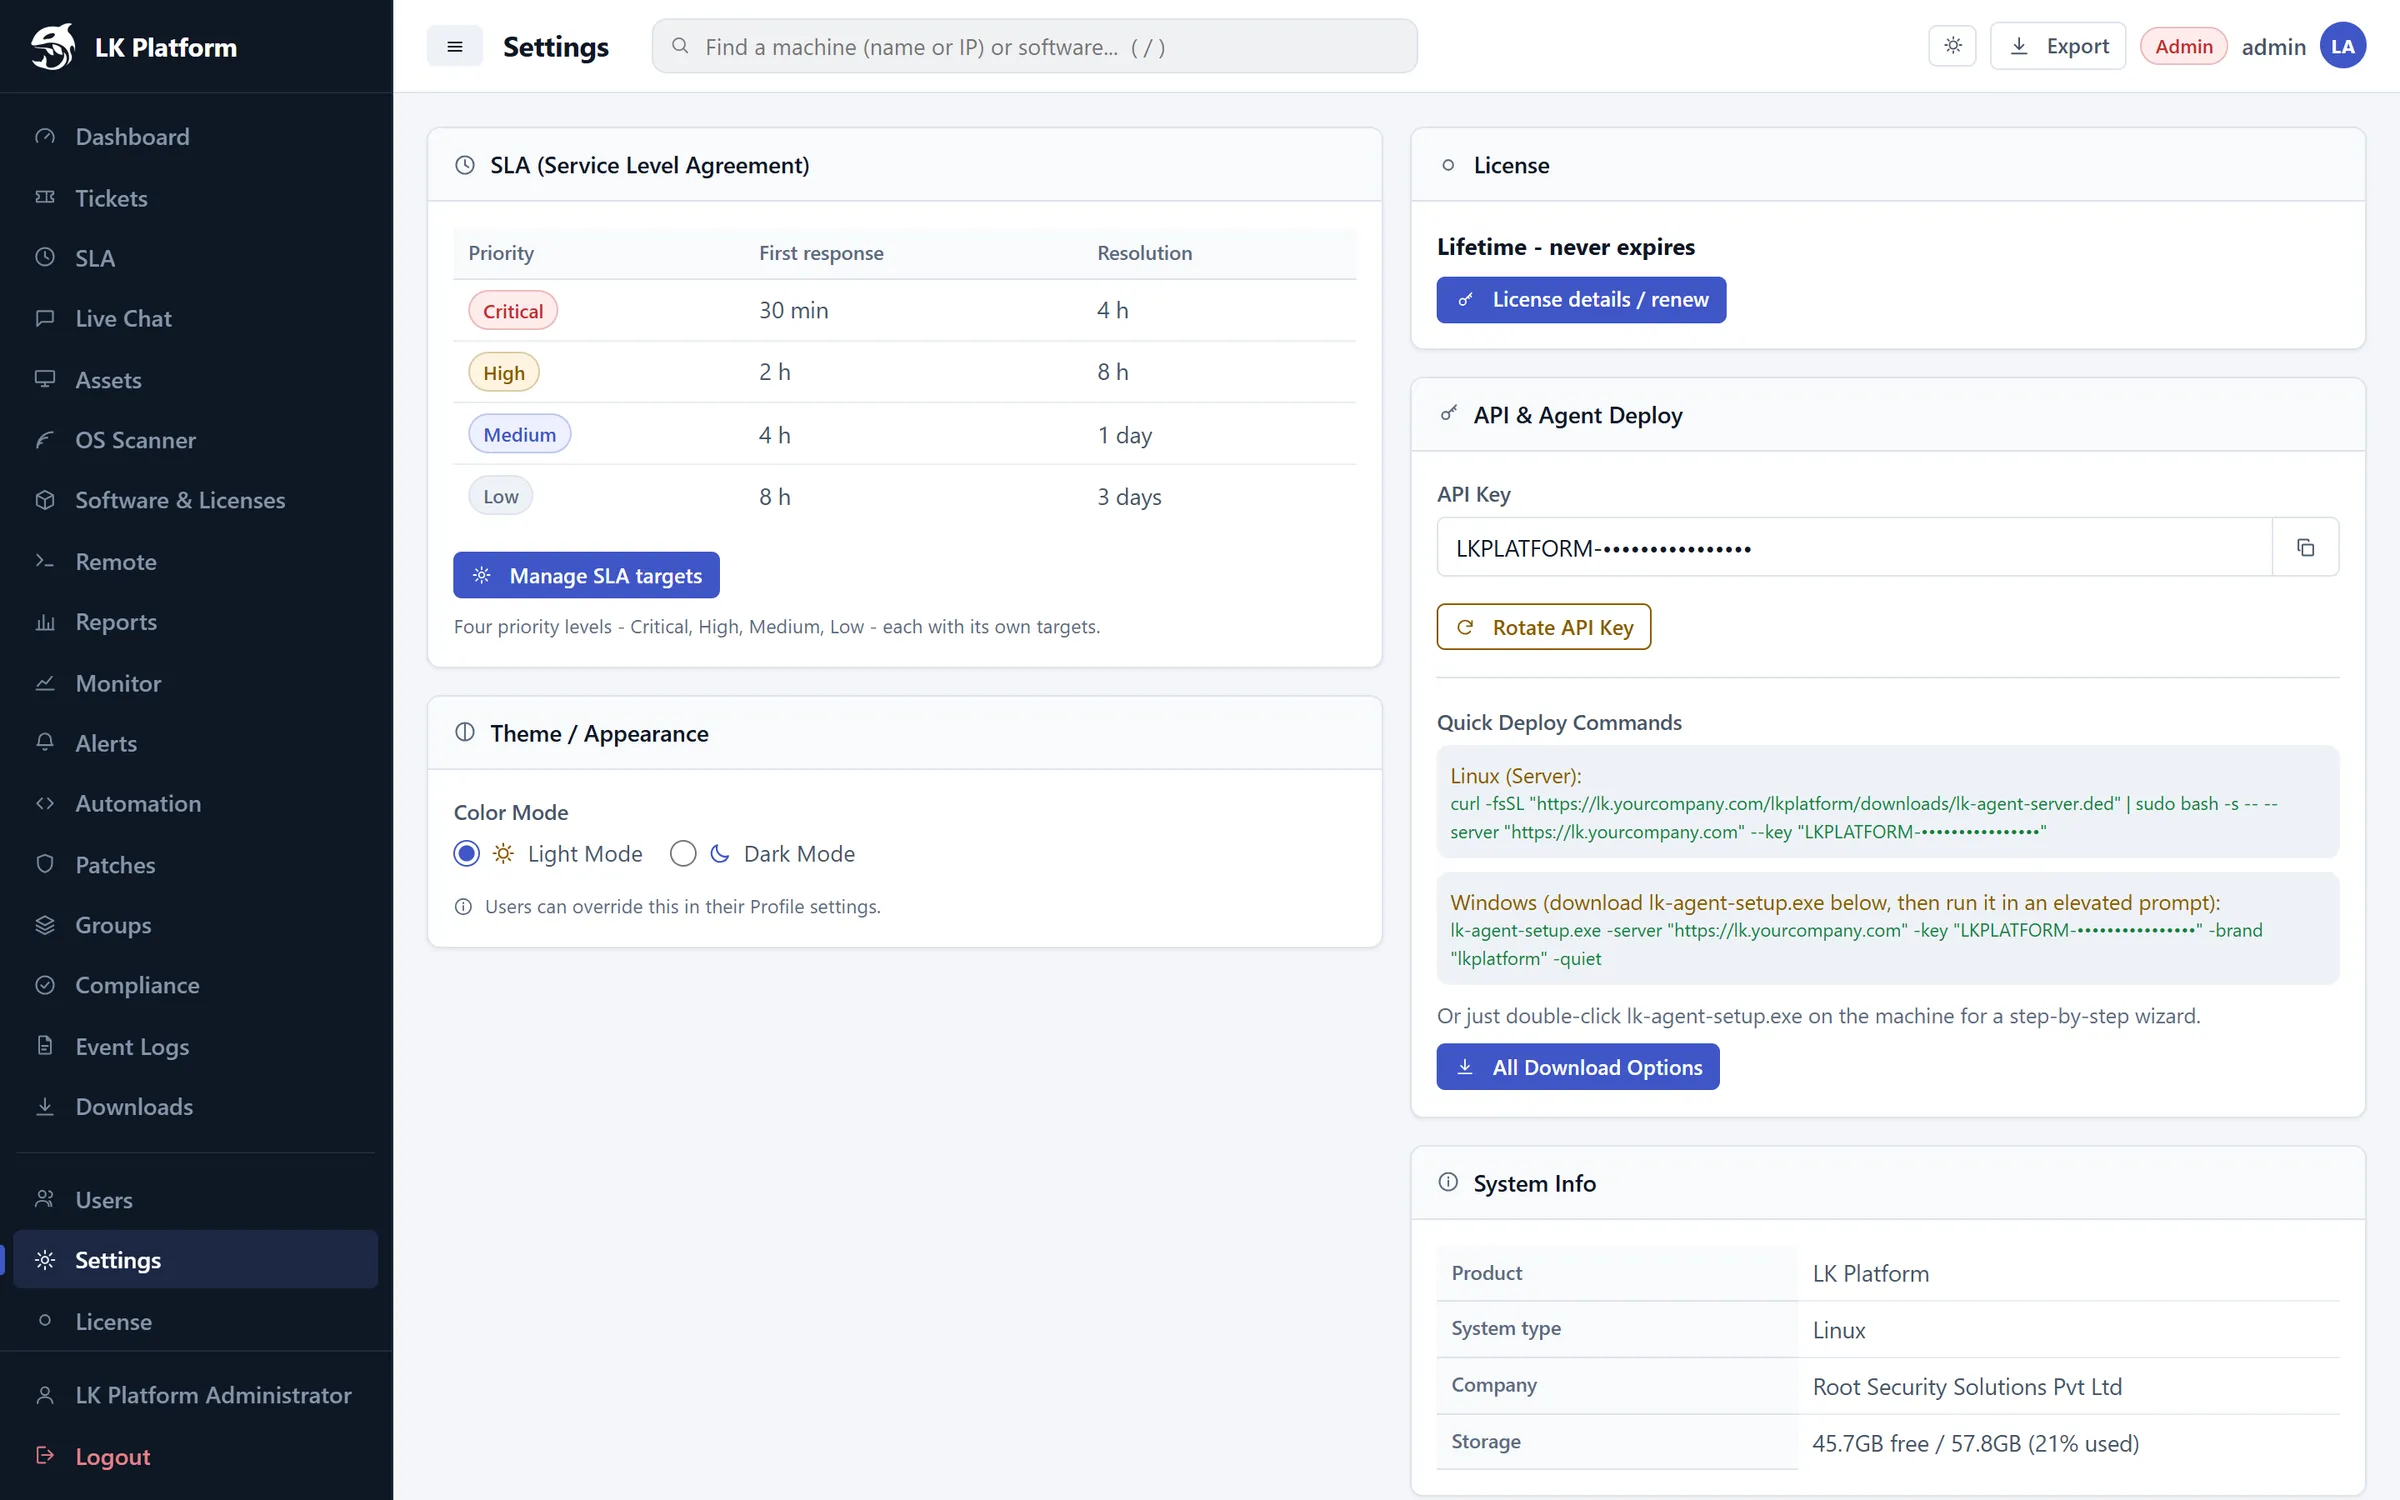
Settings (administrators only) contains:
SLA: summary of targets, with a link to Manage SLA targets.
Theme / Appearance: default light or dark mode for everyone (users can override).
License: current licence type and expiry.
API & Agent Deploy: API key, Rotate API Key, and quick-deploy commands.
System Info: product, OS, company and free storage.
Settings
Applying a licence key
Open License in the sidebar to see status, type, issue/expiry dates and your Installation ID.
Paste the new key into New license key and click Apply key.
Note: A new key must run longer than the current one. Send your Installation ID to your vendor if they ask for it.
Backup & restore
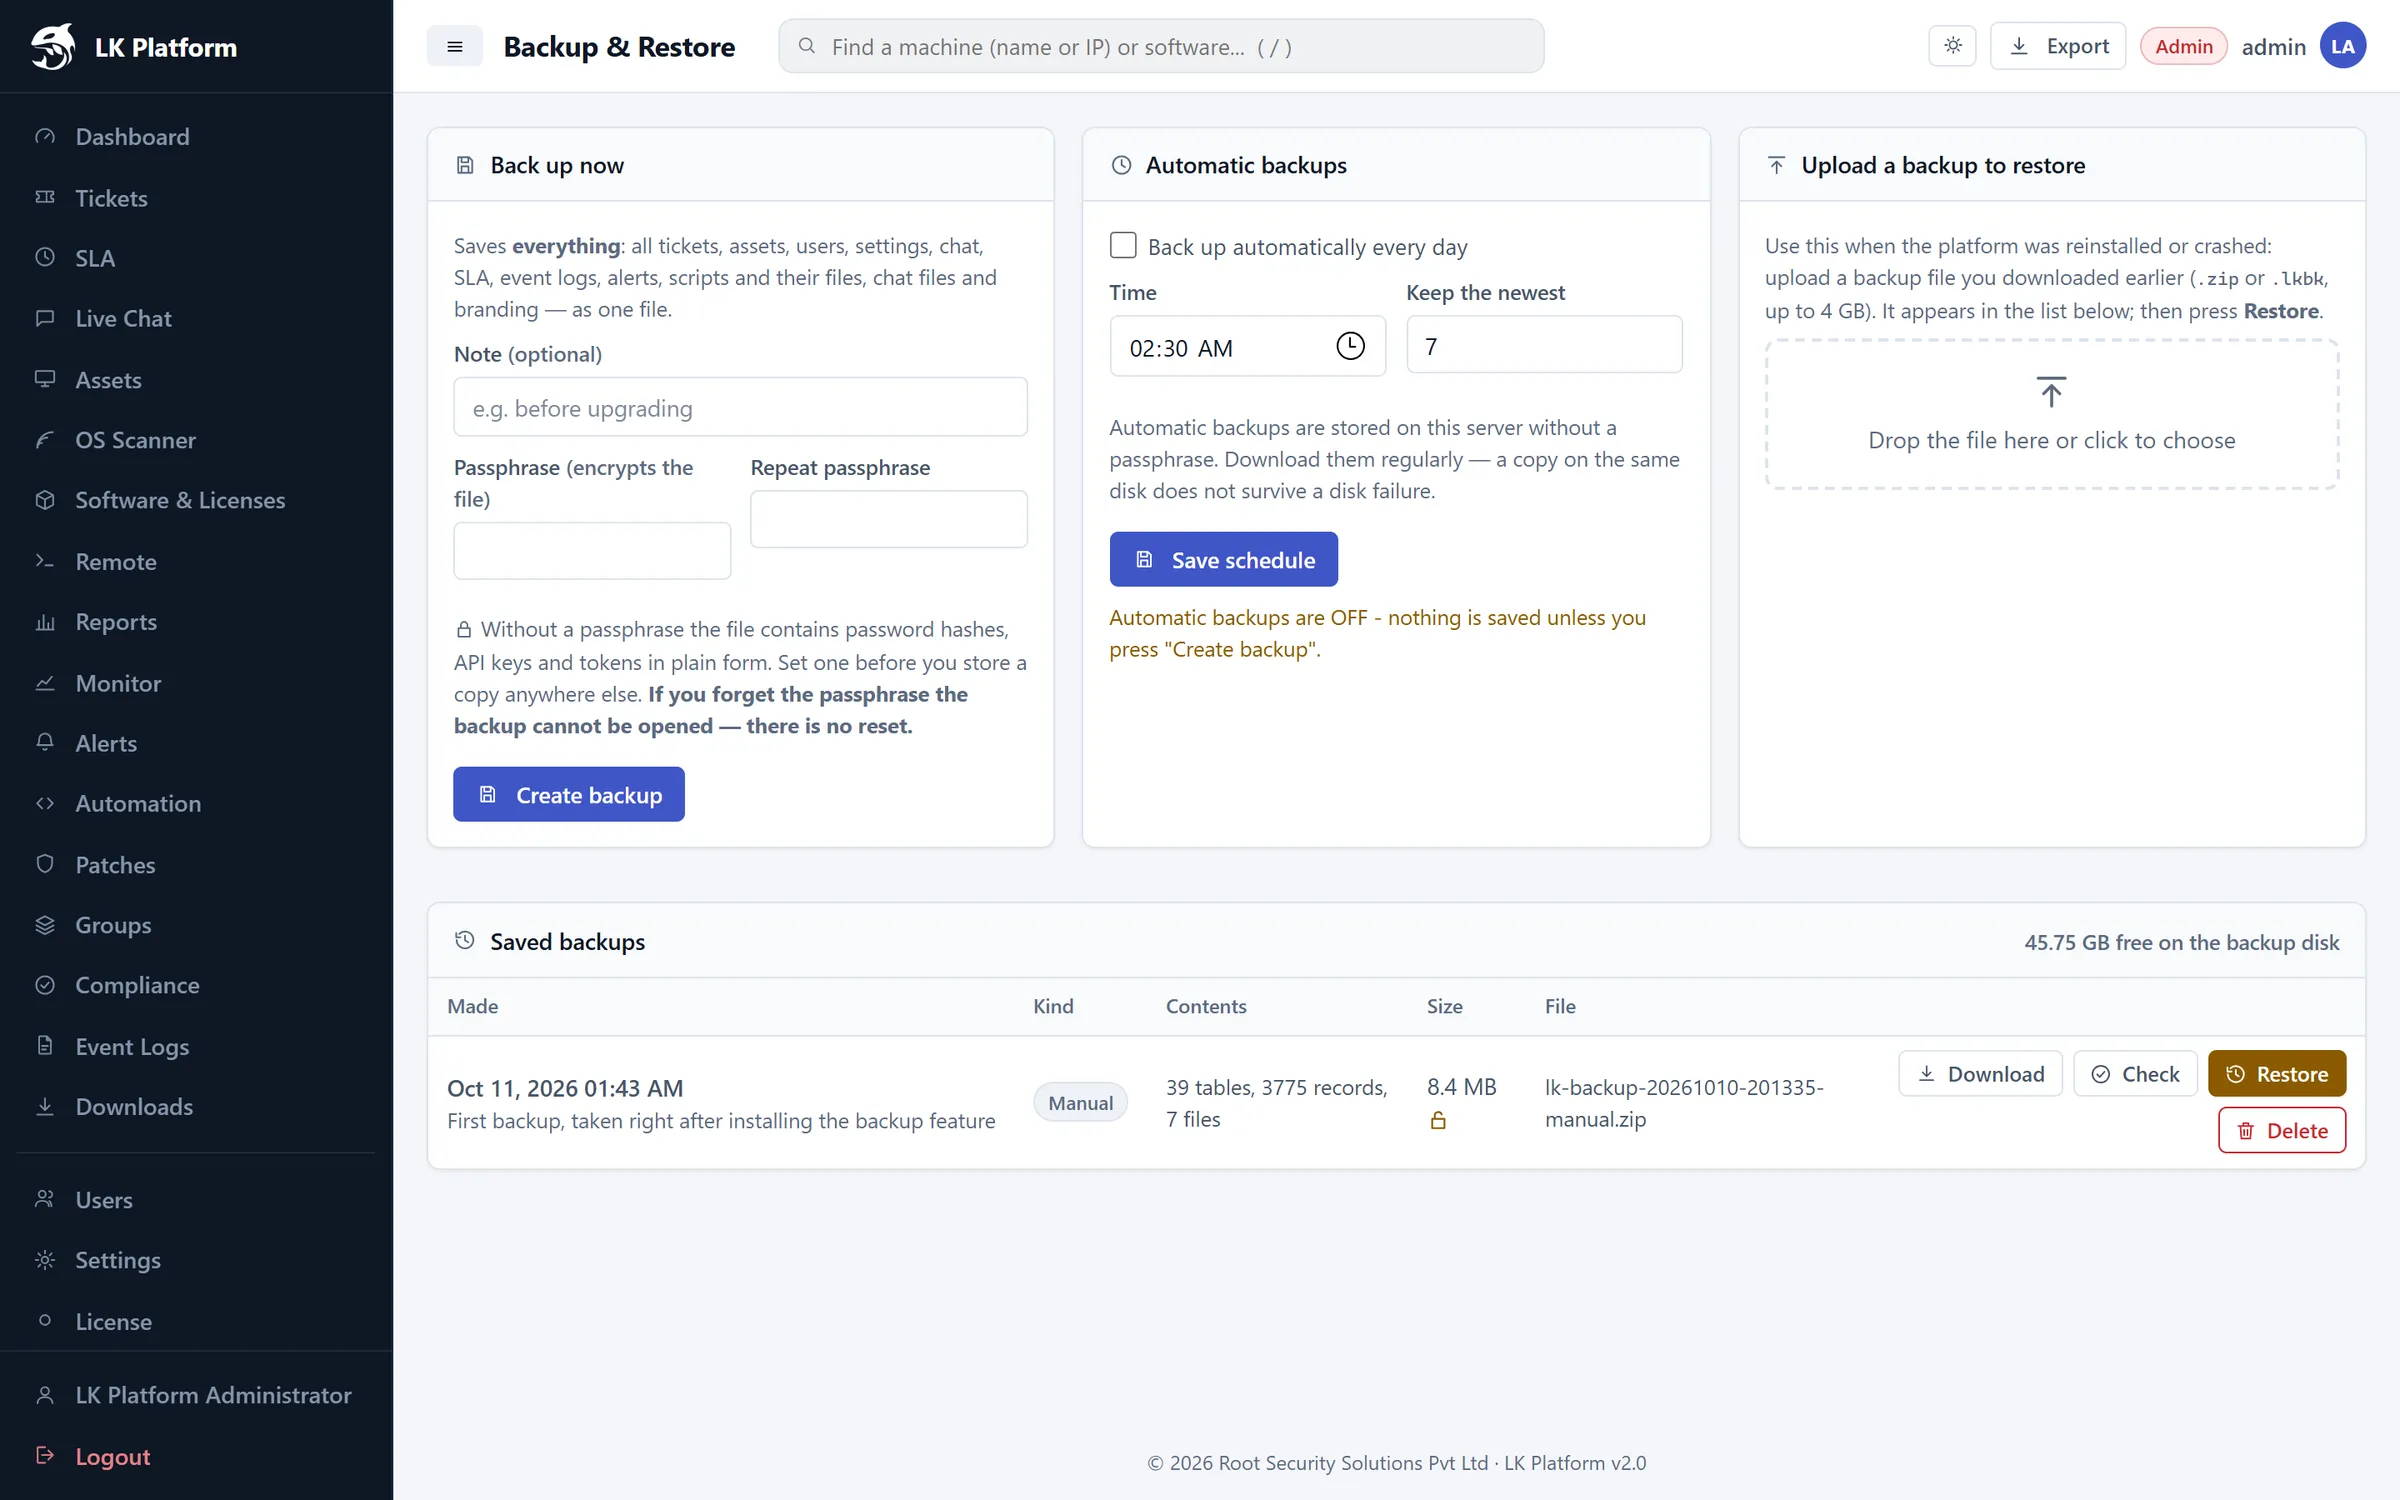
One backup file contains everything: tickets, assets, users, settings, chat, SLA, event logs, alerts, scripts and their files, chat files and branding.
Create a backup
Open Backup (under Settings in the sidebar).
Optionally add a Note, then enter and repeat a Passphrase to encrypt the file.
Click Create backup. It appears in Saved backups, where you can Download it.
Important: Without a passphrase the file contains password hashes, API keys and tokens in plain form. If you forget the passphrase, the backup cannot be opened, and there is no reset.
Automatic daily backups
Tick Back up automatically every day, choose a Time and how many to Keep.
Click Save schedule.
Automatic backups are stored on the same server without a passphrase. Download them regularly, because a copy on the same disk won't survive a disk failure.
Restore
After a reinstall or crash, drag your backup file (.zip or .lkbk, up to 4 GB) onto Upload a backup to restore.
In Saved backups, click Check to verify the file, then Restore.
Backup
Need a hand?
Our team can help with deployment, migration and training.